
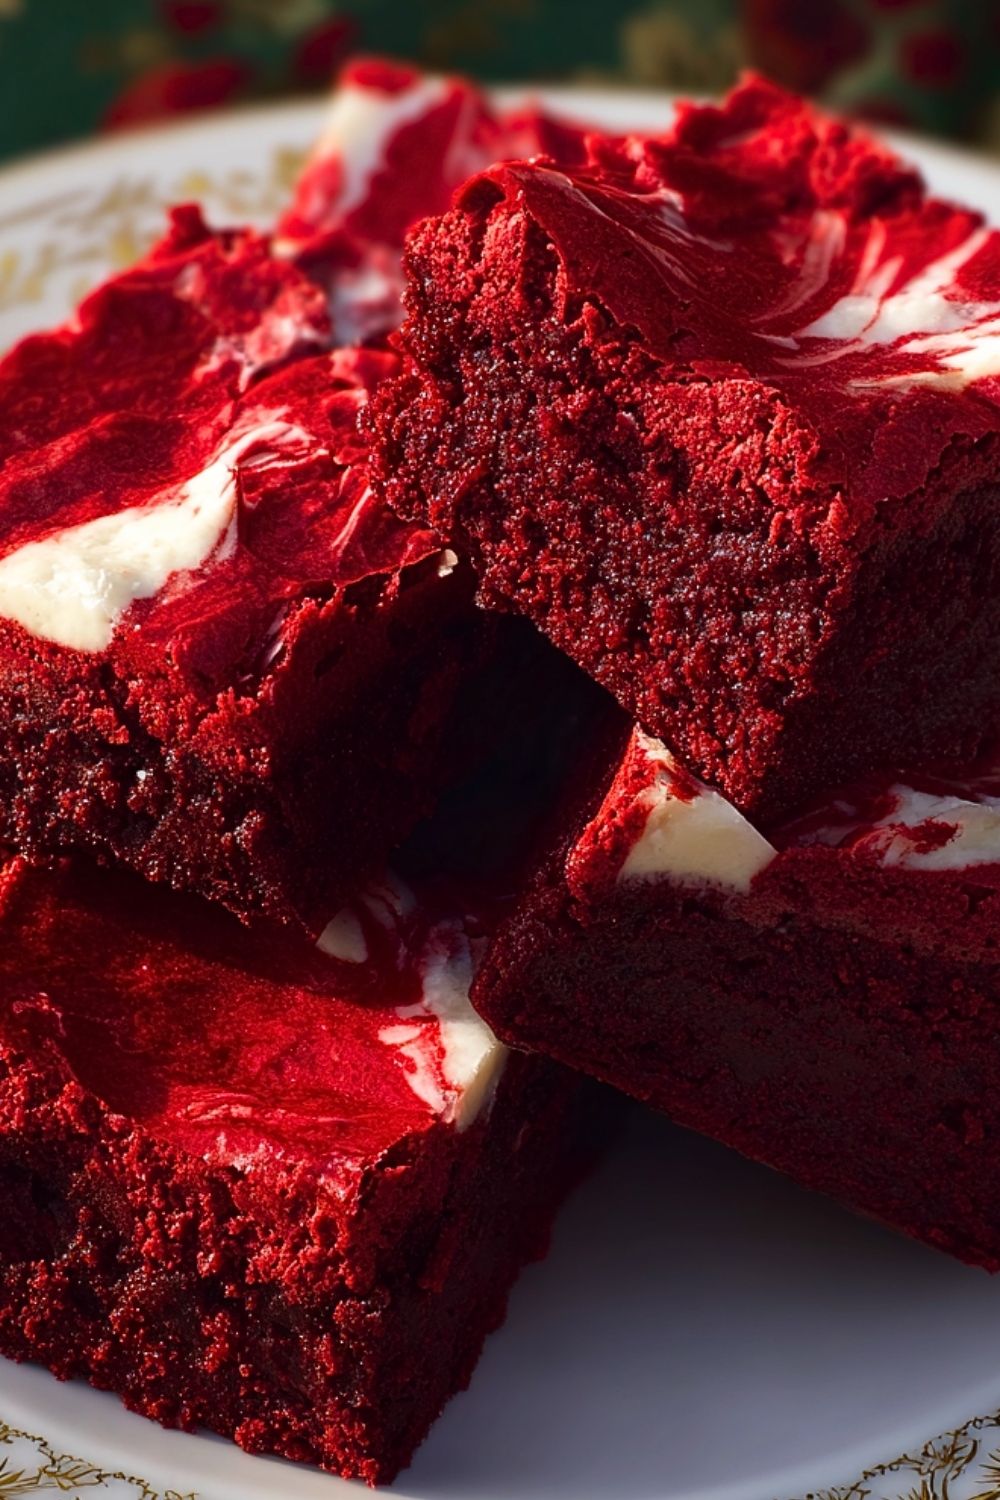
Red Velvet Brownies bring together everything I love about classic brownies and rich red velvet cake in one irresistible dessert. The first time I baked a batch, I was surprised by how perfectly the fudgy chocolate base paired with the slight tang from the cream cheese swirl on top. Every bite feels rich, soft, and decadent without being overly sweet.

What makes these brownies stand out is their vibrant color and bakery-style texture. I enjoy serving them for holidays, birthdays, or even casual weekend baking because they always look impressive on the dessert table. The crackly top, chewy edges, and velvety center create a dessert that disappears quickly every single time.
Why You’ll Love This Red Velvet Brownies Recipe
These Red Velvet Brownies have the perfect balance of fudgy texture and rich cocoa flavor. They stay moist for days and have a dense, chewy bite that brownie lovers appreciate.
The beautiful red color makes them ideal for Valentine’s Day, Christmas gatherings, or party desserts. Even without complicated decorating, they instantly look festive and elegant.
Another reason I keep coming back to this recipe is how simple it is to prepare. The batter comes together in one bowl, and the cream cheese swirl adds a bakery-style finish with very little extra effort.
What Makes Red Velvet Brownies Different From Regular Brownies?
Red Velvet Brownies combine the deep chocolate flavor of brownies with the signature tangy richness found in red velvet desserts. Unlike traditional brownies that focus purely on chocolate intensity, these brownies include hints of vanilla and a slight cream cheese flavor that creates a smoother, more balanced taste.
The texture is also slightly softer and more velvety than classic brownies. The addition of red food coloring gives them their signature bold appearance, making them as visually striking as they are delicious.
Many people also love that these brownies feel lighter in flavor while still delivering the rich fudgy texture expected from a brownie recipe.
Options for Substitutions
If you prefer a more natural coloring option, beet powder or natural red food dye can replace traditional food coloring. The shade may be softer, but the brownies will still look beautiful.
For a deeper chocolate flavor, dark cocoa powder can be used instead of regular cocoa powder. This creates a richer brownie while keeping the classic red velvet taste.
Cream cheese can be swapped with mascarpone if you want an even smoother swirl topping. Mascarpone provides a milder flavor and creamy texture.
If you need a gluten-free version, a high-quality gluten-free all-purpose flour blend works well in this recipe. Make sure the blend contains xanthan gum for the best structure.
You can also replace butter with neutral oil for an extra moist texture, although butter adds more richness and flavor.
Ingredients for This Red Velvet Brownies Recipe
Unsalted Butter
Butter creates the rich and fudgy foundation of these brownies. It adds moisture, enhances the cocoa flavor, and helps achieve the dense bakery-style texture that makes brownies so satisfying.
Granulated Sugar
Sugar sweetens the brownies while also contributing to the shiny, crackly top layer. It helps keep the interior soft and chewy after baking.
Brown Sugar
Brown sugar adds moisture and a subtle caramel depth that balances the cocoa and vanilla flavors beautifully. It also helps make the brownies extra chewy.
Eggs
Eggs provide structure and richness to the batter. They help bind all the ingredients together while creating a smooth and velvety texture.
Vanilla Extract
Vanilla enhances the flavor profile and gives the brownies that classic red velvet warmth. It complements both the cocoa and cream cheese swirl.
Red Food Coloring
Red food coloring gives these brownies their iconic bold red appearance. Gel food coloring is especially effective because it creates vibrant color without thinning the batter.
Unsweetened Cocoa Powder
Cocoa powder adds the signature chocolate flavor that makes red velvet desserts so irresistible. A small amount creates balance without overpowering the velvet-like flavor.
All-Purpose Flour
Flour gives the brownies structure while still allowing them to stay soft and fudgy. Using the right amount is important for maintaining the perfect dense texture.
Salt
Salt enhances the sweetness and deepens the chocolate flavor. Even a small amount makes the brownies taste more balanced and rich.
Cream Cheese
Cream cheese creates the smooth swirl topping that pairs beautifully with the fudgy brownie base. Its slight tanginess gives red velvet desserts their recognizable flavor.
Powdered Sugar
Powdered sugar sweetens the cream cheese mixture while helping it stay smooth and creamy for swirling.
Step 1: Prepare the Baking Pan
Preheat your oven to 350°F (175°C). Line an 8×8-inch baking pan with parchment paper, leaving some overhang on the sides so the brownies can easily be lifted out later.
Lightly grease the parchment paper to prevent sticking. Preparing the pan properly ensures clean edges and easier slicing once the brownies cool.
Step 2: Melt the Butter
Place the butter in a microwave-safe bowl or saucepan and melt it completely. Allow it to cool slightly before mixing with the sugar so the eggs do not cook prematurely.
Melted butter creates a denser and fudgier brownie texture compared to softened butter.
Step 3: Mix the Sugars Into the Butter
Whisk the granulated sugar and brown sugar into the melted butter until smooth and glossy. This process helps dissolve the sugar slightly, which contributes to the shiny brownie top.
Continue whisking for about one minute to create a smooth consistency.
Step 4: Add the Eggs and Vanilla
Add the eggs one at a time, whisking thoroughly after each addition. This creates a silky batter and helps trap air for a better texture.
Mix in the vanilla extract and continue stirring until fully combined.
The batter should now appear thick, smooth, and glossy.
Step 5: Add the Red Food Coloring
Stir the red food coloring into the wet ingredients until the batter becomes evenly colored. Gel food coloring is recommended because it creates a bold red shade without affecting the consistency.
The deeper the red color, the more dramatic the finished brownies will look.
Step 6: Fold in the Dry Ingredients
Sift together the cocoa powder, flour, and salt in a separate bowl. Gradually fold the dry ingredients into the wet mixture using a spatula.
Mix only until no dry streaks remain. Overmixing can create tough brownies instead of soft, fudgy ones.
The final batter should be thick and rich.
Step 7: Prepare the Cream Cheese Swirl
In a small bowl, beat the cream cheese and powdered sugar together until smooth and creamy. The mixture should be soft enough to swirl easily but not too runny.
This creamy topping adds contrast to the rich chocolate base.
Step 8: Assemble the Brownies
Pour most of the brownie batter into the prepared baking pan and spread it evenly. Drop spoonfuls of the cream cheese mixture over the top.
Add the remaining brownie batter in small dollops around the cream cheese layer. Use a knife or skewer to gently swirl the mixtures together.
Avoid over-swirling so the distinct red velvet and cream cheese patterns remain visible.
Step 9: Bake the Red Velvet Brownies
Place the pan into the preheated oven and bake for approximately 30 to 35 minutes.
The edges should appear set while the center remains slightly soft. Insert a toothpick near the center; a few moist crumbs are ideal for fudgy brownies.
Be careful not to overbake, as the brownies will continue to set while cooling.
Step 10: Cool Before Slicing
Allow the brownies to cool completely in the pan before lifting them out using the parchment paper.
Cooling is essential because warm brownies are fragile and may fall apart when sliced too early.
Once cooled, cut into squares using a sharp knife. Wiping the knife clean between cuts creates neat bakery-style slices.
Step 11: Optional Finishing Touches
For an extra decorative finish, drizzle melted white chocolate over the cooled brownies or sprinkle red velvet crumbs on top.
You can also chill the brownies slightly before serving for a firmer and even fudgier texture.
These brownies pair wonderfully with coffee, milk, or vanilla ice cream for an indulgent dessert experience.
How Long to Prepare Red Velvet Brownies
Making Red Velvet Brownies is surprisingly simple, and most of the time involved comes from baking and cooling rather than active preparation. The batter itself comes together quickly, especially since the recipe uses basic pantry ingredients and simple mixing techniques.
For the best results, it is important not to rush the cooling process. Allowing the brownies to cool completely helps them develop a dense and fudgy texture while making them easier to slice into clean squares.
Preparation Time
Preparing the ingredients, mixing the batter, and creating the cream cheese swirl usually takes about 15 to 20 minutes. If all ingredients are measured beforehand, the process becomes even smoother.
Baking Time
The brownies typically bake for 30 to 35 minutes depending on the oven and the depth of the baking pan. Slightly underbaking them helps preserve the soft and fudgy center.
Cooling Time
Cooling requires approximately 45 minutes to 1 hour. This step is essential because warm brownies are delicate and can crumble when sliced too early.
Total Time
From start to finish, expect the full recipe to take around 1 hour and 30 minutes, including preparation, baking, and cooling.
Tips for Perfect Red Velvet Brownies
Use Room Temperature Ingredients
Room temperature eggs and cream cheese blend more smoothly into the batter and swirl mixture. This helps create a consistent texture throughout the brownies.
Avoid Overmixing the Batter
Once the flour is added, mix gently until just combined. Overmixing develops gluten, which can make the brownies dense and cakey instead of soft and fudgy.
Choose Gel Food Coloring
Gel food coloring provides a stronger and more vibrant red color without adding extra liquid to the batter. This keeps the brownie texture thick and rich.
Do Not Overbake
The brownies should still appear slightly soft in the center when removed from the oven. Residual heat continues baking them while they cool.
Let Them Cool Completely
Cooling helps the brownies set properly and intensifies the fudgy texture. Chilling them slightly before slicing can make them even denser and easier to cut.
Use High-Quality Cocoa Powder
Since cocoa is one of the main flavors in red velvet desserts, using a good-quality cocoa powder noticeably improves the taste.
Watch Out for These Mistakes While Cooking
Adding Too Much Flour
Using too much flour creates dry and crumbly brownies. Always measure flour carefully using the spoon-and-level method.
Overbaking the Brownies
One of the most common mistakes is waiting until the center looks fully baked. Red Velvet Brownies should retain a slight softness in the middle.
Over-Swirling the Cream Cheese
Swirling too aggressively can muddy the beautiful red and white contrast. A few gentle swirls create the best visual effect.
Skipping the Parchment Paper
Without parchment paper, removing the brownies cleanly from the pan becomes much more difficult.
Using Cold Cream Cheese
Cold cream cheese creates lumps in the swirl mixture. Allow it to soften first for a smooth and creamy consistency.
Cutting the Brownies While Warm
Warm brownies are delicate and messy when sliced too early. Waiting until fully cooled creates cleaner slices and better texture.
What to Serve With Red Velvet Brownies?
Vanilla Ice Cream
The cold creaminess of vanilla ice cream pairs beautifully with the rich and fudgy texture of Red Velvet Brownies.
Fresh Strawberries
Strawberries add freshness and slight tartness that balance the richness of the dessert.
Hot Coffee
A warm cup of coffee enhances the chocolate notes in the brownies and creates a cozy dessert pairing.
Whipped Cream
Light whipped cream adds softness and extra creaminess without overpowering the brownies.
Chocolate Drizzle
A drizzle of melted chocolate or white chocolate creates a bakery-style presentation and extra indulgence.
Storage Instructions
Storing at Room Temperature
Red Velvet Brownies can stay fresh at room temperature for up to 3 days when stored in an airtight container. Keep them away from direct sunlight or heat to preserve their texture.
Refrigerating the Brownies
Because of the cream cheese swirl, refrigeration is recommended if storing for more than a few days. Place the brownies in a sealed container and refrigerate for up to 1 week.
The brownies become even fudgier after chilling, which many people enjoy.
Freezing Instructions
These brownies freeze very well. Wrap individual squares tightly in plastic wrap and place them in a freezer-safe container or bag.
They can be frozen for up to 3 months. Thaw overnight in the refrigerator or at room temperature before serving.
Best Way to Reheat
If you prefer warm brownies, microwave a slice for about 10 to 15 seconds. This softens the texture and slightly melts the chocolate flavor back to life.
Estimated Nutrition
The nutritional values may vary slightly depending on ingredient brands and portion sizes.
- Calories: Approximately 320 per serving
- Carbohydrates: 38g
- Protein: 4g
- Fat: 17g
- Saturated Fat: 10g
- Sugar: 28g
- Fiber: 1g
- Sodium: 180mg
These brownies are intended as a rich dessert treat, so smaller portions can still feel satisfying.
Frequently Asked Questions
Can I Make Red Velvet Brownies Without Food Coloring?
Yes, the brownies will still taste delicious without food coloring. They simply will not have the signature bright red appearance.
Why Are My Brownies Dry?
Dry brownies are usually caused by overbaking or adding too much flour. Measuring ingredients carefully and removing the brownies while slightly soft in the center helps prevent dryness.
Can I Use Boxed Brownie Mix?
Yes, you can adapt a boxed brownie mix by adding red food coloring and cream cheese swirl, although homemade brownies usually provide a richer flavor and better texture.
Should Red Velvet Brownies Be Refrigerated?
Because of the cream cheese topping, refrigeration is the safest option for longer storage.
Can I Add Chocolate Chips?
Absolutely. White chocolate chips, dark chocolate chips, or semi-sweet chocolate chips all work wonderfully in this recipe.
Conclusion
Red Velvet Brownies are the perfect combination of rich chocolate flavor, soft fudgy texture, and beautiful presentation. The cream cheese swirl adds just the right amount of tanginess, making every bite feel balanced and indulgent.
Whether you are baking for a holiday, celebration, or simply satisfying a dessert craving, these brownies always make an impression. Their vibrant appearance and bakery-style texture turn a simple homemade dessert into something truly memorable.
Once you try them, they quickly become the kind of recipe you look forward to making again and again.
Red Velvet Brownies
- Prep Time: 20 minutes
- Cook Time: 35 minutes
- Total Time: 55 minutes
- Yield: 9 brownies
- Category: Dessert
- Method: Baking
- Cuisine: American
- Diet: Vegetarian
Description
These Red Velvet Brownies are rich, fudgy, and packed with smooth chocolate flavor with a beautiful cream cheese swirl on top. They combine the best parts of classic brownies and red velvet cake into one easy dessert recipe that feels bakery-quality right at home. Perfect for holiday desserts, Valentine’s Day treats, easy dessert ideas, party desserts, or whenever you need a quick chocolate fix, these brownies stay moist, chewy, and incredibly decadent. With their vibrant red color, soft centers, and crackly tops, these homemade Red Velvet Brownies are one of the best easy baking recipes for beginners and experienced bakers alike. Whether you serve them chilled, warm with ice cream, or alongside coffee, they always become a crowd favorite.
Ingredients
1 cup unsalted butter
1 cup granulated sugar
1/2 cup brown sugar
2 large eggs
2 teaspoons vanilla extract
1 tablespoon red food coloring
1/4 cup unsweetened cocoa powder
1 cup all-purpose flour
1/2 teaspoon salt
8 ounces cream cheese
1/3 cup powdered sugar
Instructions
1. Preheat the oven to 350°F (175°C) and line an 8×8-inch baking pan with parchment paper.
2. Melt the butter and allow it to cool slightly.
3. Whisk the granulated sugar and brown sugar into the melted butter until smooth.
4. Add the eggs one at a time and mix well after each addition.
5. Stir in the vanilla extract and red food coloring.
6. Sift together the cocoa powder, flour, and salt in a separate bowl.
7. Fold the dry ingredients gently into the wet mixture until combined.
8. In another bowl, beat the cream cheese and powdered sugar until smooth.
9. Spread most of the brownie batter into the prepared pan.
10. Add spoonfuls of the cream cheese mixture on top of the batter.
11. Dollop the remaining brownie batter over the cream cheese layer.
12. Use a knife to gently swirl the layers together.
13. Bake for 30 to 35 minutes until the edges are set and the center is slightly soft.
14. Allow the brownies to cool completely before slicing into squares.
Notes
Do not overbake the brownies because they continue setting while cooling.
Use gel food coloring for a vibrant red color without thinning the batter.
For extra fudgy brownies, chill them in the refrigerator before serving.
Nutrition
- Serving Size: 1 brownie
- Calories: 320
- Sugar: 28g
- Sodium: 180mg
- Fat: 17g
- Saturated Fat: 10g
- Unsaturated Fat: 5g
- Trans Fat: 0g
- Carbohydrates: 38g
- Fiber: 1g
- Protein: 4g
- Cholesterol: 65mg
Keywords: red velvet brownies, fudgy brownies, easy dessert recipe, brownie recipe, homemade brownies, cream cheese brownies, chocolate dessert, easy baking recipe