
There’s something undeniably joyful about a dessert that comes together without turning on the oven—especially one as luxuriously creamy and satisfying as this No-Bake Cheesecake. I remember the first time I tried a no-bake version at a summer potluck. It had this silky smooth texture and a rich vanilla tang that was beautifully balanced by a crunchy graham cracker crust. Ever since then, it’s become one of my favorite go-to recipes when I want something decadent but fuss-free.
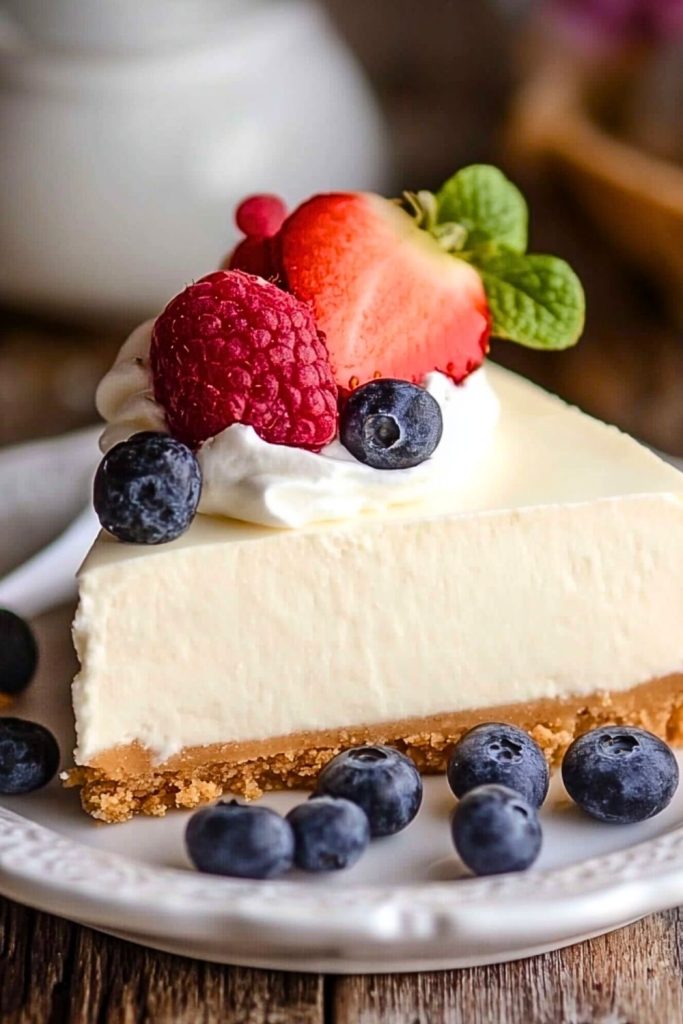
What makes this cheesecake so special is its versatility. Whether you’re prepping it for a dinner party, a holiday celebration, or just treating yourself midweek, this chilled delight hits all the right notes. The cream cheese filling is fluffy yet rich, the crust is buttery and crisp, and the fresh fruit topping adds just the right touch of brightness. And the best part? No oven, no water bath, no cracks—just pure creamy bliss.
Why You’ll Love This No-Bake Cheesecake
- Effortless Preparation: Skip the baking, cooling, and cracking fears.
- Perfect for Warm Weather: Keep your kitchen cool while your dessert chills.
- Customizable Toppings: From fresh berries to caramel drizzle, the possibilities are endless.
- Great Make-Ahead Dessert: Ideal for prepping the night before an event.
- Light and Creamy Texture: Airy enough to feel indulgent without being too heavy.
- Crowd-Pleasing Flavor: Classic vanilla and tangy cream cheese never go out of style.
What Type of Crust Works Best for a No-Bake Cheesecake?
For me, the crust sets the stage for the entire cheesecake experience. A traditional graham cracker crust is a tried-and-true favorite because of its buttery crunch and sweet, toasty flavor. You can crush the crackers yourself or buy them pre-crushed—either way, mix them with melted butter and a touch of sugar, press into your pan, and chill. It firms up beautifully without baking and provides a sturdy base for the creamy filling.
But if you’re feeling adventurous, try swapping in crushed digestive biscuits, vanilla wafers, or even Oreos for a fun twist. Chocolate cookie crusts add richness, while almond or shortbread cookies offer a more delicate, buttery flavor. The key is making sure your crumb mixture holds together when pressed—add a little extra butter if it seems too dry.
Options for Substitutions
Whether you have dietary needs or are simply missing an ingredient, this cheesecake is flexible enough to adapt:
- Cream Cheese: Use full-fat for the best texture, but you can substitute with low-fat or even dairy-free versions for a lighter or vegan option.
- Whipped Topping: Traditional whipped cream is ideal, but store-bought whipped topping works great if you’re short on time.
- Crust Alternatives: Try gluten-free graham crackers, crushed pretzels for a salty twist, or nuts mixed with dates for a no-grain base.
- Sweetener: Swap sugar for honey, maple syrup, or a sugar alternative like stevia to suit your preference.
- Toppings: Fresh berries are classic, but you can also use fruit compotes, lemon curd, chocolate ganache, or crushed candies.
Ingredients for This No-Bake Cheesecake
Every ingredient in this no-bake cheesecake plays a role in building its creamy texture and rich flavor. Here’s what you’ll need and why each is important:
- Graham Cracker Crumbs
These form the classic, buttery base of the cheesecake. Their slight sweetness and crunch balance the smooth filling perfectly. - Unsalted Butter
Melted butter binds the graham cracker crumbs together, helping the crust firm up and hold its shape once chilled. - Granulated Sugar
A touch of sugar sweetens both the crust and the filling, enhancing the flavor without overwhelming the natural tang of the cream cheese. - Cream Cheese
The star of the show. Use full-fat cream cheese for a rich, silky texture and that unmistakable cheesecake tang. - Powdered Sugar
This dissolves easily into the cream cheese and provides a smooth sweetness without any graininess. - Vanilla Extract
Adds warmth and depth to the filling. It ties together the dairy elements and gives the cheesecake a comforting, familiar flavor. - Heavy Whipping Cream
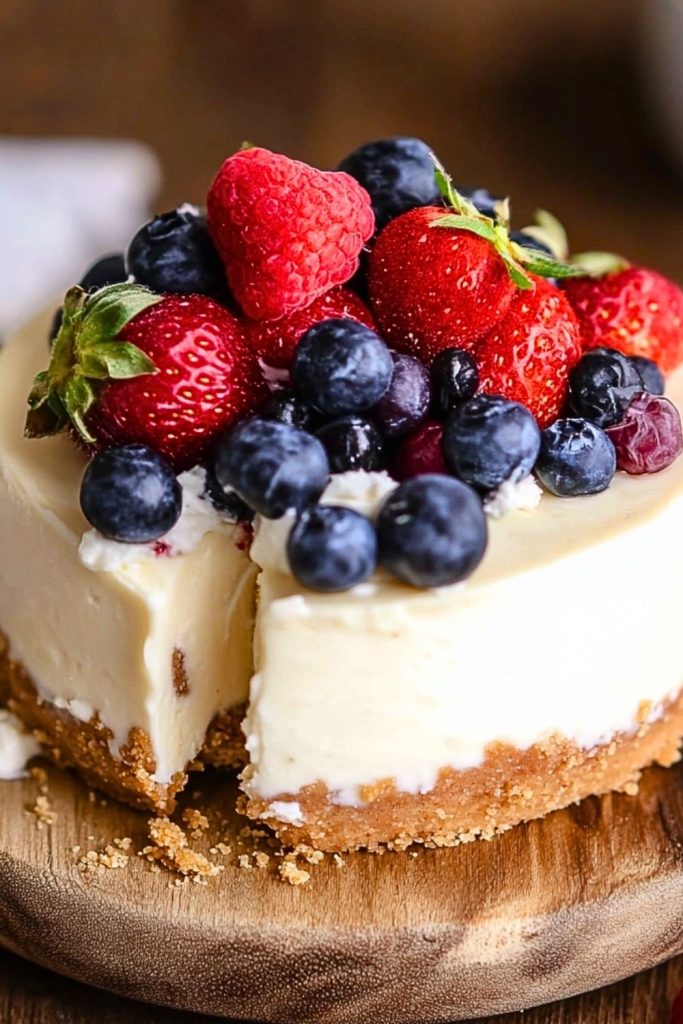
When whipped and folded in, it adds airiness and a mousse-like consistency that keeps the filling light yet indulgent. - Fresh Berries and Whipped Cream (Optional for Topping)
These provide color, contrast, and a refreshing fruity brightness on top of the rich filling—plus they make your cheesecake look stunning.
Step 1: Prepare the Crust
Start by combining your graham cracker crumbs, melted butter, and a spoonful of sugar in a mixing bowl. Mix until the crumbs are evenly coated and resemble wet sand. Press the mixture firmly into the bottom of a springform pan using the bottom of a glass or measuring cup to create an even, compact layer. Place the crust in the fridge for at least 30 minutes to firm up while you work on the filling.
Step 2: Whip the Cream
In a separate mixing bowl, whip the cold heavy cream until stiff peaks form. This will help give the cheesecake its airy, mousse-like consistency. Set the whipped cream aside in the fridge to keep it cold.
Step 3: Make the Cheesecake Filling
In a large bowl, beat the softened cream cheese until completely smooth and creamy. Add powdered sugar and vanilla extract, then mix until well combined and fluffy. Be sure there are no lumps—this step is key for that silky-smooth texture.
Step 4: Fold in the Whipped Cream
Gently fold the whipped cream into the cream cheese mixture using a spatula. This step should be done slowly and carefully to preserve the lightness of the whipped cream, which gives the cheesecake its delicate structure.
Step 5: Assemble and Chill
Pour the cheesecake filling over the chilled crust and smooth out the top with a spatula or the back of a spoon. Cover the pan with plastic wrap or foil and place it in the refrigerator for at least 6 hours—preferably overnight—to set completely.
Step 6: Garnish and Serve
Once fully set, remove the cheesecake from the springform pan and transfer to a serving plate. Decorate the top with fresh berries and piped whipped cream, or whatever toppings you prefer. Slice with a sharp knife dipped in warm water for clean edges, and enjoy every bite.
How Long to Cook the No-Bake Cheesecake
The beauty of this cheesecake is that it requires zero cooking, but it does need time to set properly in the fridge. Once you’ve assembled the crust and filling, refrigerate the cheesecake for at least 6 hours, though overnight (8–12 hours) is best for a firm texture that slices cleanly. If you’re in a rush, popping it in the freezer for 2–3 hours can help speed up the process, but be sure to let it thaw in the fridge for 30 minutes before serving to avoid an icy texture.
Tips for Perfect No-Bake Cheesecake
- Use Room Temperature Cream Cheese: This makes mixing easier and prevents lumps in the filling.
- Whip the Cream Properly: Stiff peaks give the cheesecake body and lightness. Under-whipped cream can lead to a soft, runny filling.
- Don’t Overmix After Folding: Gently combine the whipped cream with the cream cheese mixture to keep the filling fluffy.
- Chill Long Enough: A full chill ensures your cheesecake holds its shape and doesn’t collapse when sliced.
- Line the Pan Base: Use parchment paper to make removing the cheesecake from the pan much easier.
- Clean Knife Between Slices: For picture-perfect slices, dip your knife in hot water and wipe clean before each cut.
- Choose a Springform Pan: This type of pan allows easy release without disturbing the crust or sides.
- Use Full-Fat Dairy: For the best texture and richness, don’t skimp on fat content in the cream cheese or cream.
Watch Out for These Mistakes While Cooking
Even though it’s a no-bake dessert, there are a few sneaky missteps that can affect your final result. Here are the most common ones to avoid:
- Using Cold Cream Cheese: This results in a lumpy filling that’s difficult to smooth. Always let it soften to room temperature.
- Overbeating the Filling: Once you add whipped cream, overmixing can deflate the air and make the filling dense.
- Not Chilling Long Enough: Impatience leads to soft, unstable slices. Let it chill thoroughly—overnight is ideal.
- Adding Too Much Butter to the Crust: It might become greasy and harden too much in the fridge.
- Using Low-Quality Cream Cheese: Off-brand or whipped types can give the filling a thin, off-texture consistency.
- Skimping on the Crust Pressure: If you don’t press the crust firmly, it may crumble when sliced.
- Not Leveling the Filling: An uneven top doesn’t set uniformly and can be harder to slice cleanly.
- Rushing the Whipped Cream: Under-whipped cream won’t provide enough structure, so make sure you reach stiff peaks.
What to Serve With No-Bake Cheesecake?
A simple no-bake cheesecake pairs beautifully with a variety of textures and flavors. Here are 8 delicious serving suggestions to elevate your dessert table:
1. Fresh Mixed Berries
Sweet and tart, a handful of blueberries, raspberries, and strawberries make for a refreshing topping.
2. Berry Compote
Warm berry sauce with a touch of lemon and sugar adds a comforting, jammy contrast to the chilled filling.
3. Salted Caramel Drizzle
For an indulgent touch, pour a ribbon of thick caramel over each slice and sprinkle with flaky sea salt.
4. Chocolate Ganache
A glossy layer of rich dark chocolate ganache adds decadence and makes the dessert feel ultra-luxe.
5. Citrus Zest
Lemon or orange zest adds brightness and cuts through the richness with its fragrant zing.
6. Espresso Shot or Coffee
Serve alongside a cup of strong espresso or cold brew to contrast the cheesecake’s sweetness.
7. Chopped Nuts
Pecans, almonds, or pistachios add crunch and nuttiness to every bite.
8. Whipped Cream Rosettes
Simple swirls of whipped cream not only look elegant but add an airy finish.
Storage Instructions
No-bake cheesecake stores beautifully, making it an ideal make-ahead dessert. Once it’s fully set:
- Refrigerator: Store the cheesecake in the fridge, covered with plastic wrap or in an airtight container, for up to 5 days. Make sure it’s kept cold at all times to maintain its structure.
- Freezer: You can freeze the whole cheesecake or individual slices. Wrap tightly in plastic wrap, then foil, and place in a freezer-safe container. It will keep for up to 2 months. Thaw in the fridge overnight before serving.
- Avoid Room Temperature Storage: Because of the dairy content, it’s best not to leave the cheesecake out for more than 2 hours.
Pro tip: If you plan to freeze it, avoid adding fresh fruit on top until serving time to prevent soggy or discolored toppings.
Estimated Nutrition
Here’s a general nutritional breakdown for one slice (based on 12 servings and a classic version with graham crust and whipped cream topping):
- Calories: ~420 kcal
- Total Fat: 31g
- Saturated Fat: 18g
- Cholesterol: 100mg
- Sodium: 280mg
- Total Carbohydrates: 32g
- Sugars: 23g
- Protein: 5g
- Fiber: 0.5g
Note: Nutrition may vary depending on substitutions and toppings.
Frequently Asked Questions
What’s the best pan to use for a no-bake cheesecake?
A springform pan is ideal because it allows you to release the cheesecake easily without damaging the crust or sides. If you don’t have one, a deep pie dish can also work.
Can I make a no-bake cheesecake without whipped cream?
Yes, but you’ll lose some of the fluffiness. You can substitute with store-bought whipped topping or try folding in Greek yogurt or sour cream for a denser, tangier texture.
Why is my cheesecake filling too soft?
Most likely it didn’t chill long enough or the cream wasn’t whipped to stiff peaks. Always allow at least 6 hours in the fridge (preferably overnight) for it to firm up.
How do I prevent the crust from crumbling?
Be sure to use enough butter and press the crust firmly into the pan. Chill it well before adding the filling to keep it stable.
Can I make this cheesecake vegan?
Absolutely. Use dairy-free cream cheese, coconut whipped cream, and a plant-based butter substitute for the crust. Just note that the flavor and texture may vary slightly.
How far ahead can I prepare this cheesecake?
You can make it 2–3 days in advance and store it in the fridge. Add fresh fruit toppings just before serving to keep them vibrant and fresh.
Can I flavor the filling?
Yes! Add lemon zest, melted chocolate, peanut butter, or espresso powder to infuse your cheesecake with different flavors while keeping the same base.
Is it okay to freeze leftovers?
Yes, no-bake cheesecake freezes very well. Wrap slices tightly and freeze for up to 2 months. Thaw overnight in the fridge for best texture.
Conclusion
This No-Bake Cheesecake is everything I love in a dessert—simple, elegant, and endlessly customizable. It brings creamy indulgence without the stress of baking, perfect for any occasion from casual dinners to special celebrations. With the right ingredients and a little chill time, you get a dessert that looks impressive and tastes like it took hours to make. Whether topped with fruit, drizzled with caramel, or enjoyed plain, each bite is a smooth, velvety treat. I hope you enjoy making it as much as I do.

No-Bake Cheesecake Recipe
- Prep Time: 20 minutes
- Chill Time: 6 hours
- Total Time: 6 hours 20 minutes
- Yield: 12 servings
Description
If you’re searching for the perfect quick dessert, this No-Bake Cheesecake checks every box. Creamy, dreamy, and topped with your favorite berries or sauces, it’s a guaranteed crowd-pleaser that doesn’t require turning on the oven. Whether you’re looking for easy dinner party ideas, a summer treat, or a simple make-ahead dessert, this recipe delivers. With its rich cream cheese filling and buttery graham cracker crust, every bite is pure bliss. This is a top pick for those who love food ideas that balance ease, beauty, and taste.
Ingredients
For the Crust:
- 1 1/2 cups graham cracker crumbs
- 1/3 cup granulated sugar
- 6 tablespoons unsalted butter, melted
For the Filling:
- 24 oz (3 packages) full-fat cream cheese, softened
- 1 cup powdered sugar
- 1 teaspoon vanilla extract
- 1 cup heavy whipping cream (cold)
Optional Toppings:
- Fresh berries
- Whipped cream
- Fruit compote
- Chocolate shavings
Instructions
- Combine graham cracker crumbs, sugar, and melted butter in a bowl. Mix until the texture resembles wet sand.
- Press mixture into the bottom of a 9-inch springform pan. Chill in the fridge for at least 30 minutes.
- Whip the cold heavy cream in a chilled bowl until stiff peaks form. Set aside.
- In a separate bowl, beat cream cheese until smooth. Add powdered sugar and vanilla extract; mix until fluffy.
- Gently fold in whipped cream until fully combined.
- Pour the filling over the crust and smooth the top. Cover and refrigerate for at least 6 hours, or overnight.
- When ready to serve, remove from the pan and garnish with your choice of toppings.
- Slice with a warm knife for clean edges and enjoy!