
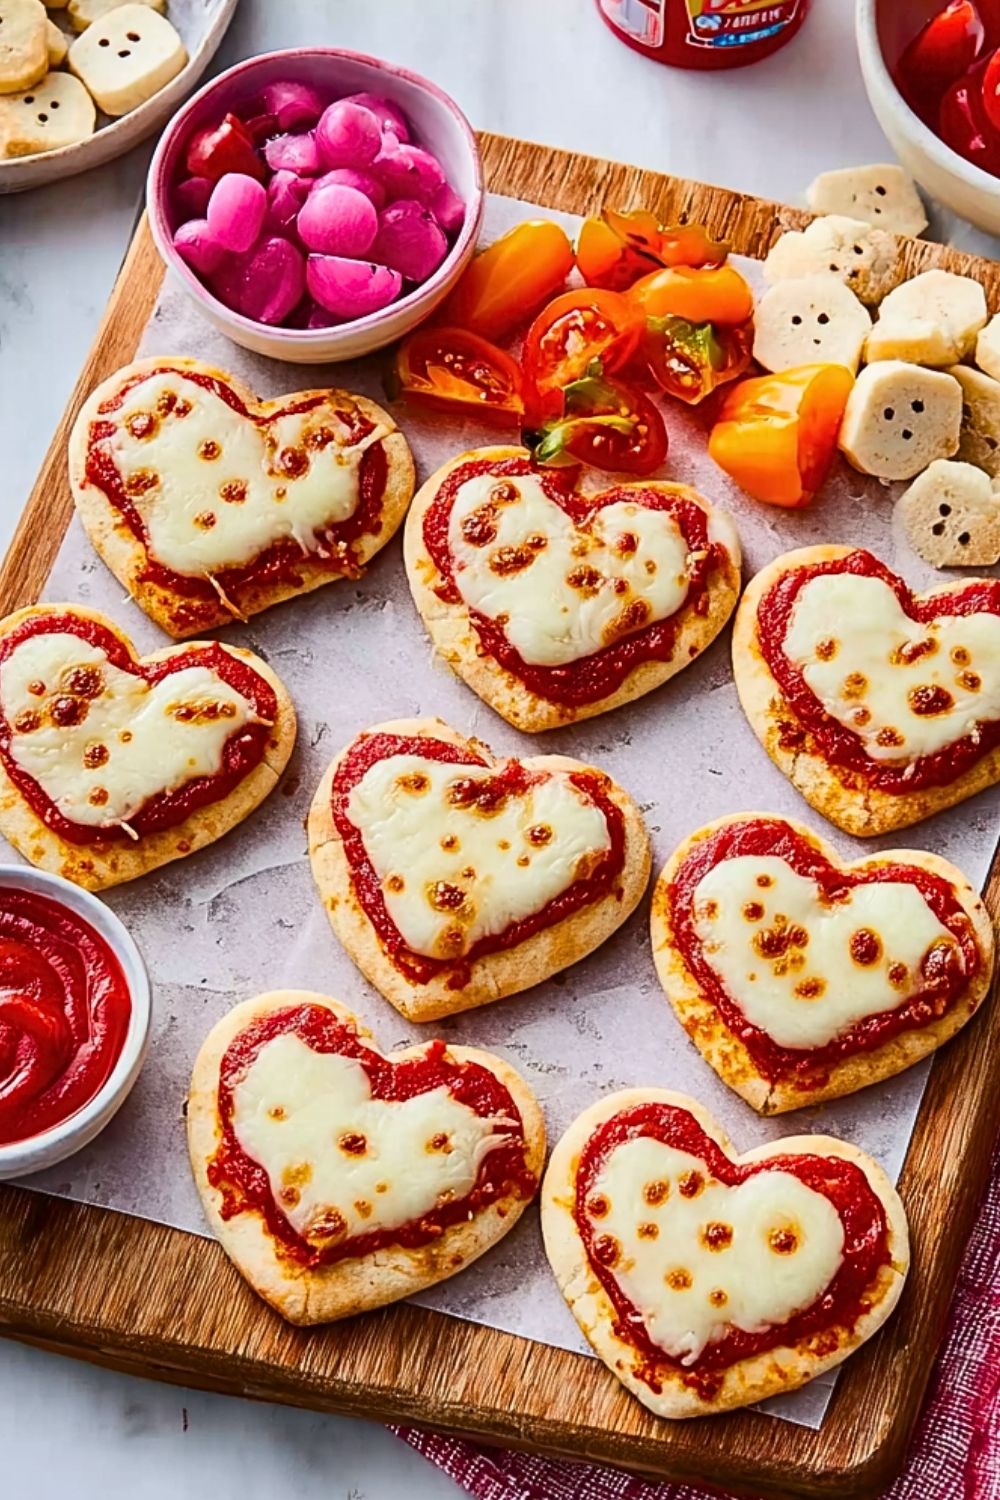
A Valentine Snack Board filled with adorable heart-shaped mini pizzas brings both charm and flavor to your celebration. Each bite is a delightful combination of soft, golden crust, rich tomato sauce, and perfectly melted cheese, making it an irresistible treat for both kids and adults. Whether you’re planning a romantic evening or a fun family gathering, this dish adds a playful and heartfelt touch to the table.
What makes this snack board truly special is its versatility and visual appeal. The heart shapes instantly create a festive mood, while the customizable toppings allow you to tailor each piece to your taste. It’s not just food—it’s an experience that brings people together and makes any Valentine’s moment more memorable.
Why You’ll Love This Valentine Snack Board
This Valentine Snack Board is easy to prepare, fun to assemble, and guaranteed to impress. The mini pizzas are perfectly portioned, making them ideal for sharing without the mess. You can get creative with toppings, making it suitable for picky eaters or adventurous food lovers alike. Plus, it’s a great activity to involve loved ones in the kitchen, turning cooking into a bonding experience.
Preparation Phase & Tools to Use (Essential Tools and Equipment and Their Importance)
To create this Valentine Snack Board, you’ll need a few essential tools. A rolling pin helps you evenly flatten the dough, ensuring consistent baking. Heart-shaped cookie cutters are key for achieving the festive look, making each mini pizza visually appealing. A baking sheet lined with parchment paper prevents sticking and ensures even cooking. A pastry brush can be useful for lightly coating the dough edges with oil for a golden finish. Lastly, a sharp knife helps in preparing toppings efficiently and safely.
Preparation Tips
For the best results, make sure your dough is at room temperature before rolling—it will be easier to handle and shape. Avoid overloading the mini pizzas with sauce or toppings, as this can make them soggy. Use high-quality mozzarella for that perfect melt and slight browning on top. Preheat your oven fully before baking to ensure even cooking, and keep an eye on the pizzas during the final minutes to prevent over-browning. A light drizzle of olive oil before baking can enhance both flavor and texture.
Valentine Snack Board
Ingredients for this Valentine Snack Board
For the Mini Pizza Base:
- 2 cups all-purpose flour (plus extra for dusting)
- 1 teaspoon instant yeast
- 1 teaspoon sugar
- 1/2 teaspoon salt
- 3/4 cup warm water (not too hot to avoid killing yeast)
- 1 tablespoon olive oil
For the Toppings:
- 1 cup pizza sauce or marinara sauce
- 1 1/2 cups shredded mozzarella cheese
- 1/4 cup grated Parmesan cheese (optional, for extra flavor)
- 1/2 teaspoon dried oregano
- 1/2 teaspoon dried basil
- 1 tablespoon olive oil (for brushing)
Optional Add-Ons (Customizable):
- Sliced pepperoni (can be cut into mini hearts)
- Black olives (sliced)
- Bell peppers (finely diced or shaped)
- Cooked mushrooms
- Sweet corn kernels
- Fresh basil leaves for garnish
Instructions: Step-by-Step Guide to Make Valentine Snack Board
Step 1: Prepare the Dough
In a large mixing bowl, combine flour, instant yeast, sugar, and salt. Gradually add warm water and olive oil while mixing until a soft dough forms. Knead the dough on a floured surface for about 8–10 minutes until smooth and elastic. Place it in a lightly oiled bowl, cover, and let it rise in a warm place for 1 hour or until doubled in size.
Step 2: Preheat the Oven
Preheat your oven to 400°F (200°C). Line a baking sheet with parchment paper to prevent sticking and ensure even baking.
Step 3: Roll Out the Dough
Once the dough has risen, punch it down gently to release air. Roll it out on a lightly floured surface to about 1/4-inch thickness. Keep the thickness consistent for even baking.
Step 4: Cut Heart Shapes
Using a heart-shaped cookie cutter, cut out mini heart-shaped bases. Gather leftover dough, re-roll, and cut more shapes until all dough is used.
Step 5: Transfer to Baking Sheet
Place the heart-shaped dough pieces onto the prepared baking sheet, leaving a little space between each to allow for slight expansion during baking.
Step 6: Add Sauce
Spread a small amount of pizza sauce on each heart, leaving a slight border around the edges to create a crust. Avoid adding too much sauce to prevent sogginess.
Step 7: Add Cheese and Toppings
Sprinkle mozzarella cheese evenly over each piece. Add Parmesan if desired. Arrange optional toppings creatively—try making smaller heart shapes with cheese or pepperoni for a decorative look.
Step 8: Season and Brush Edges
Lightly sprinkle oregano and basil over the pizzas. Brush the edges of the dough with olive oil to help achieve a golden, slightly crispy crust.
Step 9: Bake to Perfection
Place the baking sheet in the preheated oven and bake for 10–12 minutes, or until the cheese is melted and bubbly and the edges are lightly golden.
Step 10: Cool Slightly and Garnish
Remove from the oven and let the mini pizzas cool for a couple of minutes. Garnish with fresh basil leaves if desired for added freshness and color.
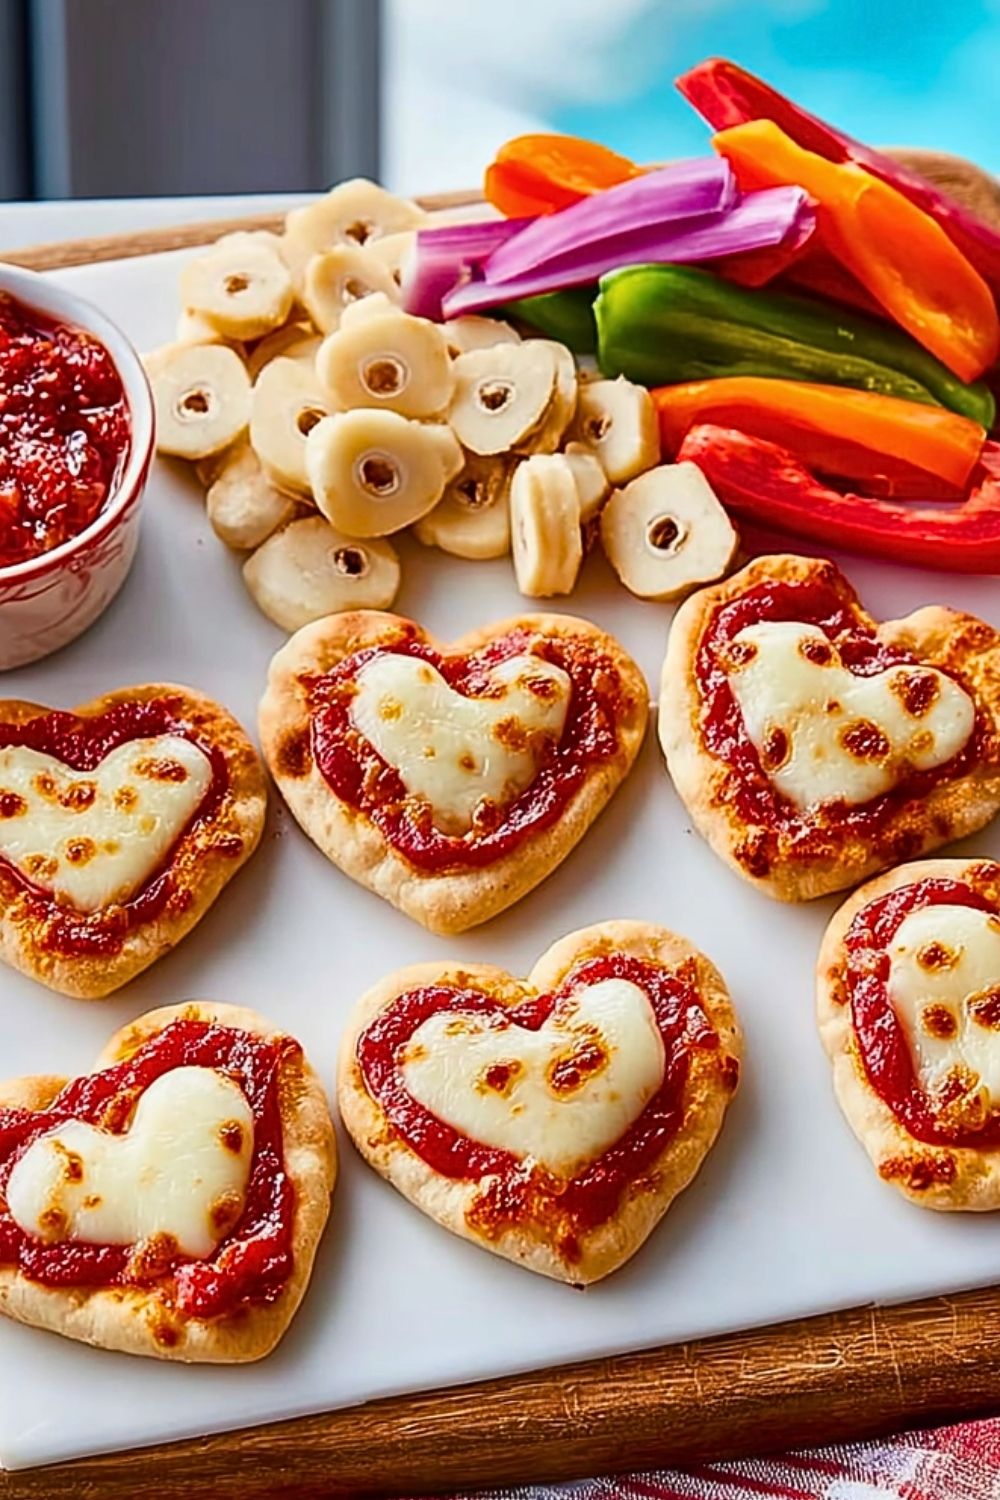
Step 11: Assemble the Valentine Snack Board
Arrange the mini heart pizzas on a serving board. Add a small bowl of extra pizza sauce or dip in the center. Enhance the board with complementary snacks like sliced vegetables, crackers, or fruits for variety.
Step 12: Serve and Enjoy
Serve warm for the best taste and texture. These mini pizzas are perfect as a centerpiece for your Valentine Snack Board and are sure to delight everyone.
Valentine Snack Board
Notes
This Valentine Snack Board is highly adaptable, making it perfect for different preferences and dietary needs. You can use store-bought dough to save time or experiment with whole wheat or gluten-free alternatives for a healthier twist. The balance between sauce, cheese, and toppings is key—keeping it light ensures a crisp base and prevents sogginess. For a more gourmet touch, consider mixing cheeses like mozzarella and provolone or adding a hint of garlic oil to the crust before baking. Presentation also plays a big role, so arranging the mini pizzas neatly and adding colorful sides can elevate the entire experience.
Watch Out for These Mistakes While Cooking
- Overloading toppings can make the mini pizzas heavy and undercooked in the center.
- Using cold dough straight from the fridge makes shaping difficult and uneven.
- Not preheating the oven properly can lead to uneven baking.
- Adding too much sauce can result in soggy crusts.
- Skipping parchment paper may cause sticking and uneven browning.
- Cutting shapes too thin may lead to overly crispy or burnt edges.
- Not spacing the pizzas on the tray can cause them to stick together while baking.
Storage Instructions
If you have leftovers, allow the mini pizzas to cool completely before storing. Place them in an airtight container and refrigerate for up to 3 days. To reheat, use an oven or toaster oven at 350°F (175°C) for about 5–7 minutes to restore crispiness. Avoid microwaving if possible, as it can make the crust chewy. For longer storage, you can freeze the baked mini pizzas in a single layer, then transfer to a freezer-safe bag for up to 2 months. Reheat directly from frozen in the oven until heated through.
Estimated Nutrition
Per serving (approx. 2–3 mini pizzas):
- Calories: 220–280 kcal
- Protein: 10–12g
- Carbohydrates: 25–30g
- Fat: 8–12g
- Saturated Fat: 4–6g
- Fiber: 1–2g
- Sodium: 350–500mg
Frequently Asked Questions
Can I use store-bought pizza dough?
Yes, store-bought dough works perfectly and saves time while still delivering great results.
Can I make these ahead of time?
You can prepare the dough and cut the shapes ahead, then assemble and bake just before serving for best freshness.
What cheese works best besides mozzarella?
Provolone, cheddar, or a blend of Italian cheeses can add more depth of flavor.
How do I make them crispier?
Roll the dough slightly thinner and bake on a preheated baking sheet or pizza stone.
Can I make this recipe gluten-free?
Yes, simply substitute with gluten-free pizza dough available in stores or homemade.
Are these suitable for kids?
Absolutely, the fun shapes and simple flavors make them very kid-friendly.
Can I cook these in an air fryer?
Yes, cook at 375°F (190°C) for about 6–8 minutes, checking frequently to avoid burning.
What dips go well with this snack board?
Marinara sauce, garlic butter, ranch dressing, or even a creamy cheese dip pair wonderfully.
Conclusion
This Valentine Snack Board is more than just a recipe—it’s a creative and delicious way to celebrate special moments. With its charming heart-shaped design, customizable toppings, and crowd-pleasing flavors, it’s a dish that brings joy to both the cook and those enjoying it. Whether shared with a partner, family, or friends, these mini pizzas are sure to make your Valentine’s celebration extra memorable.
Valentine Snack Board
- Prep Time: 20 minutes
- Cook Time: 12 minutes
- Total Time: 1 hour 32 minutes
- Yield: 4 servings
- Category: Appetizer
- Method: Baking
- Cuisine: Italian-American
- Diet: Vegetarian
Description
Fall in love with this Valentine Snack Board, a fun and easy recipe that turns simple ingredients into a charming and delicious experience. These heart-shaped mini pizzas are perfect for a quick dinner, creative lunch, or festive gatherings. With a soft crust, rich sauce, and melted cheese, it’s a guaranteed crowd-pleaser.
Ingredients
2 cups all-purpose flour
1 teaspoon instant yeast
1 teaspoon sugar
1/2 teaspoon salt
3/4 cup warm water
1 tablespoon olive oil
1 cup pizza sauce
1 1/2 cups shredded mozzarella cheese
1/4 cup grated Parmesan cheese
1/2 teaspoon dried oregano
1/2 teaspoon dried basil
1 tablespoon olive oil
1/4 cup sliced pepperoni
1/4 cup sliced black olives
1/4 cup diced bell peppers
1/4 cup cooked mushrooms
2 tablespoons sweet corn
Instructions
1. In a bowl, mix flour, yeast, sugar, and salt, then add warm water and olive oil to form a dough
2. Knead the dough for 8–10 minutes and let it rise for 1 hour
3. Preheat oven to 400°F and line a baking tray
4. Roll dough and cut into heart shapes
5. Spread pizza sauce on each piece
6. Add cheese and toppings
7. Sprinkle herbs and brush edges with oil
8. Bake for 10–12 minutes until golden
9. Cool slightly and serve on a board
Notes
Do not overload toppings to keep crust crisp
Use room temperature dough for easier shaping
Preheat oven fully for even baking
Nutrition
- Serving Size: 2–3 mini pizzas
- Calories: 260
- Sugar: 4g
- Sodium: 420mg
- Fat: 10g
- Saturated Fat: 5g
- Unsaturated Fat: 4g
- Trans Fat: 0g
- Carbohydrates: 28g
- Fiber: 2g
- Protein: 11g
- Cholesterol: 20mg
Keywords: valentine snack board, mini pizza, heart pizza, easy recipe, dinner ideas