
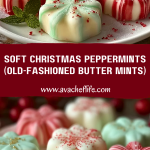
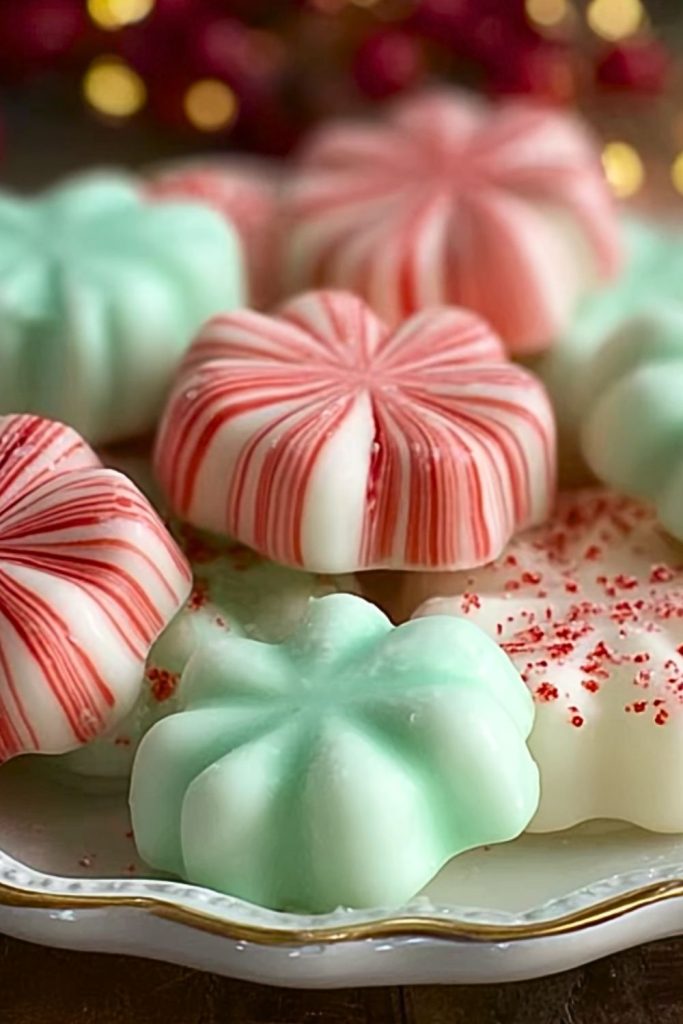
These Soft Christmas Peppermints, also known as Old-Fashioned Butter Mints, melt in your mouth with a creamy, refreshing burst of peppermint flavor. With their charming holiday colors and delicate, flower-like shape, they instantly bring back cozy memories of festive gatherings, cookie swaps, and candy bowls passed around at grandma’s house. Whether nestled on a dessert platter or gifted in a pretty tin, these mints are a nostalgic nod to simpler times.
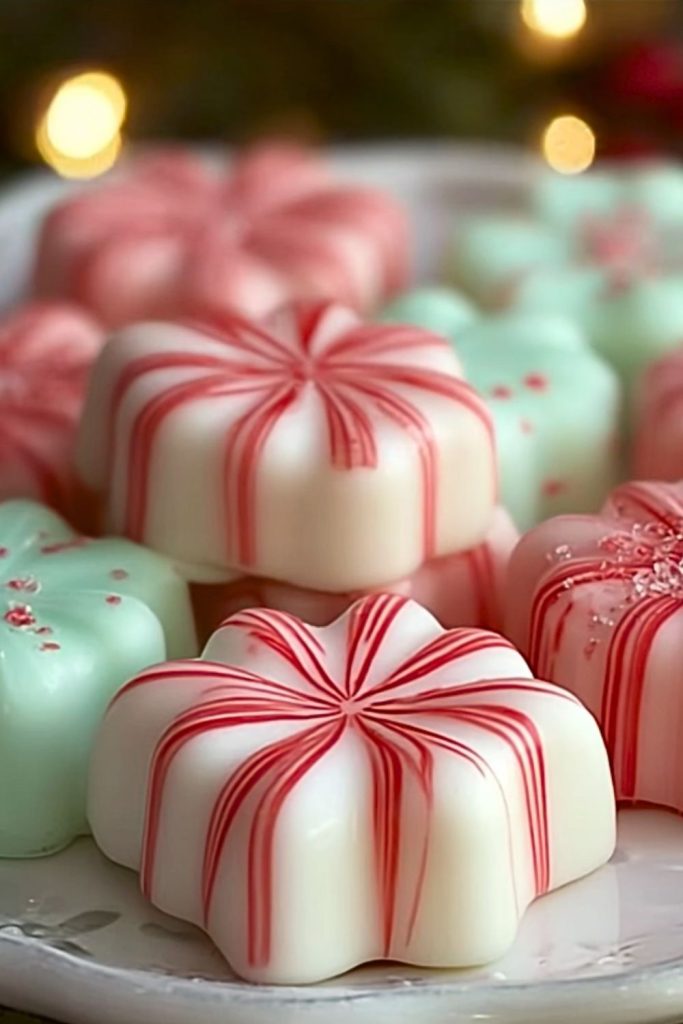
They’re incredibly easy to make with just a handful of ingredients and no baking required. The texture is soft yet firm enough to hold its shape, making them perfect for a make-ahead holiday treat. Plus, the homemade touch and pepperminty cheer will have everyone asking for the recipe. Their vibrant red, green, and white swirls are just as delightful to look at as they are to eat!
Why You’ll Love This Soft Christmas Peppermints Recipe
- Perfect for gifting or party platters
- No-bake and easy to make in big batches
- Nostalgic holiday flavor with a modern twist
- Naturally gluten-free
- Customizable colors and shapes to match any occasion
Preparation Phase & Tools to Use
To make these soft peppermints, you’ll need a stand mixer (or a hand mixer with a strong motor) to cream the butter and sugar to the right texture. Silicone candy molds are essential for creating the cute, consistent shapes—opt for festive ones like snowflakes or stars for extra holiday flair. A rubber spatula helps with mixing and scraping the dough-like mint mixture into the molds. Food-safe gloves are handy if you’re tinting the dough by hand to avoid stained fingers.
Using high-quality peppermint extract and gel food coloring will make a noticeable difference in both flavor and appearance.
Preparation Tips
For the smoothest texture, use room temperature butter and sift your powdered sugar before mixing. Don’t rush the creaming process—it should be light and fluffy before you add the extract. If your mixture feels too sticky, add more sugar in small amounts. To speed up shaping, divide the dough and color each batch before pressing into molds or shaping by hand. Chill the mints to firm them up before storing or serving, especially if your kitchen runs warm.
Ingredients for This Soft Christmas Peppermints Recipe
- 1/2 cup (1 stick) unsalted butter, softened to room temperature
- 1/4 teaspoon salt
- 1/4 teaspoon peppermint extract (adjust to taste)
- 3 1/2 to 4 cups powdered sugar, sifted
- 2 tablespoons heavy cream or milk
- Gel food coloring (red, green, white or your holiday color choices)
- Optional: Sprinkles or edible glitter for decoration
Step 1: Cream the Butter
Start by adding the softened butter to the bowl of a stand mixer fitted with a paddle attachment. Beat on medium speed until it’s light and fluffy, about 2-3 minutes. This creates the smooth base for the mints and ensures a silky texture.
Step 2: Add Flavor and Cream
Add the peppermint extract and salt to the creamed butter. Mix until incorporated. Then add the heavy cream and beat until well combined. This adds both moisture and flavor.
Step 3: Mix in Powdered Sugar Gradually
With the mixer on low speed, add the powdered sugar 1 cup at a time. Scrape down the sides as needed. You’re aiming for a thick, moldable dough consistency—similar to playdough. If it’s too soft, add more powdered sugar; if too dry, a splash of cream can bring it back.
Step 4: Divide and Tint the Dough
Divide the dough into separate portions, depending on how many colors you want. Knead a small amount of gel food coloring into each portion until evenly tinted. Use gloves to prevent staining your hands.
Step 5: Shape the Mints
Press the colored dough into silicone candy molds or roll it into small balls and flatten slightly with a fork or the bottom of a glass. If using molds, chill the dough slightly before unmolding for cleaner shapes. This step is where you can be creative—snowflakes, stars, trees, or classic round shapes all work beautifully.
Step 6: Let Them Set
Place the shaped mints on a parchment-lined tray and let them dry at room temperature for 12–24 hours, uncovered. This allows the outside to firm up while the inside stays soft and creamy.
Step 7: Store Properly
Once fully set, transfer the mints to an airtight container. Layer with parchment or wax paper to prevent sticking. Store in the fridge for longer shelf life or leave them at room temperature for up to 2 weeks.
Notes
These butter mints are incredibly forgiving, making them a fantastic project for beginner candy makers or kids. You can easily adjust the peppermint intensity or experiment with other extracts like vanilla or almond for a different twist. If you’re preparing them for gifting, let them air dry an extra day to make them less prone to sticking.
Food-grade gel colors are preferred over liquid dye—they provide bold hues without altering the consistency. You can also roll the shaped mints in sanding sugar or edible glitter for a festive sparkle.
Watch Out for These Mistakes While Cooking
- Using cold butter: This can cause lumps and make it difficult to cream the mixture properly.
- Overmixing after adding sugar: Can result in a tough texture. Stop once the dough comes together.
- Adding too much liquid: Stick to the recipe to maintain moldable consistency.
- Skipping the sifting: Lumpy powdered sugar can lead to grainy mints.
- Not letting them dry: Mints that don’t air dry long enough may turn sticky or melt in storage.
Storage Instructions
Once set, these soft Christmas peppermints can be stored in an airtight container, layered between parchment or wax paper. Keep them at room temperature for up to 2 weeks, or refrigerate for up to 1 month. If chilled, allow them to come to room temperature before serving for the best texture. These mints can also be frozen for up to 3 months—just thaw in the fridge overnight.
Estimated Nutrition
- Serving Size: 3 mints
- Calories: 90
- Fat: 5g
- Saturated Fat: 3g
- Carbohydrates: 12g
- Sugar: 11g
- Protein: 0g
- Sodium: 20mg
- Cholesterol: 10mg
Frequently Asked Questions
Can I make these ahead of time?
Yes! These mints are perfect for making ahead—up to a month if stored properly.
Can I use liquid food coloring?
You can, but gel food coloring is better. It won’t water down the dough and gives more vibrant color.
How long do the mints need to dry?
Anywhere from 12 to 24 hours at room temperature. Longer drying gives a firmer outer shell.
Can I freeze butter mints?
Yes, freeze them in a single layer before transferring to a container. Thaw in the fridge.
What molds work best?
Flexible silicone molds are ideal. They pop out easily without cracking the mints.
Can I use salted butter?
Yes, but reduce or skip the added salt in the recipe to balance flavors.
What if I don’t have molds?
Roll the dough into small balls and flatten with a fork or the bottom of a glass.
Can I flavor them differently?
Absolutely! Almond, vanilla, or even citrus extracts make great variations.
Conclusion
Soft Christmas Peppermints are a cheerful, creamy, and melt-in-your-mouth treat that bring vintage holiday charm to any dessert table. With a simple, no-bake recipe and endless customization possibilities, they’re perfect for gift giving, party favors, or snacking straight from the tin. Whether you’re making them with kids, friends, or on your own, this recipe guarantees festive fun and peppermint perfection.

Soft Christmas Peppermints (Old-Fashioned Butter Mints)
- Prep Time: 25 minutes
- Cook Time: 0 minutes
- Total Time: 25 minutes + drying time
- Yield: About 80 mints
- Category: Dessert
- Method: No-bake
- Cuisine: American
Description
Delicate, creamy, and bursting with peppermint cheer, these Soft Christmas Peppermints are the old-fashioned butter mints your holidays have been missing. With a melt-in-your-mouth texture and charming festive shapes, they’re the perfect no-bake treat for cookie trays, holiday gifting, or a quick nostalgic snack. Ideal for those seeking easy recipes, fun Christmas food ideas, and crowd-pleasing homemade candy. Whether you’re planning a cozy holiday breakfast, looking for easy dessert ideas, or creating edible gifts, this recipe delivers all the vintage holiday magic with modern ease.
Ingredients
1/2 cup unsalted butter, softened
1/4 teaspoon salt
1/4 teaspoon peppermint extract
3 1/2 to 4 cups powdered sugar, sifted
2 tablespoons heavy cream or milk
Gel food coloring (red, green, white)
Optional: Sprinkles or edible glitter
Instructions
1. In a stand mixer, beat the softened butter on medium speed for 2–3 minutes until light and fluffy.
2. Add peppermint extract and salt. Then add heavy cream and mix until combined.
3. Gradually mix in powdered sugar, 1 cup at a time, until the mixture forms a dough-like consistency.
4. Divide the dough into portions and knead gel food coloring into each one until evenly tinted.
5. Press the dough into silicone molds or roll into small balls and flatten.
6. Place mints on a parchment-lined tray and let them air dry for 12–24 hours.
7. Store in an airtight container layered with parchment. Keep at room temp or refrigerate.
Notes
Use room temperature butter and sifted sugar for a smoother texture.
Chill the dough slightly before molding for cleaner shapes.
Use gel food coloring to avoid changing the texture of the dough.
Nutrition
- Serving Size: 3 mints
- Calories: 90
- Sugar: 11g
- Sodium: 20mg
- Fat: 5g
- Saturated Fat: 3g
- Unsaturated Fat: 1g
- Trans Fat: 0g
- Carbohydrates: 12g
- Fiber: 0g
- Protein: 0g
- Cholesterol: 10mg
Keywords: Christmas mints, soft peppermint candy, butter mints, holiday treats, easy recipe