

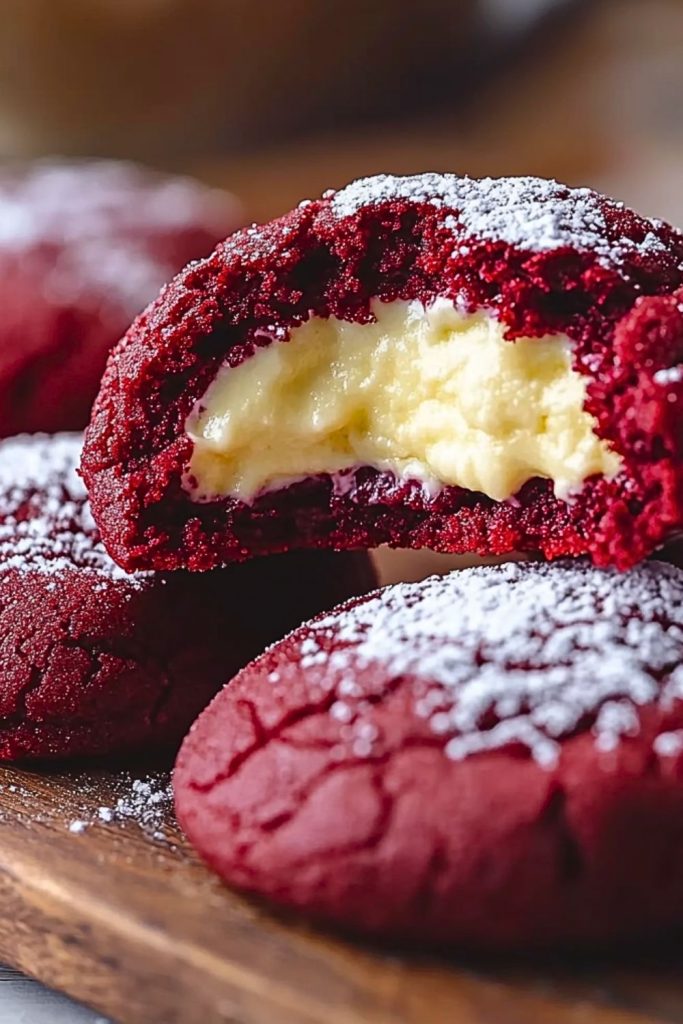
Imagine sinking your teeth into a soft, rich red velvet cookie—only to discover a creamy, luscious cheesecake center tucked inside. These Red Velvet Cheesecake Stuffed Cookies are the ultimate indulgence, offering a delightful fusion of two beloved desserts. The outer layer is moist and slightly chewy with that iconic cocoa-vanilla flavor, while the filling is a velvety burst of sweet-tangy cream cheese that melts in your mouth.
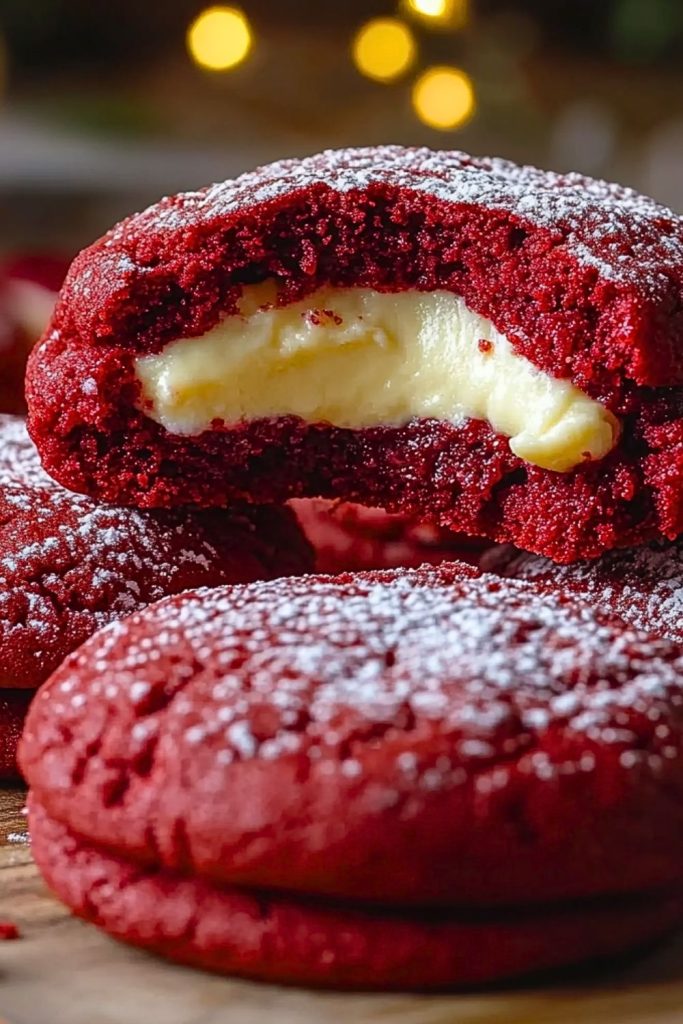
Perfect for holidays, special occasions, or just because, these cookies will steal the spotlight on any dessert table. The contrast of the vibrant red exterior with the pale, creamy center not only makes them irresistible to look at, but unforgettable to taste.
Why You’ll Love This Red Velvet Cheesecake Stuffed Cookies Recipe
- Two desserts in one: A classic red velvet cookie combined with a creamy cheesecake filling.
- Perfect texture: Soft, chewy outside with a gooey center.
- Show-stopping appearance: That bold red with a creamy white surprise inside is stunning.
- Make-ahead friendly: You can freeze both the dough and the filling for future baking sessions.
- Holiday favorite: Ideal for Valentine’s Day, Christmas, or gifting.
Preparation Phase & Tools to Use (Essential Tools and the Importance of Each)
Creating Red Velvet Cheesecake Stuffed Cookies requires a bit of prep, but the tools you’ll need are quite straightforward—and each plays a vital role in ensuring the cookies turn out perfectly.
- Electric Mixer or Stand Mixer: Creaming the butter and sugars thoroughly is key to achieving that soft, fluffy cookie texture. A mixer makes this step efficient and thorough.
- Mixing Bowls (2-3): You’ll need separate bowls for the dry ingredients, wet ingredients, and cheesecake filling. Having multiple bowls keeps the process organized.
- Baking Sheet + Parchment Paper: Parchment prevents sticking and promotes even baking. A sturdy baking sheet is essential for consistent heat distribution.
- Measuring Cups & Spoons: Precision is everything in baking, especially when it comes to leavening agents and cocoa.
- Cookie Scoop or Tablespoon: For uniformly sized cookies and even baking.
- Plastic Wrap: Used to chill the cheesecake filling, which makes it easier to stuff inside the dough.
- Spatula or Dough Scraper: Helps in folding and shaping the cookie dough without overmixing.
- Wire Rack: Allows the cookies to cool properly without continuing to cook on the hot baking sheet.
Preparation Tips
- Chill the Filling: After mixing the cheesecake filling, freeze it in small mounds. This makes it far easier to handle and prevents leakage during baking.
- Don’t Overmix the Dough: Once you add the flour, mix only until combined. Overmixing will make the cookies dense.
- Work Fast While Stuffing: The cookie dough is easier to handle when it’s slightly chilled, but becomes sticky fast. Keep your hands lightly floured or use food-safe gloves.
- Seal the Edges Well: Make sure the cheesecake filling is completely enclosed in the dough to avoid leaks during baking.
- Test Bake One Cookie: Always smart to test one cookie to ensure it holds shape, bakes correctly, and doesn’t leak.
Ingredients for This Red Velvet Cheesecake Stuffed Cookies Recipe
To create these decadent cookies, you’ll need two sets of ingredients—one for the red velvet cookie dough and another for the luscious cheesecake filling. Each component contributes to the perfect balance of flavor, texture, and visual appeal.
For the Cheesecake Filling:
- 1 package (8 oz) cream cheese, softened
- ¼ cup granulated sugar
- ½ teaspoon pure vanilla extract
For the Red Velvet Cookie Dough:
- ½ cup unsalted butter, softened
- ¾ cup brown sugar, packed
- ¼ cup granulated sugar
- 1 large egg
- 1 teaspoon vanilla extract
- 1 tablespoon milk
- 1 tablespoon red food coloring (gel or liquid)
- 1½ cups all-purpose flour
- ¼ cup unsweetened cocoa powder (preferably Dutch-processed)
- ½ teaspoon baking soda
- ¼ teaspoon salt
Optional:
- A few white chocolate chips or chunks mixed into the dough for extra texture and sweetness
- Powdered sugar for dusting after baking (purely decorative)
Make sure all ingredients are at room temperature for smoother mixing and optimal texture.
Step 1: Prepare the Cheesecake Filling
In a medium bowl, combine softened cream cheese, granulated sugar, and vanilla extract. Mix until smooth and creamy with no lumps.
Use a teaspoon or small scoop to portion out small mounds of the filling onto a parchment-lined tray.
Freeze for at least 1 hour, or until solid. This step is crucial—it makes stuffing the cookies much easier.
Step 2: Make the Red Velvet Cookie Dough
In a large bowl, cream together the softened butter, brown sugar, and granulated sugar using a hand mixer or stand mixer on medium speed until light and fluffy (about 2 minutes).
Add the egg, vanilla extract, milk, and red food coloring. Mix until fully combined.
In a separate bowl, whisk together the flour, cocoa powder, baking soda, and salt.
Gradually add the dry ingredients to the wet mixture. Mix just until the dough forms—avoid overmixing.
Step 3: Chill the Dough (Optional but Helpful)
Chill the dough in the refrigerator for about 30 minutes. This helps firm it up and makes shaping easier, especially in warmer kitchens.
Step 4: Assemble the Stuffed Cookies
Scoop a tablespoon of dough and flatten it into a disc in your palm.
Place a frozen mound of cheesecake filling in the center.
Top with another flattened tablespoon of dough and seal the edges, enclosing the filling completely.
Roll gently into a ball and place on a parchment-lined baking sheet. Repeat with remaining dough and filling.
Leave about 2 inches between cookies for spreading.
Step 5: Bake
Preheat your oven to 350°F (175°C).
Bake the cookies for 10–13 minutes or until the tops are set and slightly cracked, but still soft in the center.
Do not overbake—they’ll continue to cook on the sheet after you remove them.
Step 6: Cool and Enjoy
Allow cookies to rest on the baking sheet for 5–7 minutes before transferring to a wire rack.
Let them cool completely—or enjoy them slightly warm with the center still gooey.
They’re irresistible either way!
Notes
- Freezer-Friendly: Both the cheesecake filling and assembled cookie dough balls can be frozen. Simply add 1–2 extra minutes to the bake time if baking from frozen.
- Food Coloring: Gel food coloring gives a more vibrant red hue with less liquid. Adjust the amount based on your preference.
- Dough Consistency: If your dough feels too sticky, chill it longer or add an extra tablespoon of flour. It should be pliable but not wet.
- Custom Touch: Add mini chocolate chips to the dough or roll the cookies in coarse sugar before baking for an extra layer of texture.
Watch Out for These Mistakes While Cooking
- Skipping the Freezer Step for Filling: Trying to stuff soft cheesecake into the dough will make it messy and nearly impossible to seal properly.
- Overmixing the Dough: After the flour goes in, mix gently. Overmixing activates the gluten, making cookies tough.
- Under-sealing the Edges: If any filling is exposed, it may leak and burn during baking. Always pinch and smooth the dough completely around the center.
- Overbaking: These cookies should look slightly underdone when they come out. They will firm up as they cool. Overbaking will dry them out.
- Using Warm Ingredients: Room temperature is fine, but overly warm butter or cream cheese can affect structure and cause spreading.
- Crowding the Pan: Leave space between cookies to allow them to spread evenly without merging together.
- Ignoring Dough Stickiness: If it sticks too much to your hands, use lightly floured hands or wear gloves.
- Skipping the Cooling Period: Letting cookies sit for a few minutes post-bake prevents breakage and allows the centers to set just right.
What to Serve With Red Velvet Cheesecake Stuffed Cookies?
These indulgent cookies can be enjoyed solo or elevated with perfectly paired accompaniments that bring out their rich cocoa and creamy tang.
8 Recommendations
- Cold Milk (Classic Pairing)
The creamy texture of milk complements the tangy cheesecake and balances the cocoa richness. - Hot Espresso or Americano
The slight bitterness of coffee offsets the sweetness and enhances the chocolate tones. - Vanilla Ice Cream
Serve a warm cookie with a scoop of vanilla bean ice cream for a molten-lava-cookie feel. - Berry Compote or Fresh Berries
Tart raspberries or strawberries highlight the tangy cheesecake center and brighten the dish. - Cream Liqueurs (for Adults)
A splash of Irish cream or coffee liqueur makes an indulgent adult treat alongside these cookies. - Mint Tea
Light, refreshing, and palate-cleansing—mint tea contrasts beautifully with the cookies’ richness. - Whipped Cream Topped with Crushed Nuts
A light swirl of whipped cream with a sprinkle of pistachio or pecans adds elegance and crunch. - Dark Chocolate Sauce Drizzle
For chocoholics, a fine drizzle of warm dark chocolate sauce over the cookies makes them truly over-the-top.
Storage Instructions
To maintain their irresistible texture and flavor, proper storage of Red Velvet Cheesecake Stuffed Cookies is essential:
- Room Temperature: Store baked cookies in an airtight container at room temperature for up to 2 days. Make sure the environment is cool and dry to prevent the filling from softening too much.
- Refrigerator: For longer freshness, store in an airtight container in the fridge for up to 5 days. Allow them to come to room temperature before serving, or warm slightly in the microwave for that soft center.
- Freezer (Unbaked): Freeze the assembled (but unbaked) stuffed cookie dough balls on a tray. Once solid, transfer them to a zip-top freezer bag. They’ll keep well for up to 3 months. Bake straight from frozen, adding 1–2 extra minutes.
- Freezer (Baked): Fully baked cookies also freeze well. Cool completely, then wrap individually and store in an airtight container for up to 2 months. Thaw at room temp or warm gently to revive that soft center.
Estimated Nutrition (Per Cookie, Approximate)
- Calories: 220–250 kcal
- Fat: 12–14g
- Saturated Fat: 7g
- Carbohydrates: 28–30g
- Sugar: 16–18g
- Protein: 3g
- Fiber: 1g
- Cholesterol: 35mg
- Sodium: 120–150mg
Note: Nutritional values may vary depending on ingredient brands and optional additions like white chocolate chips.
Frequently Asked Questions
1. Can I make the dough in advance?
Absolutely. You can prepare the dough up to 48 hours in advance and keep it refrigerated. If it becomes too stiff, let it rest at room temperature for 15–20 minutes before shaping.
2. What type of food coloring works best?
Gel food coloring is preferred because it produces a vibrant red hue without thinning the dough. Liquid coloring works too but may require more to achieve the same depth of color.
3. Can I use store-bought cookie dough?
While convenient, store-bought dough doesn’t offer the same texture or flavor balance. For best results, make the dough from scratch—it’s worth the extra step.
4. How do I prevent the filling from leaking out?
Make sure the cheesecake filling is fully frozen and completely sealed inside the cookie dough. Pinch all edges tightly and smooth the seams before baking.
5. Can I make these gluten-free?
Yes. Substitute the all-purpose flour with a 1:1 gluten-free baking blend. Ensure your cocoa powder and food coloring are certified gluten-free as well.
6. Are there dairy-free options?
You can experiment with vegan cream cheese and plant-based butter. The texture may vary slightly, but the concept works. Just ensure the filling sets well when frozen.
7. Can I double the recipe?
Definitely! This recipe scales well. Just make sure to freeze the extra cheesecake mounds and bake in batches to avoid overcrowding the oven.
8. What if I don’t have a mixer?
You can mix the dough by hand using a sturdy spatula or wooden spoon. It will take more effort, especially when creaming butter and sugar, but it’s doable.
Conclusion
Red Velvet Cheesecake Stuffed Cookies are the perfect harmony of rich, cocoa-infused cookie and creamy cheesecake indulgence. They’re visually stunning, deceptively simple, and endlessly satisfying. Whether you’re baking for a holiday, a special occasion, or just because—it’s a dessert that always wows. With the right tools, some simple prep, and a little freezer time, you’ll have a batch of cookies that are soft, gooey, and unforgettable.
Ready to impress? Let’s get baking.
Red Velvet Cheesecake Stuffed Cookies
- Prep Time: 25 minutes
- Cook Time: 10 minutes
- Total Time: 35 minutes
- Yield: About 12 cookies
Description
These cookies combine two favorites: red velvet and cheesecake. The rich cocoa-flavored cookie exterior wraps around a tangy cream cheese center, offering a surprise with every bite. Soft, chewy, and utterly decadent, they’re perfect for holidays, gifts, or anytime indulgence.
Ingredients
For the Cheesecake Filling:
- 1 package (8 oz) cream cheese, softened
- 1/4 cup granulated sugar
- 1/2 teaspoon vanilla extract
For the Cookie Dough:
- 1/2 cup unsalted butter, softened
- 3/4 cup brown sugar, packed
- 1/4 cup granulated sugar
- 1 large egg
- 1 teaspoon vanilla extract
- 1 tablespoon milk
- 1 tablespoon red food coloring
- 1 1/2 cups all-purpose flour
- 1/4 cup unsweetened cocoa powder
- 1/2 teaspoon baking soda
- 1/4 teaspoon salt
Instructions
- Mix cream cheese, sugar, and vanilla until smooth. Portion into small mounds and freeze for 1 hour.
- In a large bowl, cream butter, brown sugar, and granulated sugar until light and fluffy.
- Add egg, vanilla, milk, and red food coloring. Mix until combined.
- In another bowl, whisk flour, cocoa powder, baking soda, and salt.
- Gradually mix dry ingredients into wet ingredients until a dough forms.
- Chill dough for 30 minutes (optional for easier handling).
- Flatten a tablespoon of dough, place frozen filling in center, top with another flattened dough portion, and seal edges completely.
- Place on parchment-lined baking sheet, spaced 2 inches apart.
- Bake at 350°F (175°C) for 10–13 minutes until set.
- Cool on baking sheet for 5 minutes, then transfer to wire rack to cool fully.