

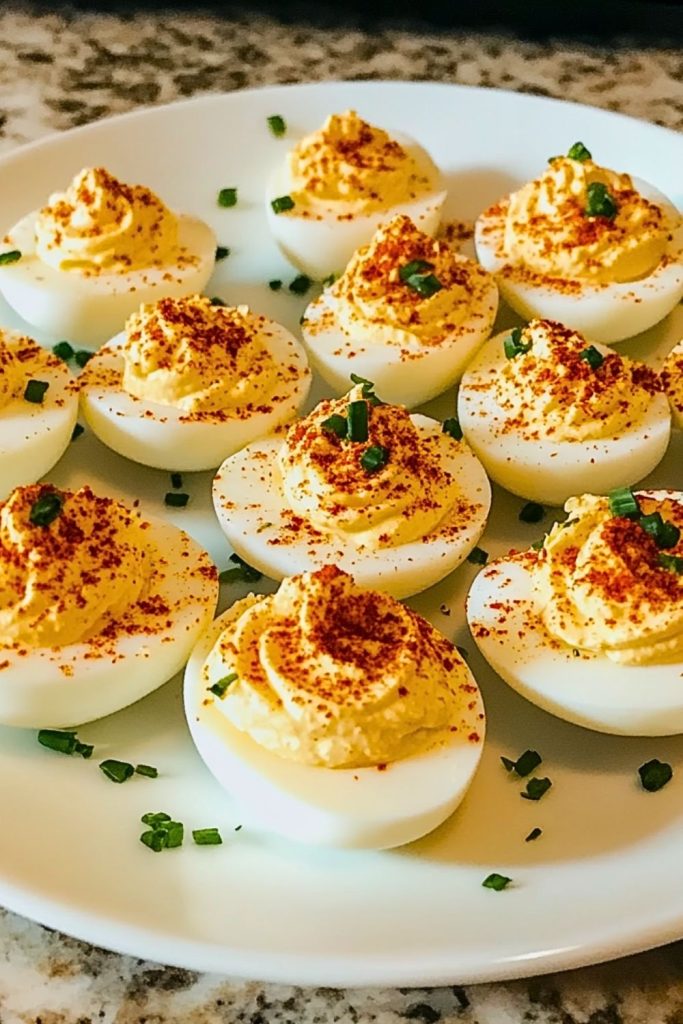
Deviled eggs are a timeless favorite, perfect for parties, holidays, or even a casual snack. These Perfectly Creamy Deviled Eggs boast a silky-smooth filling with just the right touch of tanginess and spice, nestled inside tender, flawlessly boiled egg whites. Each bite is rich, velvety, and utterly satisfying.
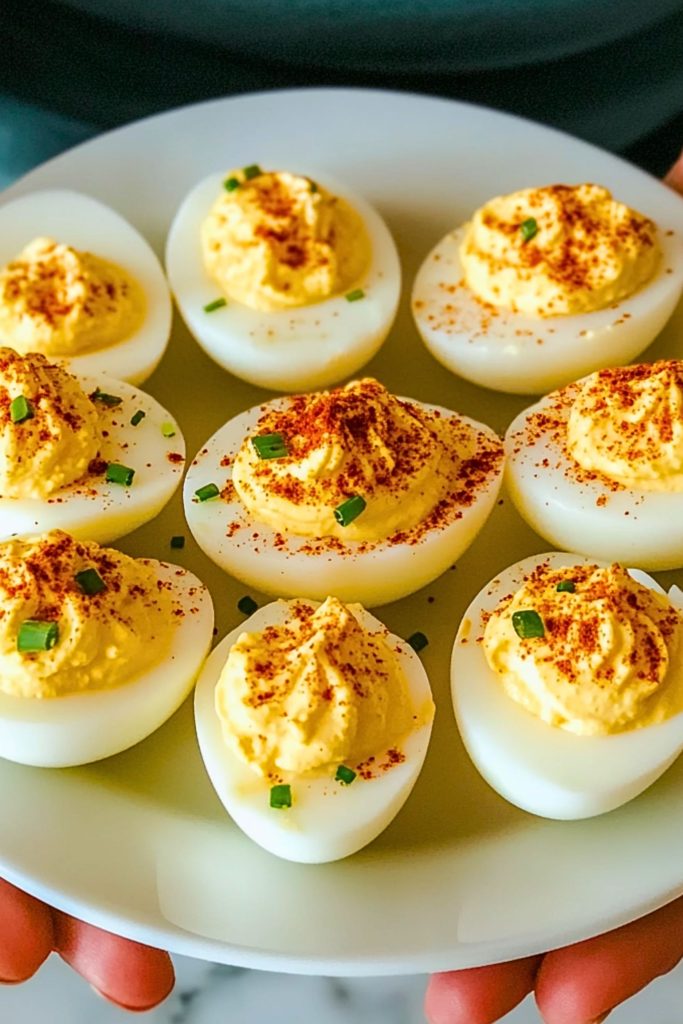
What makes this version stand out is the careful balance of classic flavors — creamy yolk, a hint of mustard, a whisper of vinegar, and a sprinkle of paprika on top for that smoky finish. Topped with fresh chopped chives, they offer a delightful burst of color and a slight oniony crunch. Whether you’re whipping up a batch for brunch, potlucks, or a quick appetizer idea, these deviled eggs are guaranteed to disappear fast!
Why You’ll Love This Perfectly Creamy Deviled Eggs Recipe
- Irresistibly creamy texture: The yolk filling is blended until silky smooth.
- Bold yet balanced flavor: Just enough zing without overpowering the classic taste.
- Simple ingredients: Most of what you need is probably already in your kitchen.
- Quick and easy: From start to finish, these come together in under 30 minutes.
- Perfect for any occasion: Whether it’s breakfast ideas, party snacks, or even Easter brunch.
- Make-ahead friendly: Prep them early and store until you’re ready to serve.
Preparation Phase & Tools to Use
To create Perfectly Creamy Deviled Eggs, having the right tools makes all the difference between a decent appetizer and an extraordinary one. Here’s what you’ll need:
- Medium to large saucepan: Essential for boiling the eggs evenly without overcrowding.
- Mixing bowl: For combining and mashing the yolk filling smoothly.
- Whisk or fork: A fork is great for mashing; a whisk ensures ultra-creamy texture.
- Piping bag (or plastic sandwich bag): To pipe the yolk mixture neatly into the egg whites for a polished, professional look.
- Sharp knife: Crucial for slicing the eggs cleanly in half without tearing.
- Spoon or small scoop: Helps remove yolks without damaging the egg whites.
- Fine mesh sieve (optional): For pressing yolks through to achieve the ultimate creamy filling.
- Serving platter: A nice wide plate keeps the deviled eggs from crowding and tipping over.
Each of these tools helps streamline the process and guarantees beautiful, luscious deviled eggs every time.
Preparation Tips
- Use older eggs: Eggs that are 7–10 days old peel much easier than fresh ones after boiling.
- Cool eggs rapidly: After boiling, plunge eggs into an ice bath immediately. This shocks the eggs and makes peeling effortless.
- Slice eggs cleanly: Wipe your knife with a damp cloth between cuts to keep slices neat and yolks intact.
- Mash yolks thoroughly: No one likes lumpy deviled eggs. For the silkiest texture, press yolks through a fine mesh sieve before mixing.
- Taste as you go: Adjust seasoning carefully. A tiny bit of extra mustard or vinegar can brighten up the whole batch.
- Use a piping bag: Not only does this make filling the eggs easier, but it also gives a beautiful, swirled finish.
- Chill before serving: Let the filled eggs sit in the refrigerator for at least 30 minutes to help flavors meld and set.
Ingredients for this Perfectly Creamy Deviled Eggs Recipe
Gather these simple, classic ingredients to create a batch of the creamiest deviled eggs you’ve ever tasted:
- 6 large eggs – Hard-boiled to perfection and peeled.
- 3 tablespoons mayonnaise – Adds rich creaminess to the filling.
- 1 teaspoon Dijon mustard – For a sharp, tangy depth of flavor.
- 1 teaspoon white vinegar – Brings brightness and balances the richness.
- Salt and pepper, to taste – Enhances all the other flavors.
- Paprika, for garnish – A dusting on top adds color and a hint of smokiness.
- Fresh chives or green onions, finely chopped (optional) – For a pop of color and a mild oniony bite.
Optional Add-Ins:
- A dash of hot sauce for a subtle kick.
- Pickle relish if you prefer a hint of sweetness in the filling.
- Smoked paprika for an even bolder flavor profile.
These basic yet essential ingredients come together to create a harmonious and unforgettable bite every time.
Step 1: Boil the Eggs
Place the eggs in a single layer in a saucepan and cover them with cold water by about an inch. Bring the water to a boil over medium-high heat. Once boiling, turn off the heat, cover the pan with a lid, and let the eggs sit for 10–12 minutes. This method ensures fully cooked yet tender eggs.
Step 2: Cool and Peel
Immediately transfer the cooked eggs to a bowl of ice water. Let them chill for at least 5 minutes. Cooling the eggs quickly helps prevent that gray ring around the yolk and makes peeling much easier. Once cooled, gently tap each egg on the counter and roll it under your hand to loosen the shell before peeling.
Step 3: Halve the Eggs
Using a sharp knife, slice each egg in half lengthwise. Carefully remove the yolks and place them into a medium mixing bowl. Arrange the empty egg white halves on your serving platter.
Step 4: Prepare the Filling
Mash the yolks thoroughly using a fork or press them through a fine mesh sieve for ultimate smoothness. Add the mayonnaise, Dijon mustard, vinegar, salt, and pepper. Whisk until the mixture is creamy and fully combined. Taste and adjust seasoning if needed.
Step 5: Fill the Egg Whites
Spoon the yolk mixture into a piping bag fitted with a star tip (or use a plastic sandwich bag with a small corner cut off). Pipe the filling into the hollows of the egg white halves, swirling as you go for a decorative touch.
Step 6: Garnish and Serve
Sprinkle the tops with paprika and finely chopped chives or green onions. Serve immediately or refrigerate until ready to enjoy. Chilled deviled eggs are even more flavorful as the ingredients have time to meld together.
Notes
- Make ahead: Deviled eggs can be made up to a day in advance. Store the egg whites and yolk filling separately, and pipe them just before serving for the freshest appearance.
- Adjust the creaminess: If you prefer a softer filling, add an extra teaspoon of mayonnaise at a time until the desired consistency is achieved.
- Customize flavors: Add-ins like horseradish, sriracha, or crumbled bacon can personalize the flavor to match your taste or event theme.
- Elegant presentation: Use a star piping tip for a stunning, professional look that will wow your guests.
Watch Out for These Mistakes While Cooking
- Overcooking the eggs: Leaving eggs in boiling water too long can cause a greenish-gray yolk and rubbery texture. Stick to the suggested timing.
- Skipping the ice bath: Cooling rapidly is crucial for easy peeling and maintaining vibrant yolks.
- Undermixing the yolk filling: Lumpy filling can ruin the creamy texture. Always mash yolks thoroughly and whisk well.
- Overloading with mayo or mustard: Balance is key. Too much can overpower the delicate flavor of the eggs.
- Filling the eggs too early: Pre-filled deviled eggs can get watery over time. If making ahead, store yolk filling separately.
- Not seasoning enough: Always taste and adjust your filling before piping; a bland filling is hard to fix once inside the egg whites.
- Rough egg handling: Be gentle when peeling and cutting eggs to avoid broken whites that won’t hold the filling properly.
- Neglecting garnish: That final sprinkle of paprika and chives doesn’t just add color—it boosts flavor and visual appeal too.
What to Serve With Perfectly Creamy Deviled Eggs?
Deviled eggs are wonderfully versatile and can complement a variety of dishes, from casual get-togethers to festive celebrations. Their creamy, tangy flavor pairs beautifully with fresh, hearty, and savory sides.
8 Recommendations
- Fresh Green Salad
A light, crisp salad with a tangy vinaigrette balances the rich creaminess of deviled eggs. - Charcuterie Board
Add deviled eggs to a platter with cured meats, cheeses, nuts, and fruits for an irresistible grazing table. - Roasted Vegetables
Warm, caramelized veggies like asparagus, Brussels sprouts, or carrots bring earthy depth to the table. - BBQ Ribs or Chicken
The smoky, saucy flavors of barbecue make a dynamic pairing with the cool creaminess of deviled eggs. - Southern Fried Chicken
For a classic Southern spread, nothing beats crispy fried chicken served alongside deviled eggs. - Buttery Dinner Rolls
Soft, warm rolls are perfect for scooping up any extra filling that may sneak onto the plate. - Grilled Shrimp Skewers
Light, juicy shrimp offer a seafood twist that complements the richness without overpowering it. - Potato Salad or Coleslaw
Creamy sides like potato salad or crunchy, tangy coleslaw create a satisfying, cohesive picnic or party meal.
Storage Instructions
Proper storage ensures your Perfectly Creamy Deviled Eggs stay fresh, flavorful, and safe to eat:
- Refrigeration: Always store deviled eggs in an airtight container in the refrigerator. They should be kept chilled at all times, especially if serving outdoors.
- Timing: Ideally, consume deviled eggs within 2 days for the best flavor and texture. They can safely be stored for up to 3 days, but the filling may start to weep slightly.
- Separate Storage Tip: If you’re prepping ahead, store the egg whites and the yolk filling separately. Fill the eggs right before serving to maintain their beautiful appearance and prevent sogginess.
- Serving Tip: If serving at a party, place the serving platter over a tray of ice to keep the eggs cool if they’ll be sitting out for more than 1 hour.
Estimated Nutrition
Here’s a general idea of the nutritional content per deviled egg half (based on the standard recipe without extra toppings like bacon):
- Calories: ~60 kcal
- Protein: ~3 grams
- Fat: ~5 grams
- Carbohydrates: ~1 gram
- Fiber: 0 grams
- Sugar: <0.5 grams
- Cholesterol: ~95 mg
- Sodium: ~100 mg
Note: Nutritional values can vary depending on ingredient brands and exact amounts used. Adding toppings like bacon or additional condiments will alter these numbers slightly.
Frequently Asked Questions
1. Can I make deviled eggs the day before?
Yes! In fact, deviled eggs are perfect for making ahead. For the best results, store the egg whites and yolk filling separately in airtight containers, and assemble just before serving to keep them looking fresh and vibrant.
2. What’s the best way to make the filling ultra-smooth?
Mash the yolks through a fine mesh sieve before mixing with the other ingredients. This creates an incredibly silky texture with no lumps, giving you professional-looking deviled eggs.
3. How long can deviled eggs sit out safely?
No more than 2 hours at room temperature. If serving outdoors or at a buffet, place the serving tray over ice to keep the eggs chilled and safe for longer.
4. Why do my hard-boiled eggs have a green ring around the yolk?
A greenish-gray ring usually means the eggs were overcooked or cooled too slowly. Prevent this by sticking to the correct boiling time and immediately transferring the eggs into an ice bath.
5. Can I customize the filling?
Absolutely! You can mix in ingredients like crispy bacon, chopped pickles, hot sauce, avocado, or even fresh herbs to create new flavor profiles.
6. What type of mustard is best for deviled eggs?
Dijon mustard is recommended for its smooth texture and bold flavor, but you can use yellow mustard for a more traditional, classic taste if you prefer.
7. How do I transport deviled eggs without a mess?
Use a deviled egg carrier or a large shallow container lined with a paper towel to help prevent sliding. You can also transport the filling separately and pipe it in at your destination.
8. Can I freeze deviled eggs?
No, freezing is not recommended. The texture of both the whites and filling changes significantly after thawing, becoming rubbery and watery.
Conclusion
Perfectly Creamy Deviled Eggs are an irresistible appetizer that blends simple ingredients into an elegant, crowd-pleasing bite. Whether you’re hosting a holiday brunch, a casual picnic, or a fancy dinner party, these little bites of happiness are guaranteed to steal the show. With a creamy, well-seasoned filling and the perfect touch of garnish, these deviled eggs are a timeless dish that everyone will love—and you’ll love how easy they are to prepare!

Perfectly Creamy Deviled Eggs Recipe
- Prep Time: 10 minutes
- Cook Time: 12 minutes
- Total Time: 22 minutes
- Yield: 12 deviled egg halves
Description
Looking for an irresistible, crowd-pleasing appetizer that’s quick, easy, and full of flavor? These Perfectly Creamy Deviled Eggs are the answer! Featuring silky-smooth yolk filling blended with a touch of mustard and vinegar, then topped with a sprinkle of paprika and fresh chives, this easy recipe delivers elegance with minimal effort. Ideal for quick breakfast ideas, easy dinner parties, healthy snack options, or simply upgrading your brunch table, these deviled eggs are a classic with a luscious twist. Each bite is creamy, tangy, and absolutely delicious, making them a staple for your go-to easy recipes and food ideas collections. Get ready to impress with this foolproof and flavorful favorite!
Ingredients
- 6 large eggs
- 3 tablespoons mayonnaise
- 1 teaspoon Dijon mustard
- 1 teaspoon white vinegar
- Salt and pepper, to taste
- Paprika, for garnish
- Fresh chives or green onions, finely chopped (optional)
Instructions
- Place eggs in a saucepan and cover with cold water. Bring to a boil over medium-high heat.
- Once boiling, remove from heat, cover, and let sit for 10–12 minutes.
- Transfer eggs immediately to an ice bath and let cool for at least 5 minutes.
- Peel the eggs and slice each one in half lengthwise.
- Remove yolks and place them into a mixing bowl.
- Mash yolks thoroughly, then mix with mayonnaise, mustard, vinegar, salt, and pepper.
- Whisk until smooth and creamy. Adjust seasoning if needed.
- Fill the egg whites using a piping bag or spoon.
- Garnish with paprika and chopped chives.
- Serve immediately or chill until ready to enjoy.