

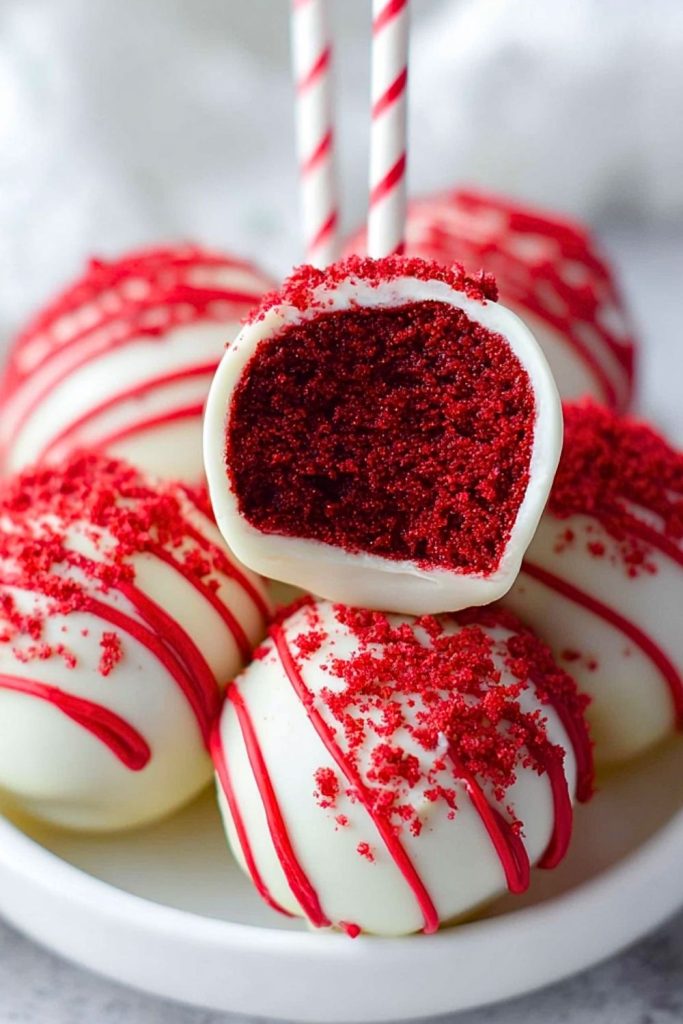
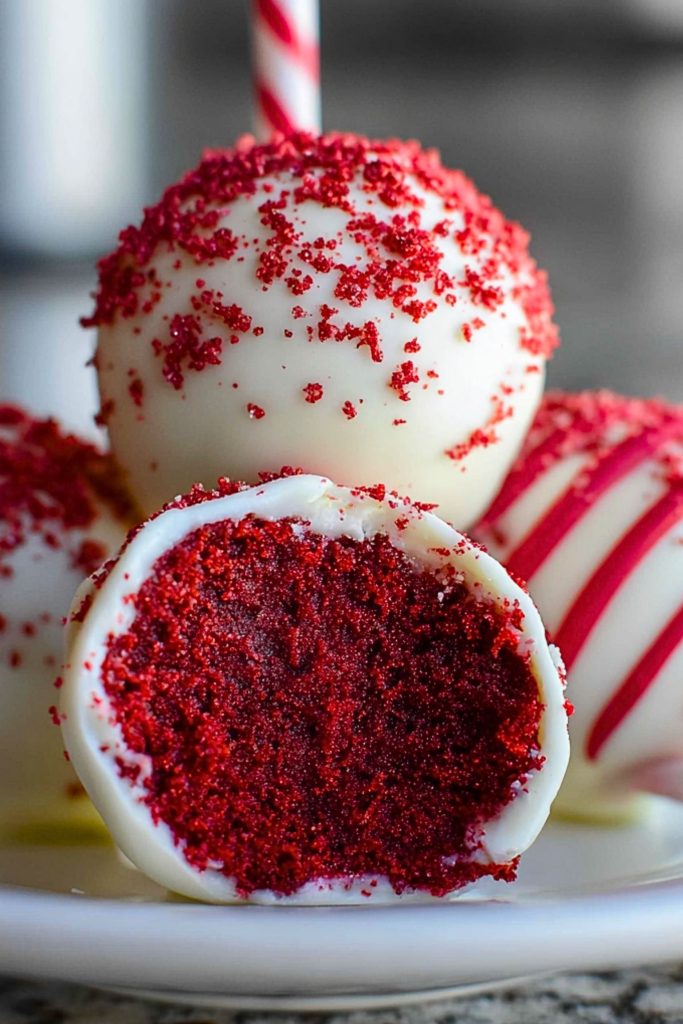
I’ve always had a soft spot for red velvet, and turning that classic cake into bite-sized, dipped delights just feels magical. These Perfect Red Velvet Cake Pops are moist, tender, and rich with a hint of cocoa—then coated in a silky layer of white chocolate and finished with a gorgeous red crumble. They’re not just cute; they’re irresistible. I love making them for parties, birthdays, or just as a weekend treat when I’m craving something sweet but don’t want to bake an entire cake.
What I enjoy most about cake pops is how customizable they are. Once you master the technique, the flavor possibilities are endless. But the red velvet version? It hits differently. There’s something about that bold red center paired with the creamy exterior that gets everyone’s attention—both visually and in taste. Whether you’re gifting them or serving at a celebration, they always disappear fast.
Why You’ll Love This Perfect Red Velvet Cake Pops Recipe
These cake pops aren’t just delicious—they’re a showstopper. The combination of velvety cake and cream cheese frosting creates a truffle-like center that’s coated in smooth, sweet white chocolate. They’re easy to serve, fun to decorate, and they freeze beautifully, making them the ideal make-ahead treat. Plus, they’re an instant crowd-pleaser for both kids and adults.
What Kind of Red Velvet Cake Should I Use?
You can use a homemade red velvet cake, a box mix, or even leftover cake from another celebration—it all works. Personally, I prefer baking a fresh, moist red velvet cake with a slight cocoa depth and that signature tang from buttermilk. But if I’m in a rush, I won’t hesitate to grab a boxed red velvet mix. Just make sure the cake is cooled completely before crumbling—it makes the mixing easier and keeps the texture just right.
Options for Substitutions
If you’re feeling adventurous or need to adjust for dietary preferences, here are a few easy swaps:
- Cake Base: Try chocolate cake for a richer pop or a vanilla cake dyed red if you’re out of cocoa powder.
- Frosting: Traditional cream cheese frosting is classic, but buttercream or mascarpone-based frostings also work beautifully.
- Coating: Instead of white chocolate, go with dark or milk chocolate melts, or use candy melts in various colors for festive themes.
- Gluten-Free Option: Use a gluten-free cake mix and ensure the frosting and chocolate are gluten-free certified.
- Vegan Option: Use a plant-based cake and frosting recipe, and dairy-free chocolate for coating.
These swaps make it easy to tailor the recipe to your taste or dietary needs without sacrificing flavor or presentation.
Ingredients for This Perfect Red Velvet Cake Pops Recipe
- Red Velvet Cake
This is the heart of the recipe. You’ll need a fully baked red velvet cake, either homemade or from a mix. Its deep color and subtle cocoa flavor make the cake pops stand out. - Cream Cheese Frosting
It binds the crumbled cake together into moist, scoopable dough. The tanginess from the cream cheese balances the sweetness of the cake and coating. - White Chocolate or Candy Melts
Used for dipping, this creates the smooth, creamy shell that encases each cake pop. Choose high-quality white chocolate or vibrant candy melts for a clean finish. - Red Velvet Crumbs or Sprinkles
Optional, but highly recommended for decoration. They add texture and enhance the visual appeal with a pop of color. - Lollipop Sticks
Essential for holding the cake pops together and turning them into fun, handheld treats. - Vegetable Oil or Shortening (optional)
A small amount can be mixed into the melted chocolate to thin it out for easier dipping and a glossier finish.
Step 1: Bake and Cool the Cake
Prepare your red velvet cake according to your recipe or box mix instructions. Let it cool completely—this is crucial to avoid a gummy texture when mixing with frosting.
Step 2: Crumble the Cake
Once cooled, break the cake into fine crumbs using your hands or a food processor. The finer the crumb, the smoother the cake pop texture will be.
Step 3: Mix with Frosting
In a large bowl, add a few spoonfuls of cream cheese frosting to the cake crumbs. Start with a little—you can always add more. Mix until the texture resembles playdough: moist but not sticky.
Step 4: Shape into Balls
Using a small cookie scoop or your hands, roll the mixture into even balls, about 1 to 1.5 inches wide. Place them on a lined baking sheet.
Step 5: Chill the Balls
Refrigerate the balls for at least 1–2 hours, or place them in the freezer for 30 minutes. This helps them firm up and hold their shape when dipped.
Step 6: Insert the Sticks
Dip the tip of each lollipop stick into melted chocolate, then insert it halfway into each chilled cake ball. This step anchors the stick in place once the chocolate hardens.
Step 7: Dip and Decorate
Dip each cake pop into the melted white chocolate or candy coating. Let the excess drip off gently. Before the coating sets, sprinkle with red velvet crumbs or decorations.
Step 8: Set and Serve
Stick the pops upright into a styrofoam block or cake pop stand and allow the coating to fully harden. Once set, they’re ready to serve or store for later.
How Long to Cook the Perfect Red Velvet Cake Pops
While the cake itself needs to be baked according to its recipe—typically 25–35 minutes—the cake pops don’t require any actual cooking after that. Once assembled, the most time-consuming step is the chilling phase. You’ll need about 1–2 hours of refrigeration or 30 minutes in the freezer to get the balls firm enough to dip. The chocolate coating hardens within 15 minutes at room temperature or faster if chilled.
Tips for Perfect Red Velvet Cake Pops
- Don’t Overdo the Frosting: Add just enough to bind the cake crumbs. Too much frosting makes the pops overly soft and hard to dip.
- Crumbs Matter: Finely crumbled cake ensures a smooth and cohesive pop. Large chunks lead to lumpy texture and unstable shapes.
- Chill Well Before Dipping: Cold cake balls are easier to coat and hold their shape better. If they’re too soft, they’ll fall off the stick.
- Use Quality Chocolate: Whether it’s white chocolate chips or candy melts, better quality means smoother melting and easier coating.
- Thin the Chocolate if Needed: Add a small amount of vegetable oil or shortening if your coating is too thick.
- Decorate Quickly: Add sprinkles or crumbs before the coating sets to ensure they stick well.
- Work in Batches: Keep uncoated cake balls chilled while working to maintain firmness as you dip and decorate.
Watch Out for These Mistakes While Cooking
- Using Warm Cake: Crumbling cake before it’s fully cooled leads to mushy dough and uneven texture.
- Too Much Frosting: It’s a common mistake that results in soggy cake pops that won’t hold their shape.
- Skipping the Chill Time: Under-chilled cake balls fall apart during dipping and can slide off the sticks.
- Thick or Overheated Chocolate: If your coating is too thick or too hot, it won’t coat smoothly and may crack as it cools.
- Not Tapping Off Excess Coating: Leaving too much chocolate on the pop leads to uneven surfaces and drips.
- Incorrect Stick Placement: Inserting the stick too shallow or too deep can cause the pop to split or slide off.
- Storing Before Fully Set: Packing or moving the pops before the coating is hardened leads to smudges and damage.
What to Serve With Perfect Red Velvet Cake Pops?
Mini Cheesecake Bites
The tanginess of cheesecake pairs beautifully with the sweet creaminess of red velvet.
Fresh Berries and Whipped Cream
A refreshing counterbalance that lightens up the richness of the cake pops.
Espresso or Coffee
The slight bitterness of coffee enhances the chocolate notes in red velvet.
Vanilla Ice Cream
Serve one or two pops alongside a scoop for a fun, deconstructed dessert.
Champagne or Sparkling Wine
Perfect for celebrations, and the bubbly cuts through the sweetness nicely.
Chocolate Fondue Fountain
Dip the cake pops again in chocolate for double decadence—especially fun for parties.
Milkshakes or Freakshakes
Use the pops as a garnish on top of milkshakes for an Instagram-worthy treat.
Storage Instructions
To keep your Perfect Red Velvet Cake Pops fresh and fabulous, store them properly:
- Room Temperature: If serving within 1–2 days and the environment is cool, keep them in an airtight container at room temp.
- Refrigerator: For up to one week, place the pops in an airtight container lined with parchment to prevent sticking. Let them come to room temp before serving for the best texture.
- Freezer: Cake pops freeze beautifully. Wrap each pop in plastic wrap, then place in a freezer-safe container. They’ll last up to 2 months. Thaw in the fridge overnight before enjoying.
Estimated Nutrition (per cake pop, approx.)
- Calories: 180
- Total Fat: 9g
- Saturated Fat: 5g
- Trans Fat: 0g
- Cholesterol: 20mg
- Sodium: 140mg
- Total Carbohydrates: 23g
- Dietary Fiber: 0.5g
- Sugars: 17g
- Protein: 2g
Note: These values can vary depending on the type of cake, frosting, and coating used.
Frequently Asked Questions
Can I make these cake pops ahead of time?
Absolutely. They can be made up to a week in advance and stored in the fridge or even frozen for longer shelf life.
Why are my cake pops cracking after dipping?
This usually happens when the cake balls are too cold and the melted chocolate is too hot. Let the balls sit for a few minutes after chilling before dipping.
Can I use store-bought frosting?
Yes, you can. Just be mindful of the texture—some store-bought frostings are softer and might require less to bind the crumbs.
What’s the best way to thin candy melts?
Add a small amount of vegetable oil or shortening and stir until smooth. This helps achieve a silky finish for dipping.
Can I use dark chocolate instead of white?
Of course! Dark or milk chocolate works well if you prefer a richer flavor. Just adjust the topping to contrast well visually.
How do I prevent the sticks from falling out?
Dipping the stick tip in melted chocolate before inserting helps secure it. Chill again briefly after inserting to set.
Can I skip the lollipop sticks and just make cake truffles?
Yes, you can serve them as truffles in mini cupcake liners for a more elegant presentation.
How do I get a smooth chocolate coating?
Use properly melted, thinned chocolate and dip in one motion. Tap gently and rotate to allow excess to drip off evenly.
Conclusion
Making Perfect Red Velvet Cake Pops is equal parts fun and satisfying. Whether you’re prepping for a celebration or simply want to turn a classic cake into adorable treats, these pops are guaranteed to impress. With just a few steps and simple ingredients, you’ll have a tray of vibrant, delicious bites that look like they came straight from a bakery. Once you try them, you’ll understand why they’re always the first to disappear at any gathering.

Perfect Red Velvet Cake Pops Recipe
- Prep Time: 45 minutes
- Cook Time: None
- Total Time: 1 hour 45 minutes
- Yield: 24 cake pops
- Category: Dessert
- Method: No-bake
- Cuisine: American
- Diet: Vegetarian
Description
These Perfect Red Velvet Cake Pops are bite-sized treats with a rich, moist red velvet cake center, bound with cream cheese frosting and dipped in creamy white chocolate. Perfect for parties, gifting, or anytime indulgence, they’re easy to make, stunning to present, and absolutely irresistible.
Ingredients
3 cups crumbled red velvet cake (baked and cooled)
1/2 cup cream cheese frosting
2 cups white chocolate or candy melts
1 tablespoon vegetable oil or shortening (optional, for thinning chocolate)
2 tablespoons red velvet cake crumbs or sprinkles (for decoration)
24 lollipop sticks
Instructions
1. Bake the red velvet cake according to your recipe or box instructions. Let it cool completely.
2. Crumble the cooled cake into fine crumbs using your hands or a food processor.
3. Add cream cheese frosting gradually and mix until the texture resembles playdough.
4. Roll the mixture into 1 to 1.5-inch balls and place them on a lined baking sheet.
5. Chill the cake balls for 1–2 hours in the fridge or 30 minutes in the freezer.
6. Dip the tip of each lollipop stick into melted chocolate and insert halfway into each ball.
7. Dip each pop into melted white chocolate or candy melts, tapping off the excess.
8. Sprinkle with red velvet crumbs or decorations before the coating sets.
9. Place upright in a stand and allow the coating to harden completely before serving.
Notes
Prep time: 45 minutes
Chill time: 1–2 hours
Yield: 24 cake pops
Category: Dessert
Calories: 180 per pop
Sugar: 17g
Sodium: 140mg
Fat: 9g
Saturated Fat: 5g
Unsaturated Fat: 3g
Trans Fat: 0g
Cholesterol: 20mg
Carbohydrates: 23g
Fiber: 0.5g
Protein: 2g
Nutrition
- Serving Size: 1 cake pop
- Calories: 180
- Sugar: 17g
- Sodium: 140mg
- Fat: 9g
- Saturated Fat: 5g
- Unsaturated Fat: 3g
- Trans Fat: 0g
- Carbohydrates: 23g
- Fiber: 0.5g
- Protein: 2g
- Cholesterol: 20mg
Keywords: red velvet, cake pops, party dessert, cream cheese