

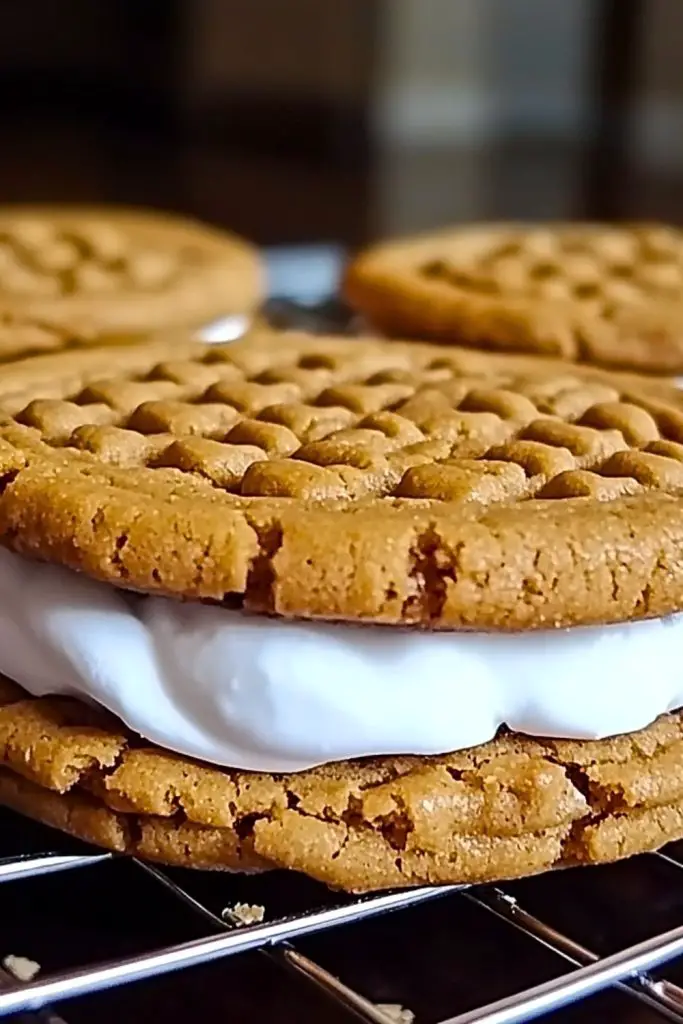
Imagine the soft, nutty richness of a classic peanut butter cookie fused with the gooey, nostalgic magic of s’mores. That’s what you get with these Peanut Butter S’mores Sandwich Cookies—a deliciously indulgent twist on two beloved treats. Perfect for both cozy nights and lively get-togethers, they combine creamy peanut butter, toasted marshmallow fluff, and melted chocolate in a way that’s practically irresistible.
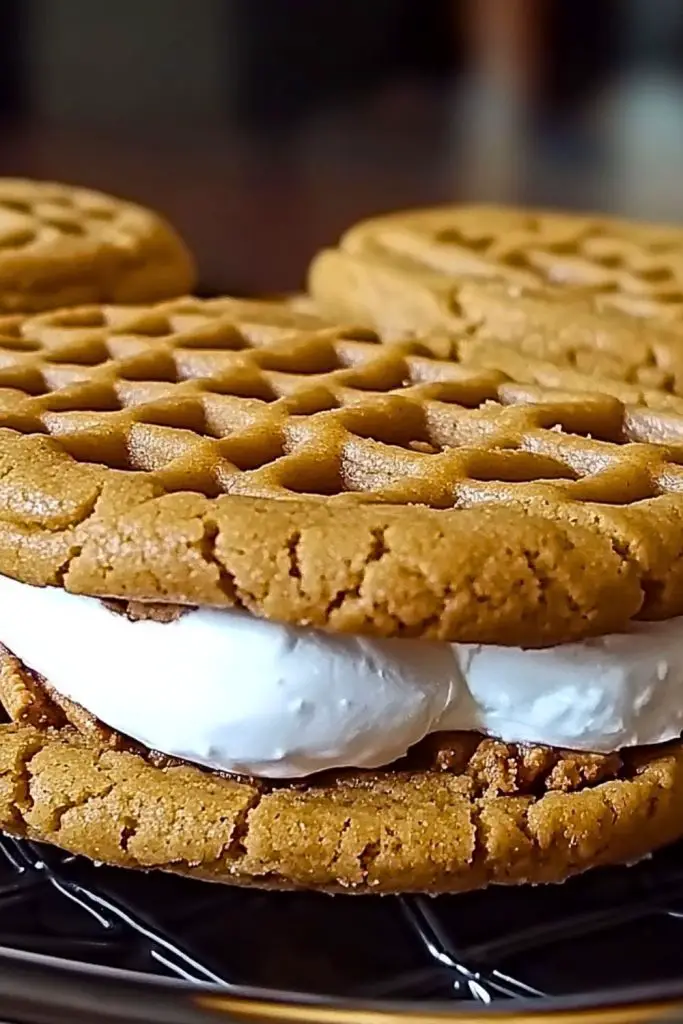
These cookie sandwiches aren’t just for kids (though they’ll love them too). With a crunchy outside and a soft, sticky center, they hit that perfect balance of texture and taste. Whether you’re looking to impress guests or just treat yourself, this recipe offers a memorable dessert experience that’s as easy to make as it is to devour.
Why You’ll Love This Peanut Butter S’mores Sandwich Cookies Recipe
- No campfire needed: All the joy of s’mores without leaving your kitchen.
- Texture heaven: Crunchy, chewy, gooey—all in one bite.
- Simple ingredients: Most of these are pantry staples.
- Kid-friendly and adult-approved: A crowd-pleaser at any event.
- Make-ahead magic: They store beautifully and taste even better the next day.
Preparation Phase & Tools to Use (Essential Tools and Equipment, and the Importance of Each Tool)
Creating Peanut Butter S’mores Sandwich Cookies is delightfully simple, but having the right tools makes all the difference for texture, consistency, and ease.
Essential Tools:
- Mixing Bowls
For combining your cookie dough and fillings. Use a large one for the dough and smaller ones for your marshmallow fluff and melted chocolate. - Hand Mixer or Stand Mixer
Crucial for achieving a smooth, creamy cookie dough. A mixer ensures your peanut butter, sugar, and egg are well blended for the perfect cookie base. - Baking Sheet
A sturdy, non-stick baking sheet is essential for evenly baked cookies with golden-brown edges. - Parchment Paper or Silicone Baking Mat
Keeps the cookies from sticking and makes cleanup a breeze. - Cookie Scoop or Tablespoon
Helps create uniform cookie sizes, ensuring even baking and ideal sandwiching. - Cooling Rack
Allows cookies to cool evenly and prevents them from becoming soggy underneath. - Spatula or Butter Knife
For spreading marshmallow fluff and chocolate onto the cookies cleanly and evenly.
Preparation Tips
- Soften the Peanut Butter Slightly
If your peanut butter is thick, microwave it for a few seconds. This helps it blend more easily into the dough. - Chill the Dough (Optional but Recommended)
If your dough feels sticky or soft, chilling it for 20–30 minutes helps control spreading and yields a thicker cookie. - Bake Evenly
Rotate the baking sheet halfway through baking to ensure all cookies are uniformly golden. - Use Room Temperature Ingredients
Especially the egg—this helps it incorporate better into the dough, creating a smooth and cohesive mix. - Don’t Overbake
Peanut butter cookies can become dry if overdone. Remove them just as the edges set and the centers look slightly soft—they’ll firm up as they cool.
Ingredients for This Peanut Butter S’mores Sandwich Cookies Recipe
Here’s everything you’ll need to bring these chewy, gooey delights to life:
For the Peanut Butter Cookies:
- 1 cup creamy peanut butter
(Choose a smooth, no-stir kind for best consistency) - 1 cup granulated sugar
(Can substitute half with brown sugar for deeper flavor) - 1 large egg
(Binds the dough and adds richness) - 1 teaspoon vanilla extract
(Enhances the peanut butter flavor)
For the S’mores Filling:
- 1 cup marshmallow fluff or marshmallow creme
(Creates that signature gooey center) - ½ cup chocolate spread (like Nutella or melted milk chocolate)
(Adds richness and balances the sweetness)
Optional: A pinch of sea salt to sprinkle on the chocolate layer for a salty-sweet touch.
These ingredients come together in the most effortless way, creating a dessert that feels nostalgic yet new.
Step-by-Step Instructions for Peanut Butter S’mores Sandwich Cookies
Let’s bring these irresistible sandwich cookies to life, step by delicious step.
Step 1: Preheat and Prep
Preheat your oven to 350°F (175°C).
Line a baking sheet with parchment paper or a silicone baking mat to prevent sticking and promote even baking.
Step 2: Make the Cookie Dough
In a large bowl, combine the peanut butter, sugar, egg, and vanilla extract.
Mix with a hand mixer or stand mixer on medium speed until the dough is smooth and well incorporated. The dough will be thick and slightly sticky.
Step 3: Shape the Cookies
Using a cookie scoop or tablespoon, form small dough balls and place them on the prepared baking sheet about 2 inches apart.
Flatten each ball gently with a fork in a criss-cross pattern (a signature peanut butter cookie look).
Step 4: Bake
Bake for 8–10 minutes, or until the edges are just starting to turn golden.
The centers should look slightly soft—that’s how you keep them chewy.
Let them cool on the baking sheet for 5 minutes, then transfer to a wire rack to cool completely.
Step 5: Prepare the Filling
While the cookies are cooling, prepare the filling.
- Warm your chocolate spread slightly (10–15 seconds in the microwave) for easy spreading.
- Have your marshmallow fluff at room temperature for better texture.
Step 6: Assemble the Sandwiches
Once the cookies are completely cool, flip half of them upside down.
- Spread a layer of chocolate spread on the flat side.
- Then add a dollop of marshmallow fluff on top.
- Gently press another cookie on top to form a sandwich.
Tip: Don’t press too hard—just enough to get that nice gooey squish.
Step 7: Set and Serve
Allow the assembled cookies to sit for 10–15 minutes to let the filling settle (or refrigerate briefly to firm them up).
Serve and enjoy the ultimate treat!
Notes
- Customizable Fillings: While marshmallow fluff and chocolate are the classic s’mores combo, feel free to play with flavors—try hazelnut spread, white chocolate, or even a bit of raspberry jam for a fruity twist.
- Gluten-Free Friendly: These cookies naturally contain no flour, making them gluten-free. Just double-check the labels on your spreads to ensure they’re compliant.
- Double Batch It: These go fast! Consider doubling the recipe if you’re making them for a party or holiday tray.
- Make-Ahead Tip: You can bake the cookies a day in advance and assemble the sandwiches just before serving for peak freshness and texture.
- Warm Them Up: A quick 5–10 seconds in the microwave makes them gooey and melty like a true s’more.
Watch Out for These Mistakes While Cooking
1. Overbaking the Cookies
Peanut butter cookies firm up after cooling, so removing them from the oven too late leads to a dry, crumbly texture. Pull them once the edges are just golden.
2. Using Natural Peanut Butter
Natural peanut butter separates and creates an oily dough that doesn’t hold shape well. Stick to conventional creamy peanut butter for best results.
3. Skipping the Cooling Time
Warm cookies will fall apart during assembly. Be patient and let them cool completely before adding the filling.
4. Overfilling the Sandwiches
Too much marshmallow or chocolate can lead to oozing out the sides. Use a moderate amount and gently press the top cookie.
5. Using Hot Filling
Ensure the chocolate spread is only slightly warmed—not hot—so it doesn’t melt the cookie or cause the fluff to collapse.
What to Serve With Peanut Butter S’mores Sandwich Cookies?
These rich, gooey treats are delicious on their own—but pairing them with the right beverage or side can turn them into a full dessert experience. Whether you’re hosting or simply indulging at home, these ideas elevate the moment.
8 Recommendations
- Cold Milk (Classic Choice)
You can’t go wrong with a cold glass of milk—dairy or plant-based. It balances the richness and adds that nostalgic comfort. - Hot Chocolate with Marshmallows
For an ultra-cozy vibe, serve these cookies with creamy hot chocolate topped with whipped cream or extra marshmallows. - Coffee or Espresso
The nutty flavor of the peanut butter pairs beautifully with a bold cup of coffee or a strong espresso. - Vanilla Ice Cream
Use these cookies as a base for ice cream sandwiches or serve them alongside a scoop of vanilla or chocolate chip ice cream. - Fruit Platter
Strawberries, bananas, or apple slices provide a refreshing, juicy contrast to the dense sweetness of the cookies. - Milkshakes
Blend up a chocolate, peanut butter, or banana milkshake and pair it with a cookie or two for a retro-style dessert. - Cheese Board with Dark Chocolate
For something more refined, include the cookies in a dessert cheese board featuring nuts, chocolate, and soft cheeses like brie. - Whipped Cream Dips
Serve the cookies with a small bowl of whipped cream or cream cheese frosting for dunking—especially fun for parties!
Storage Instructions
To keep your Peanut Butter S’mores Sandwich Cookies fresh, flavorful, and texturally perfect, here’s how to store them properly:
Room Temperature
- Store assembled cookies in an airtight container.
- Keep in a cool, dry place for up to 3 days.
- Place parchment paper between layers to prevent sticking.
Refrigerator
- Extend their freshness by refrigerating them for up to 1 week.
- Let them sit at room temperature for a few minutes before serving to soften slightly.
Freezer
- You can freeze the unassembled cookies for up to 2 months.
Wrap in plastic wrap and store in a zip-top freezer bag. - Thaw cookies at room temp, then add the filling fresh for the best texture.
- Assembled cookies can also be frozen, but marshmallow fluff may become slightly grainy after thawing.
Estimated Nutrition (Per Sandwich Cookie)
Please note these are approximate values and may vary based on brand and portion size.
- Calories: ~240 kcal
- Total Fat: 13g
- Saturated Fat: 4g
- Cholesterol: 20mg
- Sodium: 130mg
- Total Carbohydrates: 28g
- Sugars: 22g
- Protein: 5g
- Fiber: 1g
These are rich treats meant to be savored—perfect as a satisfying dessert or special snack.
Frequently Asked Questions
1. Can I use crunchy peanut butter instead of creamy?
Yes! Crunchy peanut butter adds texture and a bit of extra crunch. Just make sure it’s not a natural or oily kind, as that can affect the dough consistency.
2. How do I keep the marshmallow fluff from oozing out?
Use a moderate amount of fluff and don’t overpress the cookies when sandwiching. Chilling the assembled cookies briefly also helps the filling stay in place.
3. Can I toast the marshmallow for a true s’mores flavor?
Absolutely! A small kitchen torch or quick broil can toast the marshmallow fluff before sandwiching. Just be careful not to overheat the cookie itself.
4. What if I don’t have parchment paper?
Grease your baking sheet lightly with butter or non-stick spray. Parchment just makes cleanup easier and helps prevent over-browning on the bottom.
5. Are these cookies safe for someone with gluten sensitivity?
Yes! This recipe is naturally gluten-free—just ensure that all other ingredients, like your spreads, are certified gluten-free.
6. Can I use regular marshmallows instead of fluff?
Not recommended for sandwiching—they don’t spread as well. However, if you melt them down slightly or toast and press them, they can work in a pinch.
7. How far in advance can I make these?
You can bake the cookies 2–3 days in advance. For the best texture, assemble the sandwiches the same day you plan to serve them.
8. Can kids help with this recipe?
Yes! Kids love helping shape the cookies and spreading the fillings. Just supervise the oven and any hot tools if toasting the marshmallow.
Conclusion
Peanut Butter S’mores Sandwich Cookies are a dreamy fusion of soft peanut butter cookies and classic s’mores magic—perfect for everything from birthday parties to late-night cravings. With minimal ingredients and maximum flavor, they bring the joy of campfire treats into your home kitchen in the most delicious way.
Whether you make them for a crowd or sneak a few just for yourself, these gooey cookie sandwiches are destined to become a repeat favorite. Warm, nostalgic, and incredibly satisfying—they’re everything a comfort dessert should be.

Peanut Butter S’mores Sandwich Cookies
- Prep Time: 10 minutes
- Cook Time: 10 minutes
- Total Time: 20 minutes
- Yield: About 10 sandwich cookies
Description
Craving something that’s gooey, nutty, chocolatey, and utterly satisfying? These Peanut Butter S’mores Sandwich Cookies are your next go-to for a quick dessert fix. Perfect for fans of classic peanut butter cookies and lovers of all things s’mores, this easy recipe layers marshmallow fluff and melted chocolate between two rich, chewy peanut butter cookies. Whether you’re looking for new breakfast ideas, fun food ideas for kids, or a sweet treat to top off dinner, this easy recipe is loaded with nostalgic flavor and ready in no time. Irresistibly soft, delightfully sweet, and perfect for sharing—or keeping all to yourself!
Ingredients
For the Peanut Butter Cookies:
- 1 cup creamy peanut butter
- 1 cup granulated sugar
- 1 large egg
- 1 tsp vanilla extract
For the Filling:
- 1 cup marshmallow fluff
- 1/2 cup chocolate spread (or melted chocolate)
Optional: pinch of sea salt
Instructions
- Preheat oven to 350°F (175°C). Line a baking sheet with parchment paper.
- In a large bowl, mix peanut butter, sugar, egg, and vanilla until smooth.
- Scoop dough into tablespoon-sized balls. Place on baking sheet and flatten with fork.
- Bake for 8–10 minutes. Let cool on the sheet for 5 minutes, then transfer to a wire rack.
- Warm chocolate spread slightly for easy spreading.
- Flip half the cooled cookies upside down. Spread chocolate on the flat side.
- Top chocolate with marshmallow fluff. Sandwich with another cookie.
- Let sit for 10–15 minutes or refrigerate briefly before serving.