
These Orange Creamsicle Mini Cheesecakes are a dreamy dessert that combine the nostalgic flavors of a childhood creamsicle with the rich indulgence of creamy cheesecake. Each bite delivers a smooth orange-infused filling on top of a buttery graham cracker crust, crowned with a swirl of whipped cream and a sprinkle of citrus zest. They’re bright, tangy, and sweet—an irresistible treat that looks as beautiful as it tastes.
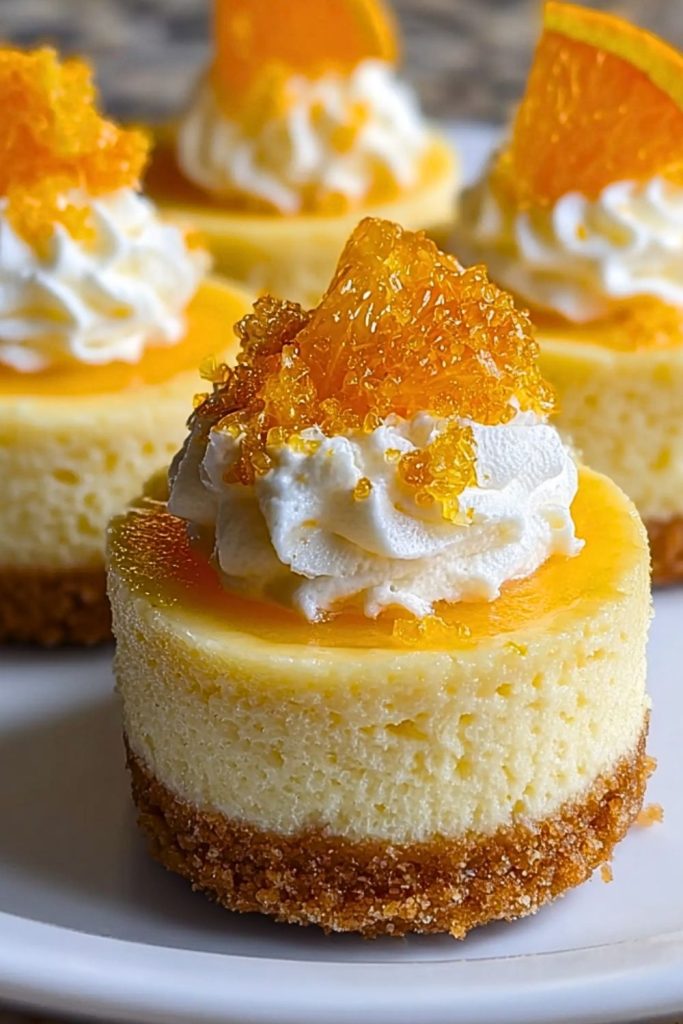
Perfectly portioned and bursting with flavor, these mini cheesecakes are ideal for parties, brunches, or a fun weekend baking project. The individual size makes them easy to serve, and the vibrant orange topping adds a touch of sunshine to any dessert table. Whether you’re a cheesecake lover or simply craving something refreshing and different, this recipe hits all the right notes.
Why You’ll Love This Orange Creamsicle Mini Cheesecakes Recipe
- Combines creamy texture with zesty citrus flavor for the ultimate dessert fusion.
- No slicing required—easy-to-serve individual portions.
- A showstopping treat that looks fancy but is surprisingly simple to make.
- Great make-ahead option for events or weekday indulgence.
Preparation Phase & Tools to Use
To achieve smooth, bakery-quality cheesecakes, a few essential tools make all the difference:
- 12-Cup Muffin Tin: Crucial for forming the mini cheesecake shapes.
- Cupcake Liners: Help with easy removal and maintain clean edges.
- Electric Mixer or Stand Mixer: Ensures a silky smooth cream cheese filling.
- Food Processor or Rolling Pin: Ideal for crushing graham crackers into fine crumbs for the crust.
- Zester or Microplane: To extract fresh orange zest that enhances the citrus flavor.
- Piping Bag: For beautiful, controlled whipped cream topping.
- Oven Thermometer (optional but helpful): Guarantees even baking temperature for a crack-free finish.
Each tool plays a role in getting the texture, flavor, and presentation just right. Don’t skip the liners or zester—they really bring the polish to this dessert.
Preparation Tips
Start with room-temperature cream cheese to ensure the filling whips up without lumps. Be gentle when mixing in the eggs—overbeating can introduce too much air, leading to cracks. Use fresh orange juice and zest for that authentic creamsicle flavor, not bottled juice or extracts. When baking, a water bath isn’t required for minis, but avoid opening the oven door too early. Once baked, cool the cheesecakes gradually and refrigerate for several hours to set. For perfect presentation, top with stabilized whipped cream just before serving and garnish with extra orange zest or a candied orange peel for flair.
Ingredients for Orange Creamsicle Mini Cheesecakes
For the Crust:
- 1 cup graham cracker crumbs (about 8 full sheets)
- 2 tablespoons granulated sugar
- 4 tablespoons unsalted butter, melted
For the Cheesecake Filling:
- 16 oz cream cheese, softened to room temperature
- 1/2 cup granulated sugar
- 1/4 cup sour cream
- 1/4 cup freshly squeezed orange juice
- 1 tablespoon orange zest
- 1 teaspoon vanilla extract
- 2 large eggs, room temperature
For the Topping:
- 1 cup heavy whipping cream
- 2 tablespoons powdered sugar
- 1/2 teaspoon vanilla extract
- Additional orange zest or candied orange peel, for garnish
Step 1: Prepare the Crust
Preheat your oven to 325°F (160°C). Line a 12-cup muffin tin with cupcake liners. In a medium bowl, combine the graham cracker crumbs, sugar, and melted butter. Mix until the texture resembles wet sand. Spoon about 1 to 1.5 tablespoons of the mixture into each liner and press down firmly using the bottom of a small glass or spoon to form a compact crust. Bake for 5-6 minutes until lightly golden. Remove from oven and let cool slightly while you prepare the filling.
Step 2: Make the Cheesecake Filling
In a large mixing bowl, beat the softened cream cheese using a hand mixer or stand mixer until smooth and creamy, about 2-3 minutes. Add in the granulated sugar and beat again until fully combined. Scrape down the sides as needed. Mix in the sour cream, orange juice, orange zest, and vanilla extract until the mixture is well blended. Finally, add the eggs one at a time, mixing on low speed after each just until combined. Do not overmix.
Step 3: Fill and Bake
Evenly divide the filling between the 12 muffin cups, pouring it over the pre-baked crusts. Gently tap the muffin tin on the counter to release any air bubbles. Bake at 325°F (160°C) for 18-22 minutes, or until the centers are set but still slightly jiggly. Avoid overbaking. Once done, turn off the oven, crack the door slightly, and allow the cheesecakes to cool in the oven for 10 minutes. Then remove and cool completely at room temperature. Transfer to the refrigerator and chill for at least 4 hours or overnight.
Step 4: Prepare the Whipped Cream Topping
Just before serving, beat the heavy whipping cream, powdered sugar, and vanilla extract in a chilled bowl until stiff peaks form. For best results, use a piping bag fitted with a star tip to swirl the cream attractively on top of each cheesecake.
Step 5: Garnish and Serve
Sprinkle extra orange zest or candied orange peel over the whipped cream. Serve chilled and enjoy the burst of citrusy creaminess in every bite. These mini cheesecakes can be served straight from the fridge and are best enjoyed within 2-3 days of preparation.
Notes
These Orange Creamsicle Mini Cheesecakes taste even better the next day after the flavors have had time to develop. Using fresh oranges is key for that authentic citrus flavor—avoid bottled juice or artificial flavoring for best results. If you want to get ahead, you can bake the cheesecakes a day in advance and pipe the whipped cream on just before serving. For a firmer whipped topping, stabilize it with a touch of gelatin or use whipped topping if preferred.
Watch Out for These Mistakes While Cooking
- Skipping room temperature ingredients: Cold cream cheese or eggs can result in a lumpy batter.
- Overmixing the batter: This can incorporate too much air, causing cracks during baking.
- Overbaking: The cheesecakes should still have a slight jiggle in the center when done. Overbaking leads to dry texture and cracking.
- Opening the oven door early: Sudden temperature changes can cause the cheesecakes to sink or crack.
- Not chilling long enough: Cheesecakes need at least 4 hours in the fridge to fully set.
Storage Instructions
Store the mini cheesecakes in an airtight container in the refrigerator for up to 5 days. If you’re making them in advance for an event, it’s best to add the whipped cream topping the day of serving. You can freeze the cheesecakes (without the whipped cream) for up to 2 months. Just wrap each one tightly in plastic wrap and then foil. Thaw in the fridge overnight before decorating and serving.
Estimated Nutrition (Per Mini Cheesecake)
- Calories: 285 kcal
- Total Fat: 21g
- Saturated Fat: 12g
- Cholesterol: 85mg
- Sodium: 190mg
- Total Carbohydrates: 20g
- Sugars: 15g
- Fiber: 0g
- Protein: 4g
Frequently Asked Questions
Can I make these mini cheesecakes without cupcake liners?
Yes, but liners make removal much easier and cleaner. If going without, use a silicone muffin pan or grease thoroughly and line with parchment rounds.
Can I use bottled orange juice?
Freshly squeezed orange juice is highly recommended for flavor. Bottled juice often contains preservatives that dull the citrus brightness.
Can I substitute the graham cracker crust?
Absolutely. You can try crushed vanilla wafers, gingersnaps, or even chocolate cookies for a different base flavor.
Do I need a water bath for mini cheesecakes?
No, a water bath isn’t necessary due to their small size, but you can use one if you want to ensure ultra-smooth tops.
How can I stabilize the whipped cream?
You can add a bit of unflavored gelatin dissolved in water, or use a commercial whipped topping for longer hold.
What’s the best way to zest an orange?
Use a fine microplane zester and only remove the orange part of the peel. Avoid the white pith—it’s bitter.
Can I make these gluten-free?
Yes, simply swap the graham crackers with a gluten-free version and ensure all other ingredients are certified gluten-free.
How long do they last in the freezer?
Wrapped tightly and stored properly, these mini cheesecakes will last up to 2 months in the freezer. Thaw overnight in the fridge before serving.
Conclusion
These Orange Creamsicle Mini Cheesecakes are a delightful blend of creamy, citrusy, and sweet flavors in a bite-sized dessert. They’re easy to make, stunning to serve, and guaranteed to impress. With a buttery crust, zesty filling, and a fluffy whipped cream crown, every bite tastes like sunshine. Perfect for any celebration or an elegant finish to a casual meal, this dessert deserves a spot in your baking repertoire.

Orange Creamsicle Mini Cheesecakes
- Prep Time: 20 minutes
- Cook Time: 22 minutes
- Total Time: 4 hours 50 minutes
- Yield: 12 mini cheesecakes
- Category: Dessert
- Method: Baking
- Cuisine: American
Description
Sunshine in every bite—these Orange Creamsicle Mini Cheesecakes are the perfect fusion of creamy indulgence and citrus brightness. With a buttery graham cracker crust, silky smooth orange-infused cheesecake, and a crown of whipped cream topped with fresh zest, this easy recipe is perfect for parties, sweet cravings, or brightening up your dessert game. Whether you’re searching for easy dessert ideas, make-ahead food ideas, or quick mini cheesecake recipes, this one checks all the boxes for taste, looks, and convenience.
Ingredients
1 cup graham cracker crumbs
2 tablespoons granulated sugar
4 tablespoons unsalted butter, melted
16 oz cream cheese, softened
1/2 cup granulated sugar
1/4 cup sour cream
1/4 cup freshly squeezed orange juice
1 tablespoon orange zest
1 teaspoon vanilla extract
2 large eggs, room temperature
1 cup heavy whipping cream
2 tablespoons powdered sugar
1/2 teaspoon vanilla extract
Extra orange zest or candied orange peel for garnish
Instructions
1. Preheat oven to 325°F (160°C) and line a 12-cup muffin tin with cupcake liners.
2. Mix graham cracker crumbs, 2 tablespoons sugar, and melted butter. Press into muffin cups and bake for 5–6 minutes. Let cool.
3. In a large bowl, beat cream cheese until smooth. Add sugar and beat again.
4. Mix in sour cream, orange juice, orange zest, and vanilla extract.
5. Add eggs one at a time, mixing gently until just combined.
6. Divide filling over crusts. Tap pan gently to release air bubbles.
7. Bake for 18–22 minutes until centers are set but slightly jiggly. Cool in oven for 10 minutes with the door ajar, then remove and let cool completely.
8. Chill in the refrigerator for at least 4 hours or overnight.
9. Beat whipping cream, powdered sugar, and vanilla until stiff peaks form. Pipe onto cheesecakes.
10. Garnish with orange zest or candied peel before serving.
Notes
Let your cream cheese come to room temperature before mixing for a smoother texture.
Use freshly squeezed orange juice and zest to avoid artificial flavors.
Chill the cheesecakes for several hours for the best set and flavor.
Nutrition
- Serving Size: 1 mini cheesecake
- Calories: 285
- Sugar: 15g
- Sodium: 190mg
- Fat: 21g
- Saturated Fat: 12g
- Unsaturated Fat: 7g
- Trans Fat: 0g
- Carbohydrates: 20g
- Fiber: 0g
- Protein: 4g
- Cholesterol: 85mg
Keywords: orange creamsicle cheesecake, mini cheesecake, easy dessert, citrus dessert, individual cheesecake, party dessert