
It all started when I found myself craving something sweet, rich, and nostalgic—but I didn’t want to turn on the oven. I had a few leftover Butterfinger bars from a holiday stash and decided to play around with them. What I ended up with were these unbelievably decadent No Bake Butterfinger Balls. They’ve got the perfect creamy, fudgy texture inside with that unmistakable Butterfinger crunch and flavor—and the best part is, they’re ridiculously easy to make.
I love recipes that come together quickly but feel like a treat you spent hours on. These are bite-sized desserts that deliver maximum satisfaction with minimal effort. They’re great for parties, gifting, or just a sneaky midnight snack. Whether you’re a lifelong Butterfinger fan or just looking for an easy no-bake dessert, this is the one.
Why You’ll Love These No Bake Butterfinger Balls
- No oven required: Just mix, chill, roll, and devour. Ideal for hot days or lazy nights.
- Bold Butterfinger flavor: Sweet, salty, and crunchy in all the right ways.
- Easy to make ahead: Store them in the fridge or freezer, and they’re ready anytime.
- Kid and crowd-approved: These little bites disappear fast at gatherings.
- Customizable: From chocolate coatings to different cookie crumbs—more on that soon.
What Kind of Butterfinger Should I Use?
For this recipe, I always reach for the classic Butterfinger candy bars. The regular size (not the bites or minis) gives you that perfect balance of flaky peanut butter layers and crunchy candy shell. I’ve tried using the fun-sized versions in a pinch, but you’ll need a few extra since the ratio of chocolate to filling can throw off the texture a bit.
You can crush the bars by hand in a zip-top bag with a rolling pin or pulse them briefly in a food processor. Just don’t turn them into powder—you want small chunks and shards that bring that signature crunch in every bite.
Options for Substitutions
While the classic Butterfinger flavor is the star here, you’ve got room to play if you’re feeling creative or need to adapt:
- Peanut Butter: Swap creamy for crunchy if you want more texture, or use almond butter for a twist.
- Graham Crackers: If you’re out of Butterfingers or want a milder option, crushed graham crackers can replace part of the mix.
- White Chocolate: Melted white chocolate can be used instead of regular candy coating for a sweeter, creamier shell.
- Cookie Butter: Want a nut-free option? Cookie butter gives you the same rich consistency with a spiced twist.
- Vegan Alternatives: Use plant-based chocolate and a vegan candy bar (like Nuttercups) if you want to keep it dairy-free.
These swaps let you personalize the treats or cater to dietary needs without losing that indulgent no-bake magic.
Ingredients for These No Bake Butterfinger Balls
Each ingredient in these little gems plays a big role in flavor and texture. Here’s what makes them irresistible:
- Butterfinger Candy Bars
These are the soul of the recipe, giving that signature peanut butter crunch and caramelized sweetness. - Creamy Peanut Butter
Acts as the binder and flavor base. It also brings creaminess that balances the crunch of the Butterfingers. - Powdered Sugar
Helps firm up the dough and sweetens the filling just right without any grainy texture. - Graham Cracker Crumbs (optional)
These can be added for a little structure and to cut down the richness if needed. - Candy Coating or Melting Chocolate
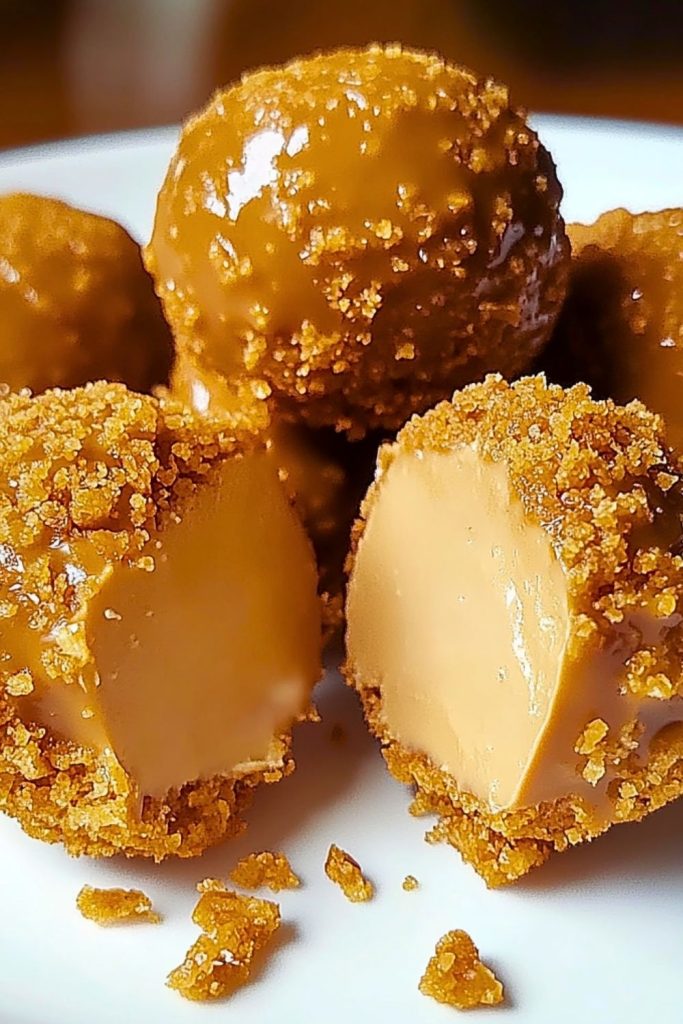
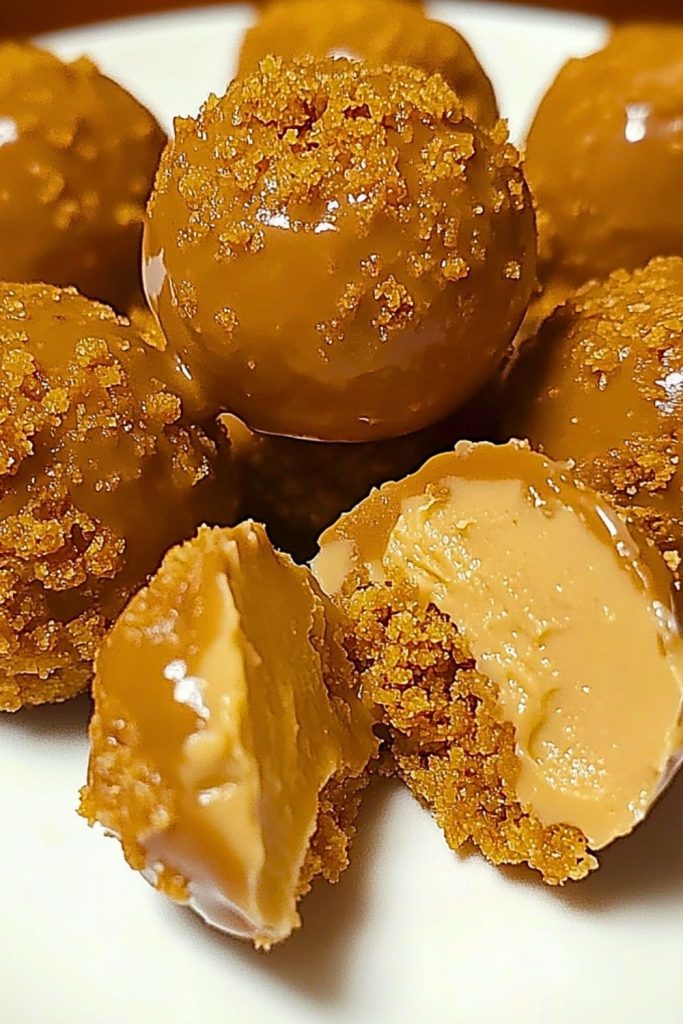
Creates that luscious, glossy shell around the truffle-like center. Choose milk, semi-sweet, or even white chocolate depending on your vibe. - Crushed Butterfinger (for coating)
A final roll in more crushed Butterfinger amps up the texture and visual appeal. It’s the finishing touch that makes them pop.
Step 1: Crush the Butterfinger Bars
Start by unwrapping your Butterfinger candy bars and placing them in a sealed zip-top bag. Use a rolling pin or heavy object to crush them into small chunks. Don’t overdo it—you want some texture, not dust.
Step 2: Mix the Filling
In a large bowl, combine the crushed Butterfingers with creamy peanut butter and powdered sugar. Use a spatula or your hands to blend everything into a cohesive, slightly sticky dough. If it feels too soft, pop it in the fridge for 10–15 minutes to firm up.
Step 3: Shape into Balls
Scoop out the mixture with a small cookie scoop or spoon and roll it into 1-inch balls between your palms. Line them up on a parchment-lined tray. Once done, chill them in the freezer for about 20 minutes. This helps them hold their shape when coated.
Step 4: Melt the Coating
Melt your candy coating or chocolate in a microwave-safe bowl, heating in 30-second intervals and stirring in between until smooth. Be careful not to overheat or burn the chocolate.
Step 5: Dip and Roll
Using a fork or skewer, dip each chilled ball into the melted coating. Let any excess drip off, then roll or sprinkle with extra crushed Butterfinger. Place them back on the parchment to set.
Step 6: Let Them Set
Allow the finished balls to set at room temperature or refrigerate them for quicker results. Once the coating hardens, they’re ready to eat—or store for later!
How Long to Cook the No Bake Butterfinger Balls
Technically, there’s no “cooking” involved—just chilling and setting. Here’s a quick timing breakdown:
- Prep Time: About 15–20 minutes to crush, mix, and roll.
- Chilling Time (before coating): 20 minutes in the freezer.
- Setting Time (after dipping): 15–30 minutes in the fridge or at room temp, depending on your environment.
From start to finish, you’re looking at roughly 1 hour total, but most of that is hands-off. Perfect for fitting into a busy day.
Tips for Perfect No Bake Butterfinger Balls
- Use room temperature peanut butter for easy mixing—it helps everything blend smoothly.
- Chill the filling well before dipping to prevent balls from falling apart in the melted coating.
- Don’t overheat the chocolate—low and slow melting keeps it glossy and smooth.
- Work in batches if needed: Keep half the balls in the freezer while dipping the rest.
- Line your tray with parchment for easy cleanup and to avoid sticking.
- Use gloves when rolling if you find the mixture too sticky to handle comfortably.
- Drizzle extra chocolate over the top for a more polished, dessert-shop look.
These tricks make a big difference in both appearance and ease of assembly!
Watch Out for These Mistakes While Cooking
Even though this is a no-bake recipe, there are a few common pitfalls that can throw things off:
- Using melted peanut butter: If your peanut butter is too runny (from overheating or natural oil separation), the mixture won’t hold together well. Stick with thick, room-temperature peanut butter.
- Skipping the chilling step: Rolling warm dough into balls will be messy, and dipping them in chocolate will lead to a gooey mess. Chill them first!
- Overcrushing the Butterfinger: Turning the bars into powder will rob you of that signature crunch. You want small chunks for texture.
- Overheating the chocolate: High heat can cause seizing or a gritty texture. Always melt low and slow.
- Not working fast enough: Once dipped, the chocolate coating sets quickly. Have your toppings ready for sprinkling while the surface is still tacky.
What to Serve With No Bake Butterfinger Balls?
These indulgent treats shine on their own, but they’re even better when paired with the right drinks or snacks.
Coffee or Espresso
The bitterness of coffee balances the sweetness perfectly and enhances the nutty flavors.
Vanilla Ice Cream
Serve a few Butterfinger Balls on the side for a killer dessert combo—hot and cold, creamy and crunchy.
Chocolate Milkshake
Double down on the indulgence by pairing these bites with a thick, creamy chocolate shake.
Salted Pretzels
The salty crunch of pretzels contrasts beautifully with the sweet and creamy center of the balls.
Fresh Berries
Brighten up the richness with a bowl of strawberries or raspberries—bonus points for dipping them in chocolate too.
Hot Cocoa
Especially during the colder months, this duo is a cozy, comforting treat.
Milk or Plant-Based Milk
Simple and classic. The creamy drink helps cut through the richness and balances each bite.
Mini Cheesecake Bites
Add variety to your dessert spread with other bite-sized treats for a stunning party tray.
Storage Instructions
These No Bake Butterfinger Balls store beautifully, making them ideal for prepping ahead:
- Refrigerator: Store in an airtight container for up to 2 weeks. Keep them chilled to maintain the firm texture and keep the coating from melting.
- Freezer: Freeze for up to 3 months. Lay them in a single layer on a baking sheet first, freeze until solid, then transfer to a zip-top bag or container. Let them thaw for 5–10 minutes at room temp before serving.
- Room Temperature: If your environment is cool (under 70°F), they can sit out for a few hours—perfect for parties or gifting. Just avoid direct sunlight or warm kitchens.
Pro tip: Layer with parchment paper if stacking, so the balls don’t stick together.
Estimated Nutrition
Here’s a general idea of what you’re indulging in—based on one Butterfinger Ball (yielding about 24–28 per batch):
- Calories: ~145
- Fat: 9g
- Carbohydrates: 15g
- Sugar: 11g
- Protein: 2g
- Sodium: 60mg
- Fiber: <1g
Note: These values can vary depending on the exact size and your choice of chocolate or peanut butter. For more precise data, use a nutrition calculator with your specific ingredient brands.
Frequently Asked Questions
Can I make these ahead of time?
Absolutely! These are perfect for prepping in advance. Store them in the fridge or freezer and just bring them out when you’re ready to serve.
Can I use natural peanut butter?
It’s best to use regular creamy peanut butter. Natural peanut butter tends to separate and can make the mixture too oily and loose.
How do I keep the chocolate coating smooth?
Melt your chocolate gently and stir constantly. If needed, add a teaspoon of coconut oil or shortening to thin it out and make dipping easier.
Can I make these without peanut butter?
Yes, you can try using cookie butter or sunflower seed butter for a nut-free alternative, but the flavor and texture will be slightly different.
Can I use other candy bars instead of Butterfinger?
Totally! Crushed Snickers, Twix, or Reese’s can also work—just know the end result will have a different flavor profile.
What’s the best way to crush the Butterfingers?
Place them in a zip-top bag and smash with a rolling pin or pulse them briefly in a food processor. Aim for small chunks, not dust.
Can I dip them in white chocolate instead?
Definitely! White chocolate gives a sweeter and creamier shell. It also looks great when drizzled with dark chocolate for contrast.
Are these gluten-free?
They can be if you use gluten-free candy bars and ensure any optional graham crumbs or coatings are gluten-free as well.
Conclusion
These No Bake Butterfinger Balls are everything a quick dessert should be: easy, rich, crave-worthy, and totally customizable. Whether you’re whipping them up for a party tray, sneaking a late-night snack, or giving them as edible gifts, they always hit the sweet spot. No oven, no stress—just pure peanut-buttery, chocolate-drenched joy.
Now that you’ve got the full breakdown, you’re only a few steps away from your next no-bake favorite.

Mouthwatering No Bake Butterfinger Balls
- Prep Time: 20 minutes
- Chill Time: 20 minutes
- Total Time: 40 minutes
- Yield: 24–28 balls
Description
These No Bake Butterfinger Balls are rich, creamy, and packed with crunchy Butterfinger goodness. They come together with just a few ingredients and require zero baking, making them perfect for quick treats, party platters, or edible gifts. A peanut-buttery center coated in smooth chocolate and topped with extra crushed Butterfinger—what’s not to love?
Ingredients
- 1 1/2 cups crushed Butterfinger candy bars (plus extra for topping)
- 1 cup creamy peanut butter
- 1 1/2 cups powdered sugar
- Optional: 1/2 cup graham cracker crumbs (for structure)
- 2 cups candy coating or melting chocolate (milk, semi-sweet, or white)
Instructions
- Place unwrapped Butterfinger bars in a zip-top bag and crush them into small chunks.
- In a mixing bowl, combine crushed Butterfinger, peanut butter, powdered sugar, and graham cracker crumbs if using.
- Mix until fully combined and a thick dough forms.
- Roll mixture into 1-inch balls and place on a parchment-lined tray.
- Freeze the balls for 20 minutes to firm up.
- Meanwhile, melt the candy coating in 30-second intervals, stirring until smooth.
- Dip each chilled ball into the melted coating, letting the excess drip off.
- Immediately roll or sprinkle with extra crushed Butterfinger.
- Let the coated balls set on parchment until the chocolate hardens.
- Store in an airtight container in the fridge or freezer.