

If there’s one pastry I find myself making over and over again, it’s the Mini Cheese Danish. These little pockets of flaky, buttery layers wrapped around a creamy, sweetened cheese center are simply irresistible. Whether I’m planning a brunch, hosting guests for coffee, or craving a cozy weekend treat, this recipe always comes through. They’re the perfect size for snacking, yet rich and satisfying enough to be the centerpiece of a breakfast spread.
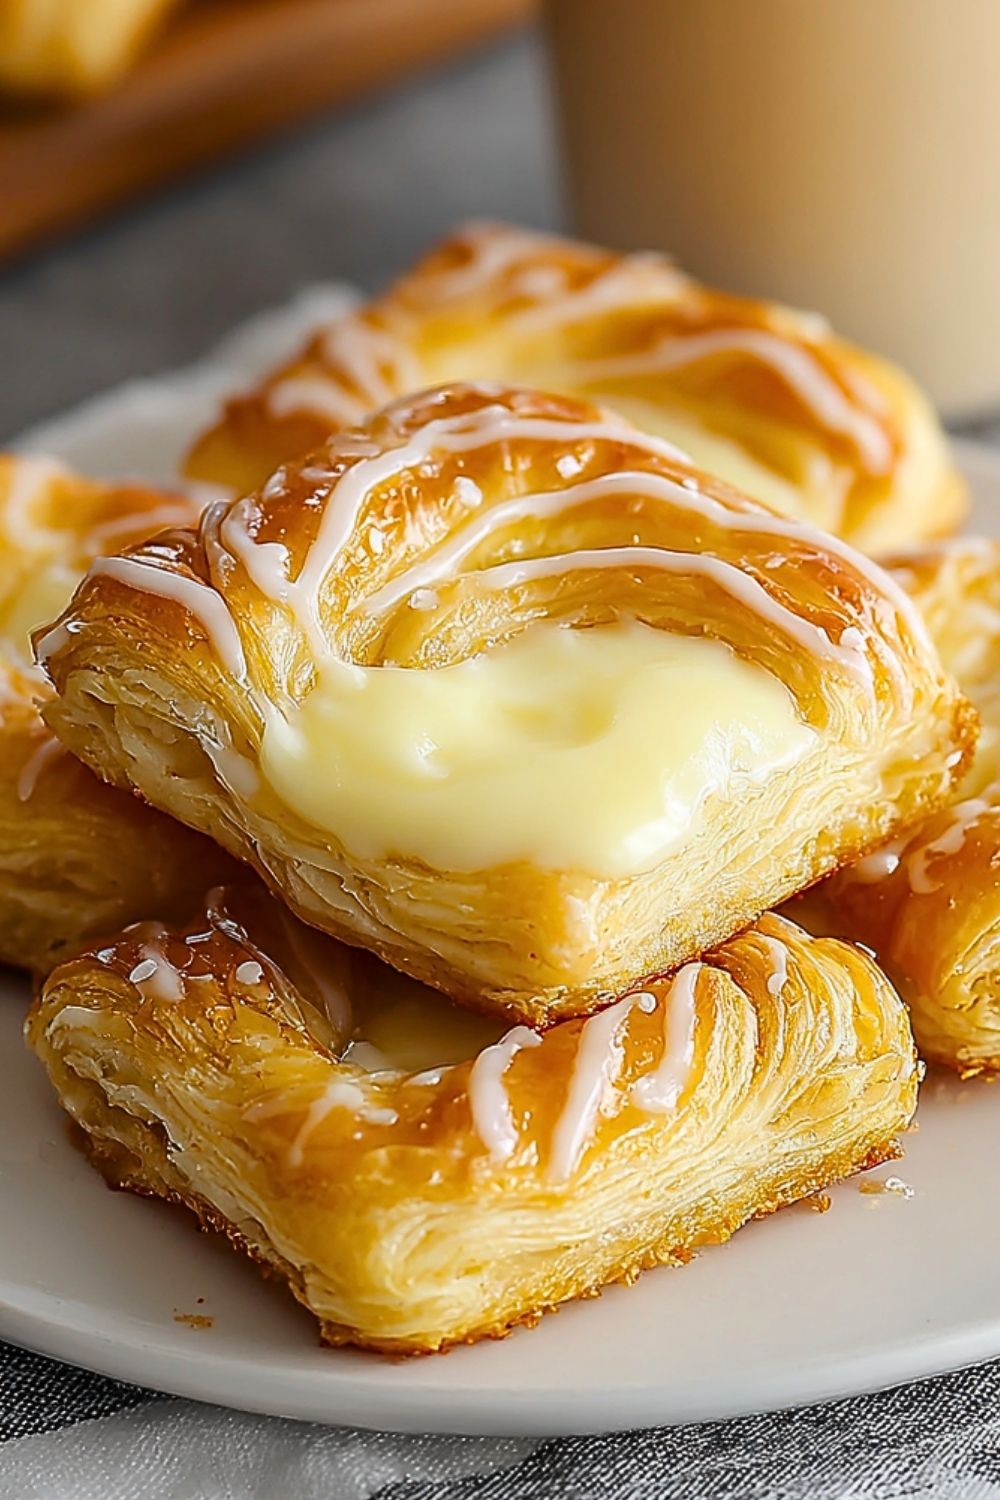
I love how they feel both indulgent and easy to make. With store-bought puff pastry and a simple cream cheese filling, you can whip up bakery-style danishes in under 30 minutes. They’re golden, glossy, slightly crisp on the outside, and soft and creamy inside — the contrast is so satisfying. Trust me, once you taste them fresh from the oven, you’ll understand why these little pastries disappear faster than any other dessert I bake.
Why You’ll Love This Mini Cheese Danish
These danishes are everything you want in a pastry — easy to make, visually impressive, and absolutely delicious. They bake up beautifully golden with a luscious cream cheese center that’s subtly sweet and tangy. You don’t need any fancy equipment or pastry skills to pull them off, making them a perfect treat for beginners and pros alike. Plus, they freeze well, reheat wonderfully, and are always a hit at breakfast tables or on dessert platters.
What Kind of Puff Pastry Should I Use?
For the best texture and flavor, use a high-quality all-butter puff pastry if you can find it. Brands like Dufour offer incredibly rich, flaky layers that really elevate the danish. That said, most store-bought puff pastry will work well — just make sure it’s thawed properly in the fridge so it stays cold but pliable when you’re working with it. Avoid using overly soft or warm dough, as that can cause the layers to melt together before baking.
Options for Substitutions
No cream cheese? Ricotta or mascarpone can step in, though the flavor will shift slightly. Want to make it sweeter? Add a touch more powdered sugar or a swirl of fruit jam in the center. For a lighter option, try low-fat cream cheese — just keep in mind it may result in a slightly looser texture after baking. You can also drizzle with chocolate or lemon glaze instead of the classic vanilla icing if you’re feeling adventurous.
Ingredients for This Mini Cheese Danish
- Puff Pastry Sheets – The essential base that gives each danish its beautiful layers and crispy golden exterior.
- Cream Cheese – Softened to room temperature, this forms the rich, tangy filling that contrasts beautifully with the sweet glaze and buttery pastry.
- Granulated Sugar – Added to sweeten the cream cheese just enough without overwhelming its flavor.
- Vanilla Extract – Infuses the filling with warm, comforting flavor and enhances the overall taste.
- Lemon Juice (optional) – A small splash adds brightness and cuts through the richness of the cheese.
- Egg (for egg wash) – Brushed on the pastry for a shiny, golden finish.
- Powdered Sugar – Used to make the simple glaze that’s drizzled over the top.
- Milk or Cream (for glaze) – Just a little liquid helps smooth the powdered sugar into a drizzleable consistency.

Step 1: Prepare the Puff Pastry
Thaw the puff pastry in the refrigerator until it’s pliable but still cold. Lay it out on a lightly floured surface and gently roll it to smooth the creases and even out the thickness. Cut each sheet into 6 equal squares (or rectangles, depending on your preference).
Step 2: Make the Cream Cheese Filling
In a medium bowl, combine the softened cream cheese, granulated sugar, vanilla extract, and lemon juice (if using). Mix until completely smooth and creamy. The filling should be thick but spreadable.
Step 3: Fill and Shape the Danishes
Spoon about a tablespoon of the cream cheese filling into the center of each puff pastry square. Fold or shape the edges if desired — you can leave them open-faced or fold the corners toward the center for a more enclosed look. Place them on a parchment-lined baking sheet with a bit of space between each one.
Step 4: Apply the Egg Wash
Beat the egg with a tablespoon of water, then lightly brush the edges of the pastry with the egg wash. This will give the danish a beautiful golden color when baked.
Step 5: Bake to Perfection
Preheat the oven to 400°F (200°C). Bake the danishes for 15-18 minutes, or until puffed and deeply golden brown. Keep an eye on them during the last few minutes — the edges should be crisp, and the bottoms lightly browned.
Step 6: Cool and Glaze
Let the danishes cool on the baking sheet for 10 minutes, then drizzle with glaze made by whisking together powdered sugar and milk until smooth. Serve warm or at room temperature.
How Long to Prepare the Mini Cheese Danish
Preparation Time
Most of your time will be spent prepping the puff pastry and mixing the filling. If your puff pastry is already thawed, this part takes just about 10 minutes. Shaping and filling the danishes is quick and easy — it’s more assembly than baking science.
Baking Time
The pastries bake for 15–18 minutes in a preheated 400°F oven. After that, give them about 10 minutes to cool before drizzling with glaze. Altogether, you’re looking at just under 30 minutes from start to finish, which is impressive for something that looks and tastes bakery-made.
Tips for Perfect Mini Cheese Danishes
- Keep your puff pastry cold until you’re ready to work with it — warm dough can get sticky and lose its flakiness.
- Don’t overfill the centers. A heaping tablespoon of filling is enough to keep them tidy and avoid leaking.
- Use parchment paper to prevent sticking and make cleanup easier.
- Let the danishes cool slightly before glazing — if they’re too hot, the glaze will melt right off.
- For a shinier finish, brush a little simple syrup on top just after baking.
Watch Out for These Mistakes While Cooking
- Not thawing the puff pastry properly – It should be soft enough to unfold but still cold. Microwave-thawed pastry often turns sticky.
- Skipping the egg wash – This step adds golden color and helps the pastry bake evenly.
- Overbaking – These pastries brown quickly. Keep an eye on them after 15 minutes.
- Under-mixing the filling – Lumpy cream cheese won’t give you that smooth, creamy bite.
- Using warm filling – It can soften the pastry and lead to a soggy base. Keep the filling cool.
What to Serve With Mini Cheese Danish?
1. Fresh Berries
Their bright flavor pairs beautifully with the rich filling.
2. Hot Coffee or Espresso
The slight bitterness cuts through the sweetness perfectly.
3. Scrambled Eggs
A savory egg dish balances out a sweet breakfast.
4. Greek Yogurt with Honey
Adds a creamy, tangy complement to the pastry.
5. Sparkling Water with Lemon
Keeps things light and refreshing, especially at brunch.
Storage Instructions
Room Temperature
If you plan to eat the danishes within 1 day, store them in an airtight container at room temperature. Make sure they’re completely cool before storing to avoid condensation.
Refrigeration
For up to 3 days of freshness, keep them refrigerated. The pastry may soften slightly, but they’ll still taste delicious. You can reheat them in a toaster oven to bring back that crispness.
Freezing
These danishes freeze beautifully. Freeze them unglazed for up to 2 months. When ready to serve, reheat at 350°F for 8–10 minutes and drizzle with fresh glaze.
Estimated Nutrition
(Per 1 mini danish, based on average ingredient values)
- Calories: ~230
- Fat: 15g
- Saturated Fat: 8g
- Carbohydrates: 20g
- Sugar: 8g
- Protein: 3g
- Sodium: 150mg
- Fiber: 0g
Frequently Asked Questions
How do I know when the danishes are done baking?
The pastry should be deeply golden, puffed, and the bottoms lightly browned. They’ll firm up slightly as they cool.
Can I make these ahead of time?
Absolutely! Assemble them a few hours in advance and refrigerate. Bake fresh when ready to serve.
What’s the best way to reheat leftovers?
Use a toaster oven or bake at 350°F for 5–7 minutes to revive the texture. Avoid microwaving — it makes them soggy.
Can I add fruit to the filling?
Yes! Add a teaspoon of jam or a few small berries on top of the cream cheese before baking for variety.
Do I have to use glaze?
Not at all. They’re delicious even without it, but the glaze does add a pretty finish and a bit of sweetness.
Conclusion
Mini Cheese Danishes are one of those recipes that deliver big results with little effort. With a buttery crunch, creamy center, and a sweet drizzle on top, they’re guaranteed to satisfy any pastry craving. Whether you’re hosting brunch, prepping ahead for guests, or just treating yourself, these bite-sized beauties deserve a spot in your regular baking rotation.

Mini Cheese Danish
- Prep Time: 10 minutes
- Cook Time: 18 minutes
- Total Time: 28 minutes
- Yield: 12 mini danishes
- Category: Breakfast, Brunch, Snack
- Method: Baking
- Cuisine: American, European-inspired
- Diet: Vegetarian
Description
These Mini Cheese Danishes are the ultimate quick breakfast or easy snack for any time of day. Made with flaky, golden puff pastry and filled with a creamy, sweetened cream cheese center, they’re the perfect balance of richness and lightness. Whether you’re looking for breakfast ideas, brunch inspiration, or easy recipes to impress guests, this bakery-style treat is a go-to winner. Topped with a simple glaze, these pastries look as stunning as they taste — and come together in under 30 minutes.
Ingredients
1 package puff pastry sheets, thawed
8 oz cream cheese, softened
1/3 cup granulated sugar
1 teaspoon vanilla extract
1 teaspoon lemon juice (optional)
1 egg, for egg wash
1/2 cup powdered sugar
1 tablespoon milk or cream
Instructions
1. Preheat oven to 400°F (200°C) and line a baking sheet with parchment paper.
2. Roll out thawed puff pastry on a lightly floured surface and cut into 6 even squares per sheet.
3. In a bowl, mix cream cheese, sugar, vanilla extract, and lemon juice until smooth and creamy.
4. Spoon about 1 tablespoon of filling into the center of each puff pastry square.
5. Optionally fold or pinch the corners, then transfer to the baking sheet.
6. Beat the egg with a tablespoon of water and brush the edges of each pastry.
7. Bake for 15–18 minutes or until golden brown and puffed.
8. Let cool for 10 minutes before drizzling with glaze.
9. Make the glaze by whisking powdered sugar and milk until smooth, then drizzle over cooled danishes.
Notes
Keep puff pastry cold while working for maximum flakiness.
Don’t skip the egg wash — it gives that gorgeous golden shine.
Let danishes cool slightly before glazing to avoid melting the icing.
Nutrition
- Serving Size: 1 mini danish
- Calories: 230
- Sugar: 8g
- Sodium: 150mg
- Fat: 15g
- Saturated Fat: 8g
- Unsaturated Fat: 5g
- Trans Fat: 0g
- Carbohydrates: 20g
- Fiber: 0g
- Protein: 3g
- Cholesterol: 40mg
Keywords: mini cheese danish, puff pastry breakfast, easy brunch pastry, sweet breakfast idea