

These Holiday Chocolate Peppermint Crinkle Cookies are the perfect festive treat to brighten up your cookie tray. With their deep cocoa richness, subtle peppermint undertone, and signature crinkled powdered sugar coating, they deliver both visual charm and seasonal flavor in every bite. The outside is crisp and snowy, while the center stays soft and brownie-like, making them irresistible to kids and adults alike.
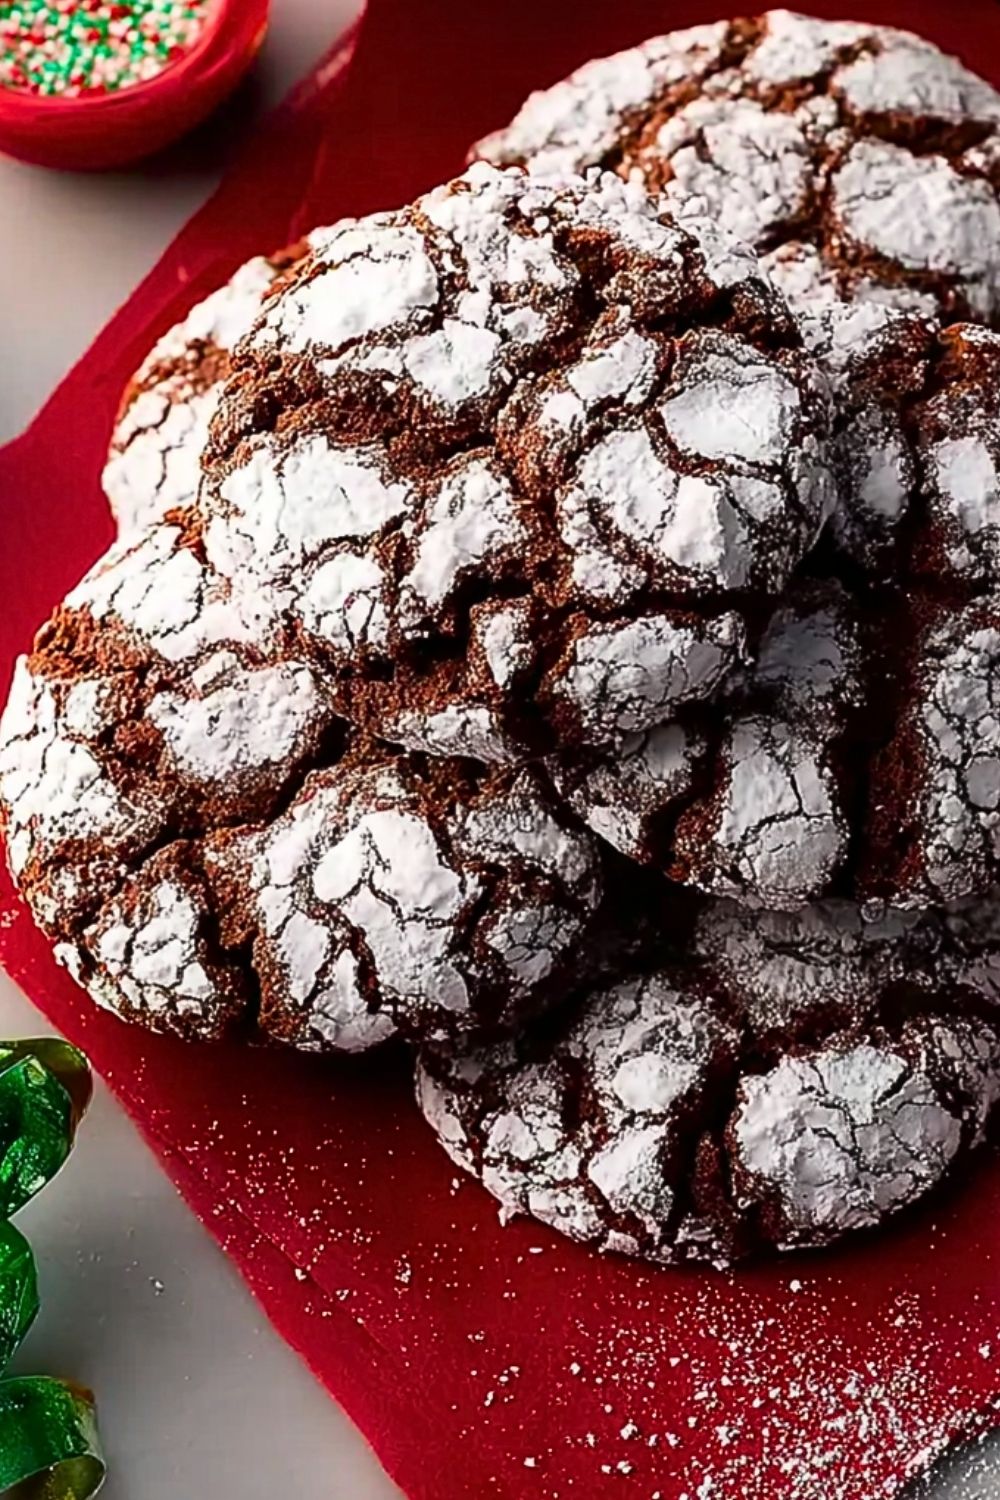
Baked to perfection and ideal for gifting or holiday parties, these cookies bring comfort and cheer to any celebration. Whether you’re sipping cocoa by the fire or hosting a cookie exchange, these crinkle cookies with a cool peppermint twist promise to be a crowd favorite.
Why You’ll Love This Holiday Chocolate Peppermint Crinkle Cookies Recipe
These cookies are more than just delicious—they’re a nostalgic nod to holiday baking traditions. The cocoa-rich dough and refreshing peppermint extract create a flavor combination that feels just right for the season. The powdered sugar coating not only adds sweetness but also gives them their signature snow-dusted appearance. Plus, the recipe is straightforward enough for novice bakers and fun enough for baking with kids.
Preparation Phase & Tools to Use
Before diving into baking, set up your workspace with a few key tools to make things smoother. You’ll need:
- Mixing bowls: One for dry ingredients, one for wet. Essential for evenly combining your batter.
- Electric mixer or stand mixer: Helps cream the butter and sugar and mix the dough to the perfect consistency.
- Measuring cups and spoons: Precision is key in baking—especially when working with cocoa powder and peppermint extract.
- Cookie scoop: Ensures uniform cookie sizes for even baking.
- Baking sheet and parchment paper: Prevents sticking and makes cleanup a breeze.
- Cooling rack: Helps cool the cookies quickly and evenly after baking.
Each tool contributes to a smooth, efficient baking experience—and to cookies that come out just right every time.
Preparation Tips
To get that perfect crinkle, chill the dough for at least 2 hours—or overnight if you can. This helps the cookies hold their shape and crack beautifully during baking. When rolling them in powdered sugar, coat generously to ensure that distinct white exterior even after baking. Don’t overbake; the centers should remain slightly soft and chewy. Letting them cool on the baking sheet for a couple of minutes before transferring to a rack helps them set without breaking.
Ingredients for Holiday Chocolate Peppermint Crinkle Cookies
- 1 cup all-purpose flour
- 1/2 cup unsweetened cocoa powder (Dutch-process recommended for richer flavor)
- 1 teaspoon baking powder
- 1/4 teaspoon salt
- 3/4 cup granulated sugar
- 1/4 cup vegetable oil (or melted butter)
- 2 large eggs, room temperature
- 1 teaspoon pure peppermint extract
- 1 teaspoon pure vanilla extract
- 1/2 cup powdered sugar (for coating)
- Optional: 1/2 cup mini chocolate chips or crushed peppermint candies for added texture
Step 1: Combine the Dry Ingredients
In a medium mixing bowl, whisk together the flour, cocoa powder, baking powder, and salt. This ensures the leavening agents are evenly distributed and prevents any clumping from the cocoa powder.
Step 2: Beat Wet Ingredients Together
In a large mixing bowl, use an electric mixer or stand mixer to beat the sugar and oil (or melted butter) until well combined. Add the eggs one at a time, beating well after each addition. Stir in the peppermint and vanilla extracts until the mixture is smooth and glossy.
Step 3: Mix Dry and Wet Ingredients
Gradually add the dry ingredients to the wet mixture, mixing until just combined. If you’re adding mini chocolate chips or crushed peppermint candies, fold them in at this stage. The dough will be soft and sticky.
Step 4: Chill the Dough
Cover the dough with plastic wrap and refrigerate it for at least 2 hours, or overnight for best results. Chilling is crucial—it firms up the dough, making it easier to roll and ensures the cookies develop that signature crinkle effect during baking.
Step 5: Preheat the Oven and Prep Baking Sheet
Once the dough is fully chilled, preheat your oven to 350°F (175°C). Line your baking sheets with parchment paper or silicone baking mats to prevent sticking.
Step 6: Roll and Coat the Dough Balls
Scoop out tablespoon-sized amounts of dough and roll them into balls using your hands or a cookie scoop. Generously roll each ball in powdered sugar, ensuring full coverage. This step is key to achieving that dramatic crinkle appearance.
Step 7: Bake the Cookies
Place the sugar-coated dough balls on the prepared baking sheet about 2 inches apart. Bake for 10–12 minutes, or until the cookies have puffed and cracked but are still soft in the center. The tops should look set but not dry.
Step 8: Cool and Serve
Let the cookies rest on the baking sheet for 3–5 minutes before transferring them to a wire rack to cool completely. This helps them firm up without breaking. Once cooled, serve them as-is or package them in festive tins for gifting.
Notes
Holiday Chocolate Peppermint Crinkle Cookies are best enjoyed within a few days of baking, as their texture is ideal when slightly chewy inside and crisp on the outside. If you want a more intense chocolate flavor, use Dutch-process cocoa. For a stronger peppermint profile, adjust the peppermint extract slightly, but be careful—not to overpower the chocolate. These cookies also make beautiful edible gifts when packed in cellophane or holiday tins.
Watch Out for These Mistakes While Cooking
- Skipping the chill time – This dough must be chilled to avoid spreading and to ensure a crinkled top.
- Under-coating with powdered sugar – Be generous when rolling; a thin layer will melt into the cookie and disappear.
- Overbaking – The cookies should still be soft in the center when removed from the oven. They continue to firm as they cool.
- Using too much peppermint extract – Peppermint can easily overpower the chocolate. Stick to the recipe or taste-test with a small amount first.
- Crowding the pan – Give each dough ball enough space to spread while baking. Crinkle cookies need breathing room to form that perfect pattern.
- Skipping parchment or silicone mat – Direct contact with the baking sheet may cause sticking or overbrowning on the bottom.
Storage Instructions
Store these cookies in an airtight container at room temperature for up to 5 days. To keep them soft, add a slice of bread to the container—it helps maintain moisture. If you’d like to freeze them, do so before baking. Roll the dough balls (without sugar), freeze on a baking sheet, then transfer to a freezer bag. When ready to bake, thaw slightly, coat in powdered sugar, and bake as directed. Baked cookies can also be frozen and thawed for about 10–15 minutes before serving.
Estimated Nutrition
Serving size: 1 cookie (based on yield of 24)
- Calories: ~95 kcal
- Carbohydrates: 13g
- Protein: 1.3g
- Fat: 4.5g
- Saturated Fat: 1g
- Unsaturated Fat: 3g
- Cholesterol: 10mg
- Sodium: 35mg
- Sugar: 8g
- Fiber: 1g
Frequently Asked Questions
Can I make the dough ahead of time?
Yes, you can make the dough up to 2 days in advance and store it tightly wrapped in the fridge.
Can I freeze the dough?
Absolutely! Roll the dough into balls (before rolling in powdered sugar) and freeze. Coat in sugar just before baking.
Can I use butter instead of oil?
Yes, melted butter can be used for a richer taste. Just be sure to cool it before mixing.
Why didn’t my cookies crinkle?
Usually, this is due to warm dough or not enough powdered sugar coating. Always chill the dough and coat generously.
How do I make them gluten-free?
Use a 1:1 gluten-free flour blend. Results may vary slightly, but it generally works well.
Can I omit the peppermint?
Yes! You can use only vanilla extract for a traditional chocolate crinkle cookie.
What’s the best cocoa powder to use?
Dutch-process cocoa gives a richer flavor and darker color, but natural cocoa works too.
Do these cookies stay soft after baking?
Yes, if stored properly in an airtight container, they stay soft for several days.
Conclusion
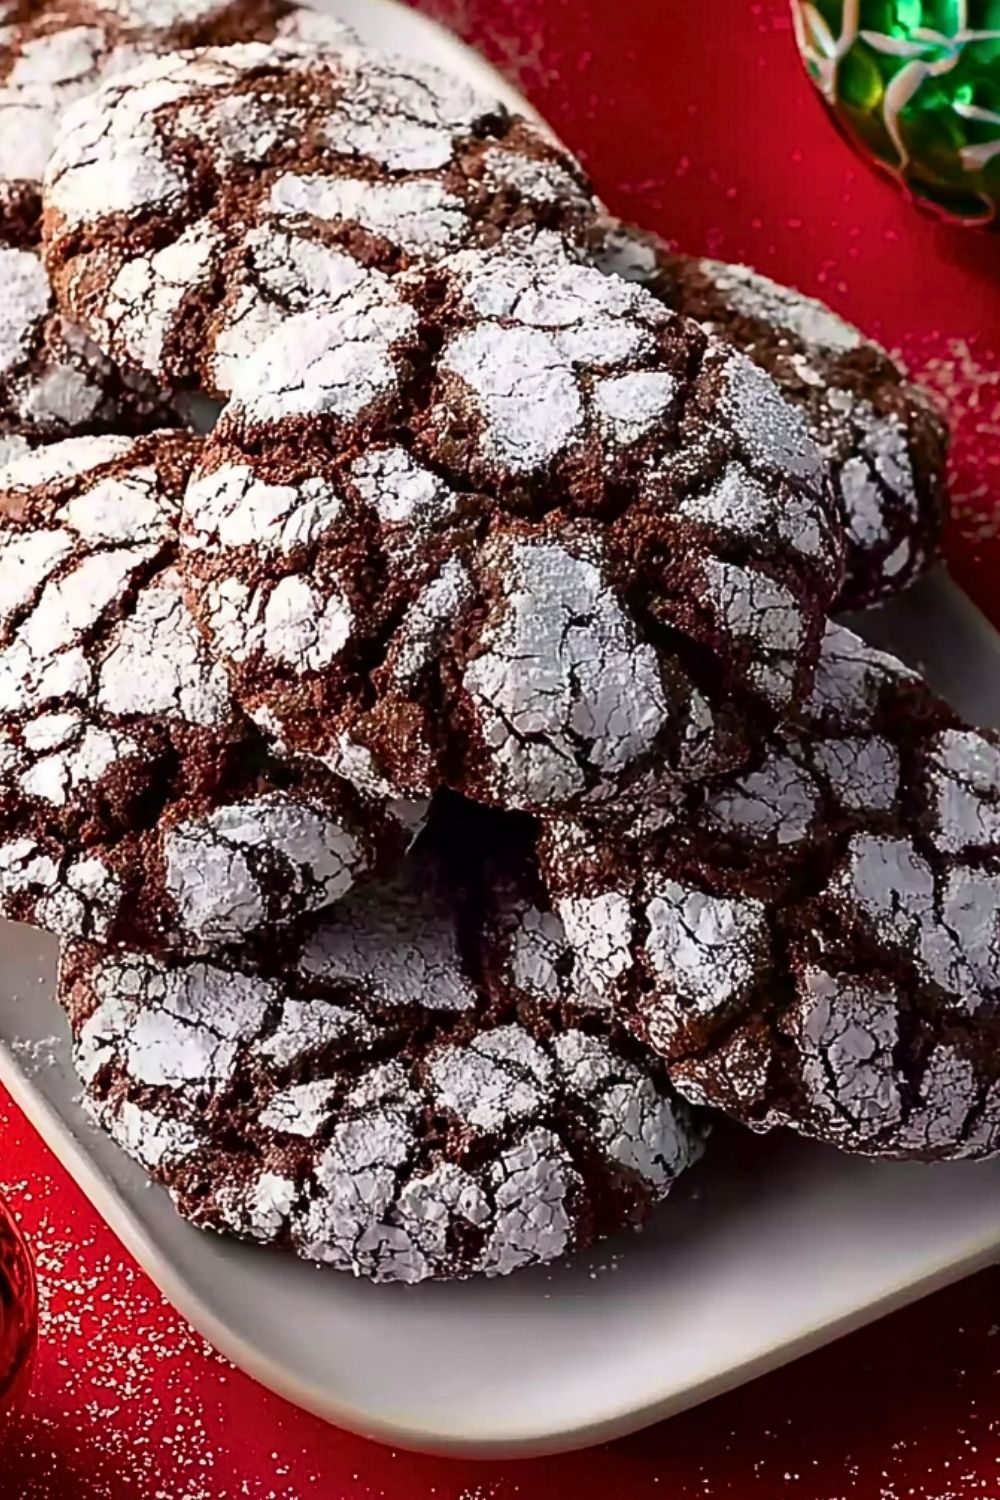
Holiday Chocolate Peppermint Crinkle Cookies are a festive staple that brings warmth, joy, and a touch of nostalgia to your kitchen. With their brownie-like centers, snowy cracked tops, and refreshing hint of peppermint, they’re a seasonal classic worth baking year after year. Whether you’re gifting them or enjoying them fresh from the oven, they capture the magic of the holidays in every bite.
Holiday Chocolate Peppermint Crinkle Cookies
- Prep Time: 15 minutes
- Cook Time: 12 minutes
- Total Time: 2 hours 30 minutes
- Yield: 24 cookies
- Category: Dessert
- Method: Baking
- Cuisine: American
Description
Soft, fudgy, and bursting with holiday charm, these Holiday Chocolate Peppermint Crinkle Cookies combine rich cocoa flavor with a refreshing peppermint twist. Perfect for gifting, parties, or cozy nights in, they feature a classic snowy crinkle appearance and a chewy, brownie-like center. These easy cookies are ideal for anyone seeking quick dessert ideas, festive food gifts, or unique Christmas cookie recipes. Whether you’re baking for a cookie exchange or filling your dessert table, this easy recipe delivers crowd-pleasing results every time.
Ingredients
1 cup all-purpose flour
1/2 cup unsweetened cocoa powder
1 teaspoon baking powder
1/4 teaspoon salt
3/4 cup granulated sugar
1/4 cup vegetable oil
2 large eggs
1 teaspoon peppermint extract
1 teaspoon vanilla extract
1/2 cup powdered sugar
1/2 cup mini chocolate chips (optional)
Crushed peppermint candies (optional)
Instructions
1. In a medium bowl, whisk together flour, cocoa powder, baking powder, and salt.
2. In a large bowl, beat sugar and oil until combined. Add eggs one at a time, then stir in peppermint and vanilla extract.
3. Gradually add dry ingredients to the wet mixture. Mix until just combined. Fold in chocolate chips or crushed peppermint if using.
4. Cover and refrigerate the dough for at least 2 hours or overnight.
5. Preheat oven to 350°F (175°C). Line baking sheets with parchment paper.
6. Scoop tablespoon-sized portions of dough, roll into balls, and coat generously in powdered sugar.
7. Place on baking sheet, spaced 2 inches apart.
8. Bake for 10–12 minutes until cracked on top but still soft inside.
9. Let cookies cool on the sheet for 3–5 minutes, then transfer to a wire rack.
10. Serve or store once completely cooled.
Notes
Chill the dough thoroughly for pronounced crinkle patterns.
Be generous with powdered sugar to maintain that snowy finish post-bake.
Add mini chocolate chips or crushed peppermint for extra texture and flavor.
Nutrition
- Serving Size: 1 cookie
- Calories: 95
- Sugar: 8
- Sodium: 35
- Fat: 4.5
- Saturated Fat: 1
- Unsaturated Fat: 3
- Trans Fat: 0
- Carbohydrates: 13
- Fiber: 1
- Protein: 1.3
- Cholesterol: 10
Keywords: holiday cookies, chocolate peppermint crinkle, Christmas dessert, festive cookies, easy holiday recipe