
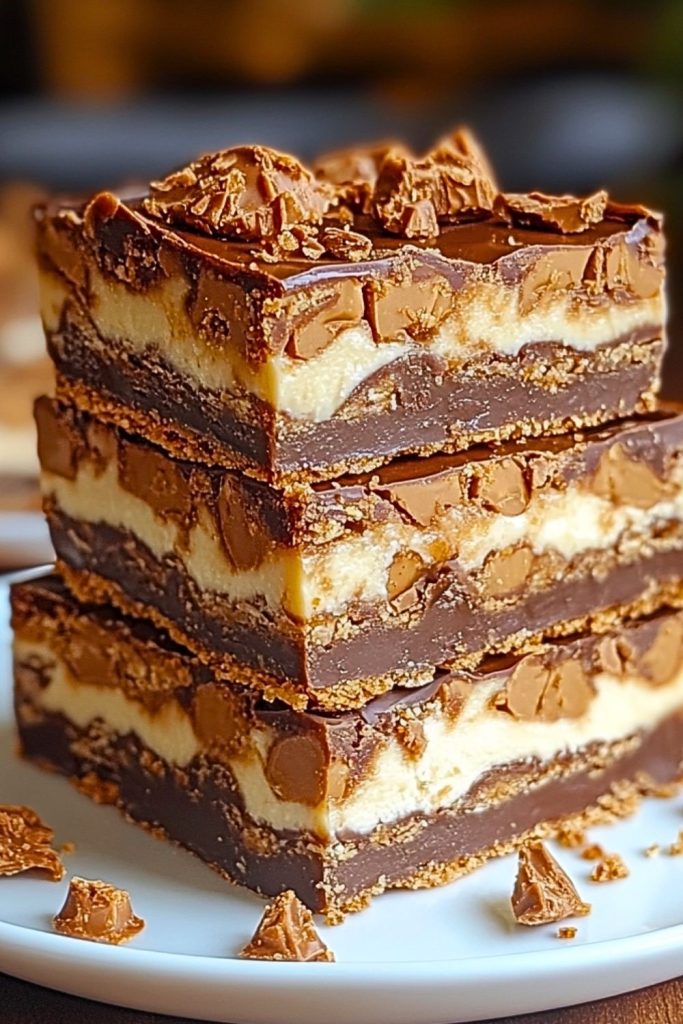
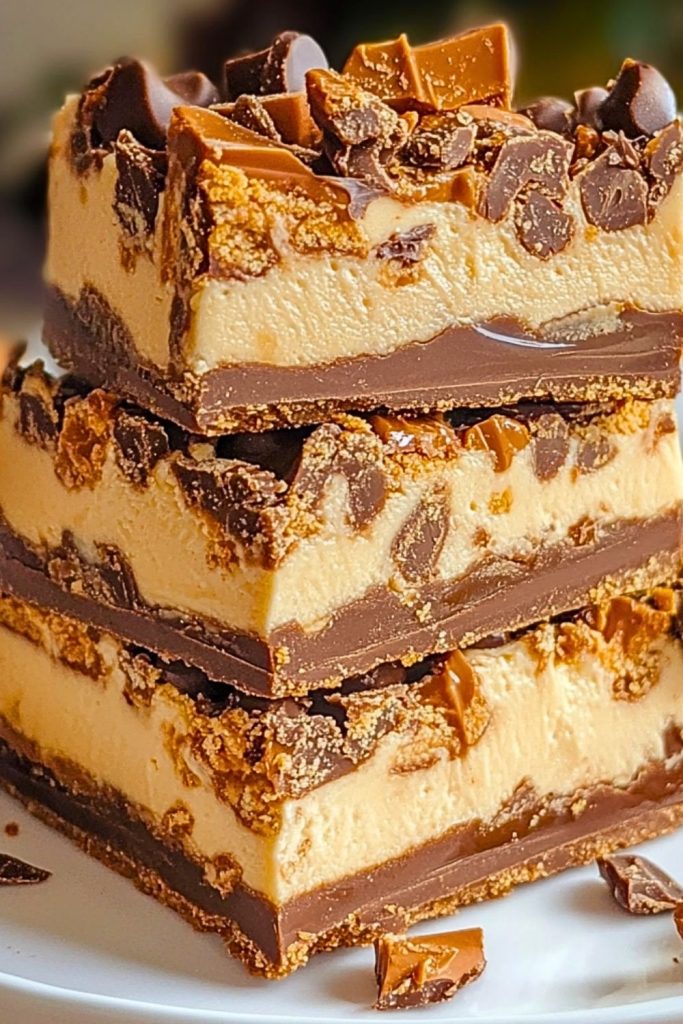
I’ve always had a soft spot for indulgent desserts that don’t require a lot of fuss — and these Reese’s Butterfinger Cheesecake Bars are the perfect guilty pleasure. Imagine sinking your teeth into layers of peanut butter cheesecake, rich chocolate, and crunchy bits of Butterfinger and Reese’s cups. Every bite delivers a blissful combo of creamy, crispy, salty, and sweet — it’s the kind of treat that stops conversation mid-sentence.
What I love most about this dessert is how it hits all the right notes — nostalgia, comfort, and just enough wow factor to impress at any gathering. Whether you’re a die-hard peanut butter lover or just crave something outrageously decadent, these cheesecake bars will become your new go-to. You don’t need to be a professional baker to pull these off — just a love for chocolate and a good appetite.
Why You’ll Love This Reese’s Butterfinger Cheesecake Bars Recipe
- Ultimate texture play – Creamy cheesecake meets the crunch of cookie crumbs and candy bits.
- No baking stress – This is a chilled dessert that requires minimal oven time, or none at all if you adapt.
- Perfect for parties – Slice into squares and you’ve got a crowd-pleaser ready to go.
- Layered with love – Chocolate, peanut butter, candy chunks, and more chocolate.
- Make-ahead friendly – These bars set beautifully in the fridge and taste even better the next day.
What Kind of Peanut Butter Candy Should I Use?
When it comes to loading up these cheesecake bars, Reese’s and Butterfinger are the dream team. Reese’s adds that creamy, salty peanut butter goodness, while Butterfinger brings the crisp, flaky texture with its signature toffee-peanut crunch. But if you want to get creative, you can also try adding Reese’s Pieces, Peanut Butter M&M’s, or even Snickers Peanut Butter chunks for a twist. The key is variety — use candies with contrasting textures to keep each bite exciting.
I like to chop the candies into bite-sized chunks rather than crushing them. That way, you still get big, satisfying bites of chocolate and peanut butter spread throughout each layer.
Options for Substitutions
No Butterfingers on hand? No problem. These bars are super forgiving, and you can swap in other favorites depending on what you’ve got or what flavors you’re craving:
- Instead of Butterfinger – Try Heath Bars, Toffee Bits, or chopped peanuts for a similar crunch.
- No Reese’s Cups? – Use Peanut Butter Chips, Mini Snickers, or even a swirl of peanut butter in the cheesecake layer.
- Need a nut-free version? – Use sunflower butter, Wowbutter, or cookie butter with chocolate chips and toffee chunks.
- Gluten-Free? – Opt for a gluten-free cookie crust or crushed gluten-free graham crackers.
You can also switch up the crust using chocolate sandwich cookies, graham crackers, or even chocolate chip cookie dough as a base. Whatever you choose, make sure your substitutions balance both texture and flavor so nothing gets lost in the mix.
Ingredients for This Reese’s Butterfinger Cheesecake Bars Recipe
Each ingredient in these bars brings something crucial — from the creamy base to the crunchy candy topping. Here’s a breakdown of what makes these indulgent squares so addictive:
- Graham Cracker Crumbs
They form the base, offering a lightly sweet, buttery crunch that holds everything together. - Unsalted Butter
Used to bind the crust and add richness. Melted butter helps the crust set and adds depth of flavor. - Cream Cheese
The star of the cheesecake layer. It brings that smooth, tangy, creamy texture we all crave. - Peanut Butter
For a rich, nutty punch that complements the candy and gives the cheesecake its signature flavor. - Powdered Sugar
Keeps the cheesecake filling smooth and sweet without adding grit. - Vanilla Extract
Just a splash enhances the overall flavor and rounds out the sweetness. - Heavy Whipping Cream
Whipped into the peanut butter mixture to make it light, airy, and luscious. - Reese’s Cups (chopped)
Add creamy chocolate-peanut butter bites in every layer and on top for that iconic taste. - Butterfinger Bars (chopped)
Deliver crunch and caramelized peanut butter candy flavor in every bite. - Chocolate Chips (semi-sweet or milk)
Melted for the top layer, giving the bars a rich, glossy finish. - Peanut Butter Chips or a drizzle of melted peanut butter
Optional, but perfect for a final flourish on top — salty, sweet, and eye-catching.
Step 1: Make the Crust
Start by combining graham cracker crumbs and melted unsalted butter in a mixing bowl. Stir until the crumbs are fully coated and resemble wet sand. Press the mixture firmly into the bottom of a parchment-lined 9×9-inch baking pan to create an even crust. Place it in the fridge or freezer while you prep the next layer.
Step 2: Whip the Cheesecake Layer
In a large bowl, beat the cream cheese until smooth and fluffy. Add the peanut butter, powdered sugar, and vanilla extract, and continue beating until well combined. In a separate bowl, whip the heavy cream until stiff peaks form. Gently fold the whipped cream into the peanut butter-cream cheese mixture to lighten it up.
Step 3: Layer and Chill
Spread the peanut butter cheesecake mixture evenly over the chilled crust. Use a spatula to smooth it out. Then, sprinkle in some chopped Reese’s cups and Butterfinger pieces for that surprise crunch inside the filling. Press them in gently. Chill the whole pan in the fridge for at least 2 hours (or until set).
Step 4: Add the Chocolate Top
Melt chocolate chips in the microwave or using a double boiler until smooth. Pour the melted chocolate over the set cheesecake layer and tilt the pan gently to spread it evenly. While the chocolate is still warm, top with more chopped Reese’s and Butterfingers.
Step 5: Drizzle & Final Touches
Melt some peanut butter chips or plain peanut butter, then drizzle it over the top for that signature swirl and salty-sweet finish. Chill again until the chocolate sets — about 30 minutes.
Step 6: Slice and Serve
Once the bars are fully chilled and firm, lift them out of the pan using the parchment paper and place on a cutting board. Use a sharp knife to slice into squares. Wipe the blade between cuts for those clean, picture-perfect edges.
How Long to Chill Reese’s Butterfinger Cheesecake Bars
Technically, there’s no traditional “cooking” involved in this recipe — but chilling is everything. Here’s the timing breakdown for perfect texture and flavor:
- Chill after the crust is formed: About 15–20 minutes in the fridge (or 10 in the freezer) to firm it up before adding the cheesecake layer.
- Chill the assembled cheesecake layer: At least 2 hours, but 4 hours or overnight is ideal for clean slices and a firm, creamy texture.
- Chill after adding the chocolate layer: Another 30–45 minutes to allow the chocolate topping to fully set.
If you’re in a hurry, you can speed things up in the freezer — but be careful not to let it freeze solid or the texture may turn icy.
Tips for Perfect Reese’s Butterfinger Cheesecake Bars
- Room temperature cream cheese is a must. It blends smoother and prevents lumps in your filling.
- Don’t overmix the whipped cream into the cheesecake layer — fold gently to keep it airy and mousse-like.
- Use a hot knife to cut clean bars. Dip your knife in hot water and wipe between cuts for those picture-perfect edges.
- Line your pan with parchment paper and let it hang over the sides. It makes lifting and cutting so much easier.
- Crush your candies strategically — don’t turn them to dust. Big chunks offer better texture contrast.
- Don’t skip the chill time. It’s tempting, but slicing too early will lead to a messy, goopy middle.
- Use good-quality chocolate for the topping. It’s the first thing people taste when they bite in!
- Balance the sweet with a pinch of salt in the crust or drizzle — it sharpens all the flavors.
Watch Out for These Mistakes While Cooking
Even though this recipe is beginner-friendly, a few common missteps can make or break your cheesecake bars. Here’s what to watch out for:
- Skipping the chill time – It may seem ready, but without proper chilling, the layers won’t hold and the bars will fall apart.
- Overmixing the whipped cream into the filling – This can deflate the mixture, making it too dense instead of light and fluffy.
- Using cold cream cheese – Cold cream cheese clumps up and makes the filling lumpy. Always let it come to room temperature first.
- Overloading the top with too many candy pieces – While tempting, too much topping can cause the chocolate to crack unevenly.
- Forgetting parchment paper – Without it, getting clean bars out of the pan becomes a sticky, frustrating challenge.
- Microwaving chocolate too long – Melt it in short bursts and stir frequently to avoid burning.
- Using natural peanut butter – It’s too oily and separates, which affects texture. Stick with conventional creamy peanut butter for this recipe.
- Cutting too soon – If you slice before it’s fully chilled, expect a gooey mess and crumbled crust.
What to Serve With Reese’s Butterfinger Cheesecake Bars?
These bars are rich and indulgent on their own, but if you’re serving them at a party, pairing them with complementary treats or drinks makes the experience even sweeter.
Mini Vanilla Cupcakes
They balance out the richness of the bars with a light and fluffy bite.
Iced Coffee or Cold Brew
A bold, chilled coffee brings a touch of bitterness that pairs beautifully with the sweetness.
Fresh Strawberries or Raspberries
Fruits add a refreshing contrast and pop of color.
Vanilla Bean Ice Cream
Serve the bars slightly warm with a scoop of ice cream for a melty, decadent combo.
Dessert Wine (like a Ruby Port)
If you’re feeling fancy, a small glass of sweet wine elevates the flavors.
Chocolate Chip Cookies
Classic and familiar, they round out a dessert spread perfectly.
Peanut Butter Milkshake
Because if you’re gonna go all in, why not double down on the peanut butter?
Hot Chai or Spiced Tea
The warming spices help cut through the richness of the dessert with cozy flavor.
Storage Instructions
These bars store like a dream — in fact, they might even taste better the next day as the layers settle and flavors meld. Here’s how to keep them fresh and fabulous:
- Refrigerator: Store the cheesecake bars in an airtight container or tightly covered with plastic wrap. They’ll keep well for up to 5 days in the fridge.
- Freezer: You can freeze the bars for longer storage — up to 2 months. Slice them first, then wrap each piece in plastic wrap and place them in a freezer-safe container or zip-top bag. This makes it easy to grab one (or two) whenever the craving hits.
- Thawing: If frozen, let them thaw in the fridge overnight or at room temperature for about 30–45 minutes. Avoid microwaving — it can mess with the texture and melt the chocolate topping unevenly.
Just a heads-up: the candy topping might lose a bit of its crunch in the freezer, but the flavor stays on point.
Estimated Nutrition
Keep in mind these are indulgent bars, made for treating yourself! Here’s an approximate breakdown for one square (based on 16 bars per pan):
- Calories: ~360
- Fat: 25g
- Saturated Fat: 13g
- Carbohydrates: 30g
- Sugar: 22g
- Protein: 6g
- Fiber: 1g
- Sodium: 180mg
These values will vary slightly depending on the brands of candy, chocolate, and peanut butter you use, but it’s safe to say each bar is a deliciously rich treat.
Frequently Asked Questions
What kind of pan should I use for these cheesecake bars?
A 9×9-inch square pan is perfect. You can use metal or glass, but make sure it’s lined with parchment paper for easy lifting and clean cuts.
Can I make these bars without candy?
Yes, but they won’t be Reese’s Butterfinger bars! If you’re out of candy, you can swirl in peanut butter and sprinkle chocolate chips or chopped nuts for texture.
Can I make them ahead of time?
Absolutely. These bars are actually better when made a day in advance — the flavors deepen and the texture sets beautifully overnight.
Can I freeze them with the chocolate topping?
You sure can. The chocolate might get a little frosty but it’ll return to its delicious self after thawing. Just wrap well and freeze in an airtight container.
How do I get clean cuts without cracking the chocolate?
Use a sharp knife dipped in hot water, wipe it clean between cuts, and slice slowly through the top. Let the bars sit at room temp for 5–10 minutes before slicing for best results.
Is there a way to make them less sweet?
You can reduce the powdered sugar slightly and use dark chocolate for the topping instead of milk chocolate. Skipping extra candy on top also tones it down.
Can I use natural peanut butter?
It’s not recommended — natural peanut butter tends to separate and adds too much oil, which affects the cheesecake’s consistency. Stick with a standard creamy peanut butter.
What’s the best way to crush the candy?
Rough chopping with a knife is best — it gives you a mix of bigger bites and smaller crumbles. Avoid over-pulsing in a food processor or you’ll lose all the texture.
Conclusion
Reese’s Butterfinger Cheesecake Bars are what dessert dreams are made of — creamy, crunchy, rich, and irresistibly peanut buttery. They’re easy enough for casual bakers and decadent enough to steal the spotlight at any potluck or party. Whether you’re craving something sweet after dinner or planning ahead for your next dessert table, these bars deliver every single time.
From the salty-sweet crust to the luscious cheesecake layer and that glorious chocolate-candy topping, this is a treat made for sharing — though no one will blame you for keeping a stash just for yourself.
Reese’s Butterfinger Cheesecake Bars
- Total Time: 3 hours
- Yield: 16 bars
Description
If you’re searching for the ultimate sweet tooth-satisfying dessert, look no further than these Reese’s Butterfinger Cheesecake Bars. With a buttery graham cracker crust, a luscious layer of peanut butter cheesecake, and a rich chocolate topping loaded with chunks of Reese’s and Butterfinger candy, this easy recipe is a crowd favorite. Perfect for holidays, parties, or just a sweet treat at home, these no-bake (or minimal-bake) bars are a must-try. Whether you’re after quick breakfast treats, easy dessert ideas, or indulgent food ideas for your next gathering, these bars deliver unforgettable flavor in every bite.
Ingredients
- 1 1/2 cups graham cracker crumbs
- 6 tablespoons unsalted butter, melted
- 16 oz cream cheese, softened
- 1/2 cup creamy peanut butter
- 1 cup powdered sugar
- 1 teaspoon vanilla extract
- 3/4 cup heavy whipping cream
- 1 cup chopped Reese’s cups (plus extra for topping)
- 1 cup chopped Butterfinger bars (plus extra for topping)
- 1 cup chocolate chips (semi-sweet or milk)
- 1/4 cup peanut butter chips or 2 tbsp melted peanut butter (optional for drizzle)
Instructions
- Mix graham cracker crumbs and melted butter until evenly coated. Press into the bottom of a parchment-lined 9×9-inch pan. Chill in fridge.
- Beat cream cheese until smooth. Add peanut butter, powdered sugar, and vanilla, and mix until well combined.
- In a separate bowl, whip the heavy cream to stiff peaks, then fold gently into the peanut butter mixture.
- Spread the filling over the chilled crust. Sprinkle in some chopped Reese’s and Butterfinger pieces. Chill for at least 2 hours.
- Melt chocolate chips and spread over the top of the cheesecake layer. Immediately sprinkle with more candy pieces.
- Drizzle with melted peanut butter or peanut butter chips, if desired. Chill for another 30 minutes until set.
- Lift bars out using parchment paper, slice with a warm knife, and serve!
- Prep Time: 30 minutes
- Chill Time: 2 hours 30 minutes