
There’s something deeply comforting about a hot plate of crispy, golden hashbrowns—especially when you’ve made them from scratch. I still remember the first time I grated my own potatoes for breakfast; it was a little messy, a bit experimental, but oh so worth it. That first bite, with its perfect crunch and soft, tender center, immediately made me swear off the frozen kind forever.
Over time, I’ve found my groove with this recipe. It’s simple, satisfying, and endlessly versatile. Whether I’m pairing it with eggs and toast for a full breakfast, or just enjoying it solo with a little sour cream or hot sauce, homemade shredded hashbrowns never disappoint. Let me take you through exactly how I make mine, so you can get that golden crust every single time.
Why You’ll Love This Homemade Shredded Hashbrowns Recipe
These hashbrowns are all about crispy edges, soft centers, and that earthy potato flavor we all crave in a hearty breakfast side. They’re naturally gluten-free, easy to customize, and use pantry staples. You’ll love them because:
- Crispy & Golden – You control the cook, so you can get the perfect crispiness every time.
- Simple Ingredients – Just a handful of everyday items needed.
- Budget-Friendly – Way cheaper (and tastier) than store-bought frozen ones.
- Quick & Easy – Ready in under 30 minutes with just one pan.
- Great for Any Meal – Not just breakfast—think brunch, dinner, or even as a burger base.
What Kind of Potatoes Should I Use for Homemade Shredded Hashbrowns?
The type of potato you choose makes a huge difference in texture and crispiness. I’ve experimented with a few, but nothing beats russet potatoes. They have a high starch content and low moisture, which is exactly what gives you that golden, crispy finish. Yukon Golds are a decent second choice if you want a creamier texture, but they won’t get quite as crunchy.
Whatever potato you go for, make sure to squeeze out as much moisture as possible after shredding. That’s the secret to getting them browned instead of soggy. Trust me—don’t skip that step.
Options for Substitutions
Want to change things up or work with what you’ve got? You totally can. Here are some swap ideas I’ve tried and loved:
- Sweet Potatoes – Adds a touch of sweetness and pairs beautifully with spicy toppings.
- Zucchini – For a lighter, veggie-forward version. Just make sure it’s well-drained.
- Carrots – Great color and a subtle sweetness, especially nice when mixed with regular potatoes.
- Cheese – A handful of shredded cheddar or parmesan mixed in takes them up a notch.
- Onion – Grated or finely chopped, it adds a savory depth.
- Oil – Use avocado oil or ghee instead of vegetable oil for a flavor twist.
- Seasonings – Garlic powder, smoked paprika, cayenne—add whatever your taste buds crave.
Ingredients for Homemade Shredded Hashbrowns
Let’s break down what goes into these crave-worthy hashbrowns and why each one plays an important role in the final result.
Russet Potatoes
The star of the show. Their high starch content gives you that iconic crispy exterior and fluffy inside. They shred beautifully and brown up like a dream.
Salt
It enhances the natural flavor of the potatoes and helps draw out excess moisture before cooking. Don’t be shy with it—you want to season generously.
Black Pepper
A simple seasoning, but one that adds just the right kick. Feel free to grind it fresh for a more intense flavor.
Cooking Oil
Neutral oils like vegetable or canola work best to let the potato flavor shine. You need enough to coat the pan and crisp up those edges.
Butter (Optional but Recommended)
A little butter adds richness and that golden-brown color we love. I like using a mix of oil and butter for the best of both worlds.
Optional: Grated Onion or Garlic Powder
Grated onion blends right in and gives an extra layer of savory goodness. Garlic powder is perfect for a more mellow background flavor.
Optional: Chives or Green Onions (for garnish)
A fresh pop of color and mild oniony bite at the end makes them feel extra special—perfect for brunch guests or just treating yourself.

Step 1: Peel and Shred the Potatoes
Start by peeling your russet potatoes. Using a box grater or food processor, shred them into fine strands. You’ll want the texture to be even so everything cooks at the same pace.
Step 2: Soak and Drain
Place the shredded potatoes into a bowl of cold water and soak for about 5–10 minutes. This step helps remove excess starch, which keeps the hashbrowns from becoming gummy.
Step 3: Squeeze Out Moisture
Drain the potatoes and transfer them to a clean kitchen towel or cheesecloth. Twist and squeeze out as much liquid as possible. This is critical—less moisture equals more crisp.
Step 4: Season the Shreds
Transfer the dry potato shreds to a bowl and season with salt and pepper. If you’re adding onion, cheese, or garlic powder, mix them in at this point too.
Step 5: Heat the Pan
Place a large non-stick skillet or well-seasoned cast iron pan over medium-high heat. Add a generous amount of oil (and butter, if using). Let it get hot—shimmering but not smoking.
Step 6: Press into the Pan
Scoop the shredded potatoes into the pan and press them down gently with a spatula to form an even layer or small mounds. Don’t overcrowd—cook in batches if needed.
Step 7: Let Them Cook
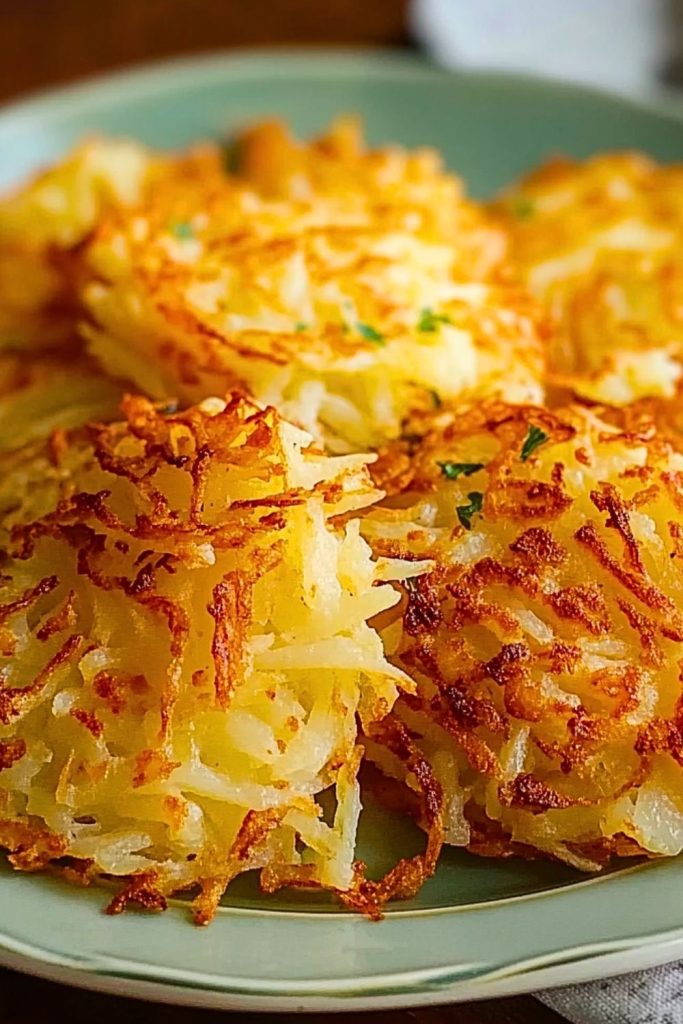
Resist the urge to flip too early! Let them cook undisturbed for about 4–5 minutes until the bottom is golden brown and crispy.
Step 8: Flip and Finish
Carefully flip the hashbrowns and cook another 3–4 minutes on the other side. Adjust heat as needed so they brown, not burn. Transfer to a paper towel-lined plate to drain any excess oil.
How Long to Cook Homemade Shredded Hashbrowns
The total cook time for homemade shredded hashbrowns is usually around 8 to 10 minutes per batch—about 4 to 5 minutes per side. The goal is that deep golden color with crispy edges and a tender, cooked-through center.
Of course, cook time can vary based on how thick your hashbrowns are, how hot your pan is, and how much moisture was left in the potatoes. If you’re making a large patty or a full skillet layer, it might take a minute or two longer. Always listen for that satisfying sizzle and look for a rich, golden crust before flipping.
Tips for Perfect Hashbrowns Every Time
Getting the texture and flavor just right isn’t hard, but these little tweaks can make all the difference:
- Squeeze Out All Moisture
This is non-negotiable. Damp potatoes steam—they don’t crisp. - Don’t Overcrowd the Pan
Give them space! Overcrowding causes steaming instead of browning. - Use Enough Oil
The potatoes need a slick surface to crisp properly. Don’t skimp—just drain excess on paper towels after cooking. - Preheat the Pan
Adding potatoes to a cold pan means soggy results. Make sure your oil is hot before you start. - Flip Only Once
Let them brown undisturbed. Flipping too soon will break them apart and mess with the crispiness. - Combine Oil and Butter
A bit of butter adds richness and beautiful browning. The oil helps prevent burning. - Taste and Season at the End
A final sprinkle of salt while they’re still hot helps lock in flavor. - Use a Cast Iron Skillet for Best Results
It distributes heat evenly and delivers that unbeatable crust.
Watch Out for These Mistakes While Cooking
Even a simple recipe like shredded hashbrowns can go sideways if you miss a few key details. Here are the most common slip-ups I’ve made (and learned from!):
Not Drying the Potatoes Enough
If you leave moisture in the shredded potatoes, you’ll get soggy hashbrowns. Take the time to squeeze them dry—seriously, it’s the make-or-break step.
Pan Not Hot Enough
If your oil isn’t shimmering before the potatoes hit the pan, they’ll soak it up instead of crisping. Always preheat.
Using the Wrong Pan
Nonstick works, but cast iron is better. Avoid stainless steel unless you love a cleanup challenge and stuck bits.
Overcrowding the Pan
Too many potatoes, and they’ll steam each other. Cook in small batches so they can crisp evenly.
Flipping Too Soon
Let them form a crust. If you try to flip too early, they’ll break apart and never fully crisp.
Too Much or Too Little Oil
Balance is key—enough to coat the bottom of the pan, but not so much they turn greasy. A tablespoon or two usually does the trick.
Skipping the Seasoning
Potatoes need salt and a touch of pepper, at minimum. Add it before cooking and taste at the end for good measure.
Cooking on Too High Heat
Medium-high is the sweet spot. Too hot, and they’ll burn before they’re cooked through.
What to Serve With Homemade Shredded Hashbrowns?
Hashbrowns go with almost everything—but these pairings are tried and true favorites in my kitchen.
Classic Eggs & Bacon
Perfect breakfast trio. Fried eggs or a soft scramble on the side balance the crispy hashbrowns beautifully.
Breakfast Sandwiches
Stack them in a biscuit or English muffin with egg, cheese, and sausage or bacon.
Fried Chicken
A fun brunch twist! Crispy meets crispy, and it works.
Steak and Eggs
Go big with this diner-style combo—great for weekend mornings or breakfast-for-dinner nights.
Breakfast Tacos
Tuck some crispy hashbrowns inside a tortilla with scrambled eggs and hot sauce.
Avocado & Salsa
Top the hashbrowns directly with mashed avocado and a spoonful of salsa for a fresh, zesty finish.
Cheese & Hot Sauce
Melt cheese over the top and drizzle with hot sauce for a snacky, comforting version.
Fresh Greens or Arugula
Toss a little salad with lemon and olive oil for a fresh counterpoint to the richness of the hashbrowns.
Storage Instructions
If you have leftover hashbrowns (though honestly, that’s rare in my house), they store and reheat pretty well with the right approach.
Refrigerator:
Place cooled hashbrowns in an airtight container lined with a paper towel to absorb moisture. They’ll keep well in the fridge for up to 3 to 4 days.
Freezer:
To freeze, lay the cooked hashbrowns on a baking sheet in a single layer and freeze until solid (about 1–2 hours). Then transfer to a freezer-safe bag or container. They’ll last up to 2 months this way.
Reheating Tips:
Skip the microwave—it makes them soft. Instead, reheat in a skillet over medium heat with a touch of oil to bring back that crispy texture. You can also pop them in the oven or toaster oven at 375°F (190°C) for 10–12 minutes.
Estimated Nutrition
Here’s a general estimate per serving (based on a small handful of basic ingredients, about 1 cup cooked hashbrowns):
- Calories: 180–220
- Fat: 10–14g (depending on oil/butter used)
- Carbohydrates: 22–26g
- Protein: 2–3g
- Fiber: 2g
- Sodium: 150–250mg (based on salt and any added cheese or toppings)
This makes them a great option for a hearty side that’s still relatively wholesome—especially if you’re making them with good oil and keeping portions in check.
Frequently Asked Questions
What’s the best tool to shred potatoes for hashbrowns?
A box grater works just fine, but if you’re making a large batch or want to save time, a food processor with a shredding disc is perfect. You’ll get even shreds with minimal effort.
Can I make these hashbrowns ahead of time?
Yes! You can shred and soak the potatoes the night before. Just store them in cold water in the fridge. Before cooking, drain and dry them very well. You can also cook and refrigerate or freeze for quick reheating.
How do I keep hashbrowns from sticking to the pan?
Make sure your pan is hot and well-oiled before adding the potatoes. Cast iron or non-stick pans work best. Also, don’t try to flip too early—let that crust form first.
Can I make them oil-free or use less oil?
You can try baking or using an air fryer for a lower-oil version, but traditional stovetop hashbrowns do need some fat to crisp properly. Using a nonstick pan with a light spray of oil is a good middle ground.
What if I don’t peel the potatoes?
Totally fine! The skins add texture and extra fiber. Just scrub the potatoes well beforehand. I actually enjoy the rustic vibe when I leave them on.
Can I use pre-shredded potatoes or frozen hashbrowns?
Yes, but make sure they’re defrosted and dried thoroughly before cooking. Homemade will always taste fresher, but pre-shredded saves time in a pinch.
Why are my hashbrowns turning gray?
That’s just oxidation—it happens when shredded potatoes sit in the open air too long. Soaking them in cold water slows this down. They’re still safe to eat, but might not look as appetizing.
How do I get them extra crispy?
Make sure they’re dry, don’t crowd the pan, and cook undisturbed until you see that deep golden crust. A mix of butter and oil also helps boost that crispy texture.
Conclusion
Homemade shredded hashbrowns are one of those humble dishes that hit all the right notes—crispy, warm, comforting, and versatile. Whether you’re fueling up for a busy day or enjoying a lazy weekend brunch, they’re a golden little gift from your skillet. Once you taste them fresh and hot from your own pan, you’ll never look at frozen hashbrowns the same way again.

Homemade Shredded Hashbrowns
- Total Time: 20 minutes
- Yield: 2-3 servings
Description
Golden, crispy, and made with love—these homemade shredded hashbrowns are your new go-to for a quick breakfast, easy brunch, or comforting snack. Whether you’re craving breakfast ideas that break away from the usual or dinner ideas that add a crispy side to your plate, this easy recipe has you covered. With just a few simple ingredients and a skillet, you’ll create hashbrowns that are crunchy on the outside, soft on the inside, and absolutely irresistible. It’s a homemade breakfast classic that’s endlessly versatile, budget-friendly, and better than anything from the freezer aisle. Perfectly crispy, naturally gluten-free, and oh-so-satisfying.
Ingredients
- 2 large russet potatoes, peeled and shredded
- 1 teaspoon salt (plus more to taste)
- 1/2 teaspoon black pepper
- 2 tablespoons vegetable oil (or a mix of oil and butter)
- Optional: 1/4 cup grated onion
- Optional: garlic powder to taste
- Optional: chopped chives or green onions for garnish
Instructions
- Peel and shred the potatoes using a box grater or food processor.
- Soak the shredded potatoes in a bowl of cold water for 5–10 minutes.
- Drain the potatoes and squeeze them thoroughly using a clean towel or cheesecloth to remove as much moisture as possible.
- Transfer the potatoes to a bowl and season with salt, pepper, and any optional seasonings or additions.
- Heat a large non-stick or cast iron skillet over medium-high heat. Add oil (and butter if using) and let it heat until shimmering.
- Add the potatoes in small mounds or a thin even layer. Press down gently with a spatula.
- Cook undisturbed for 4–5 minutes or until the bottom is golden brown.
- Flip carefully and cook the other side for another 3–4 minutes.
- Remove and place on paper towels to drain excess oil. Garnish if desired and serve hot.
- Prep Time: 10 minutes
- Cook Time: 10 minutes